How to use a tester pot to get the colour you want
|
|
||
|
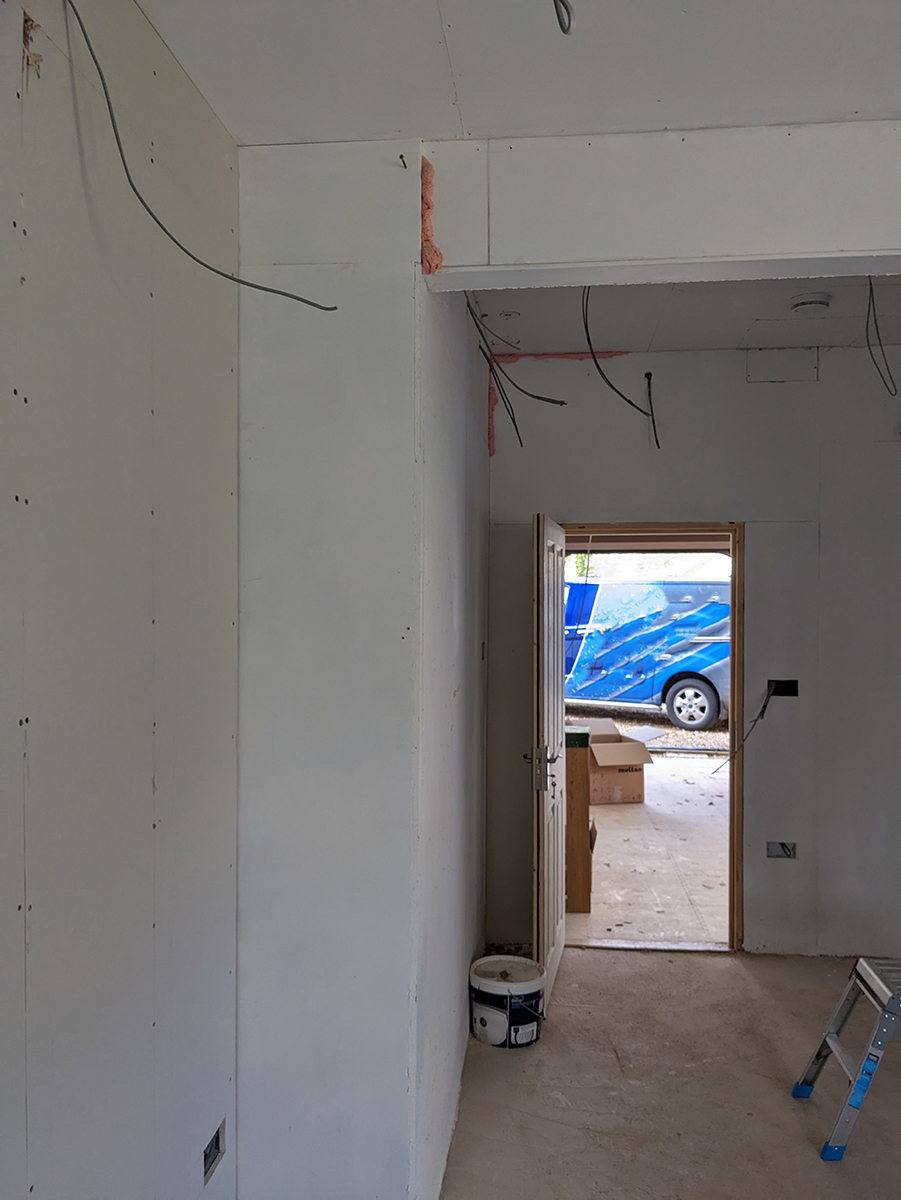
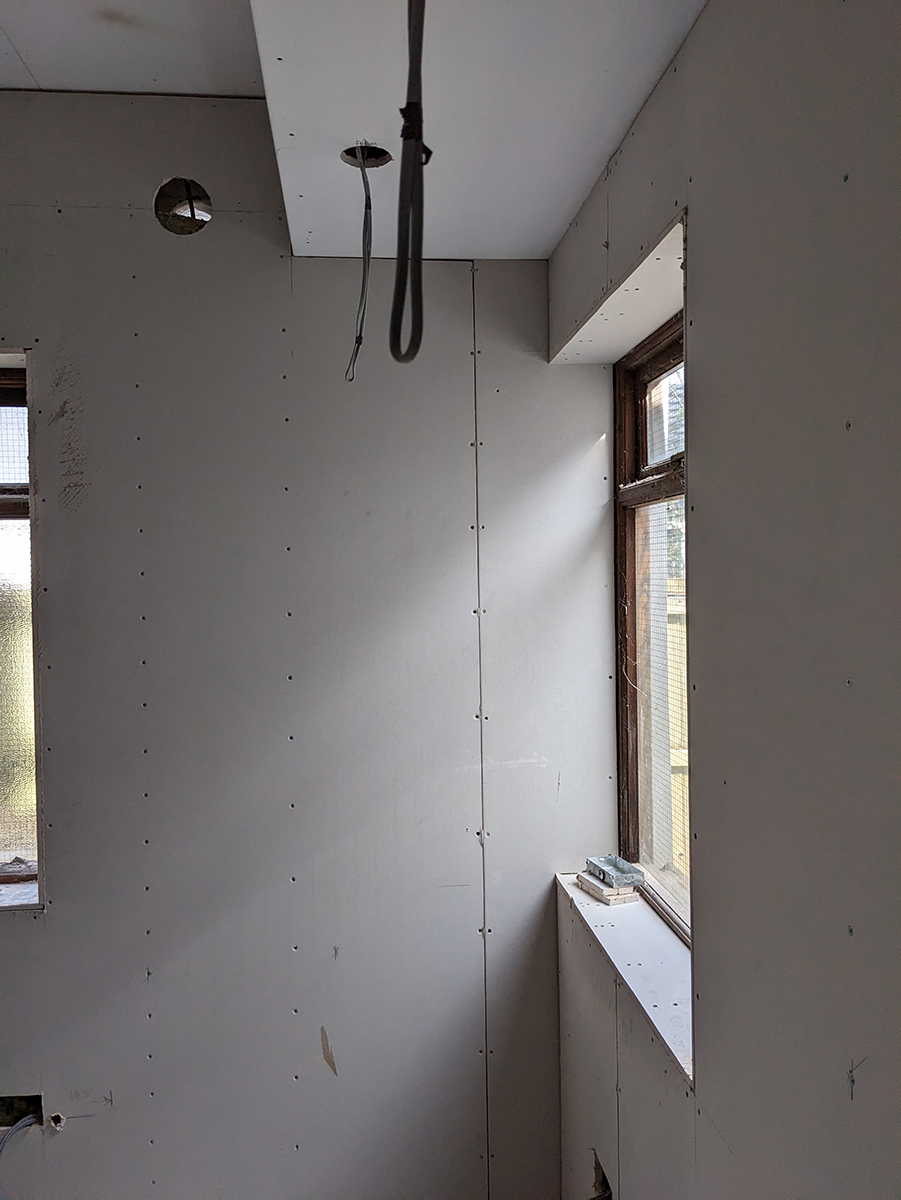
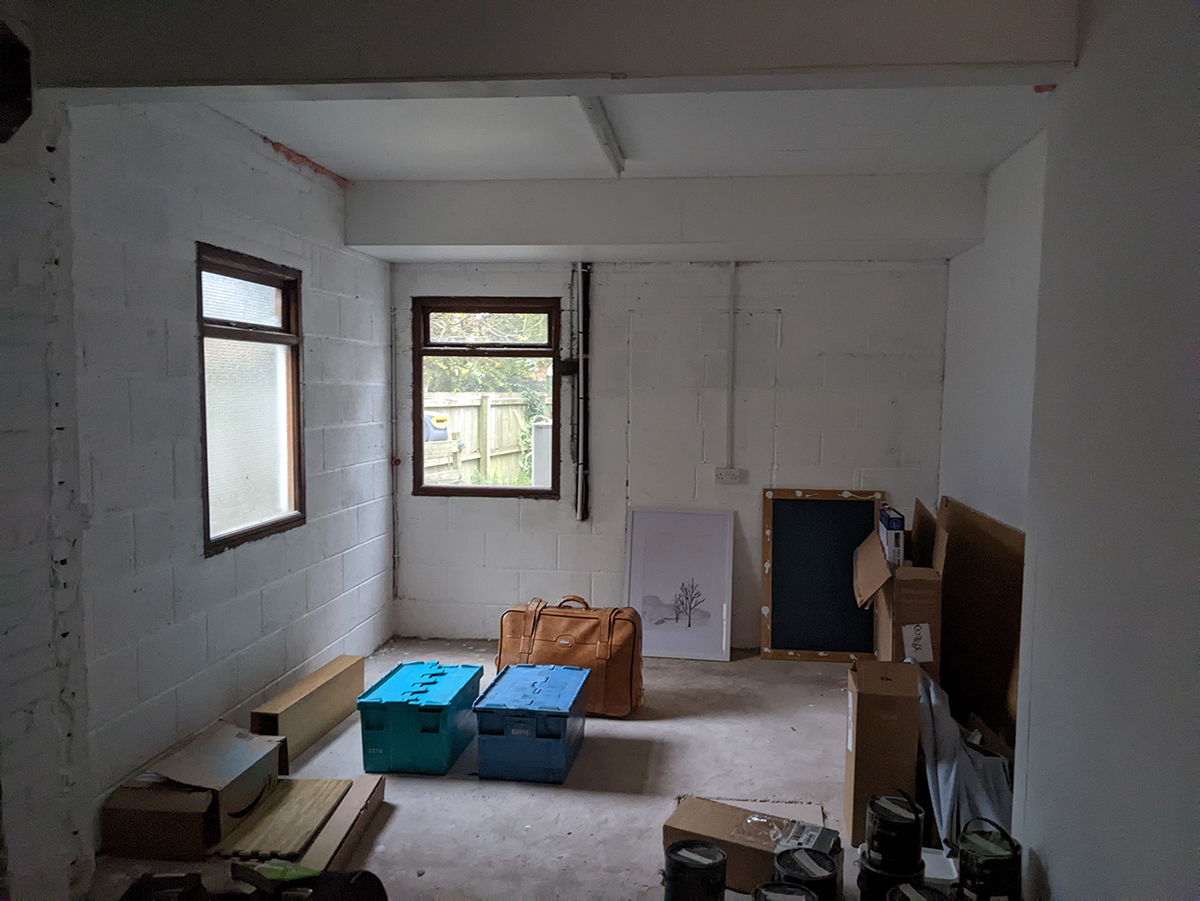
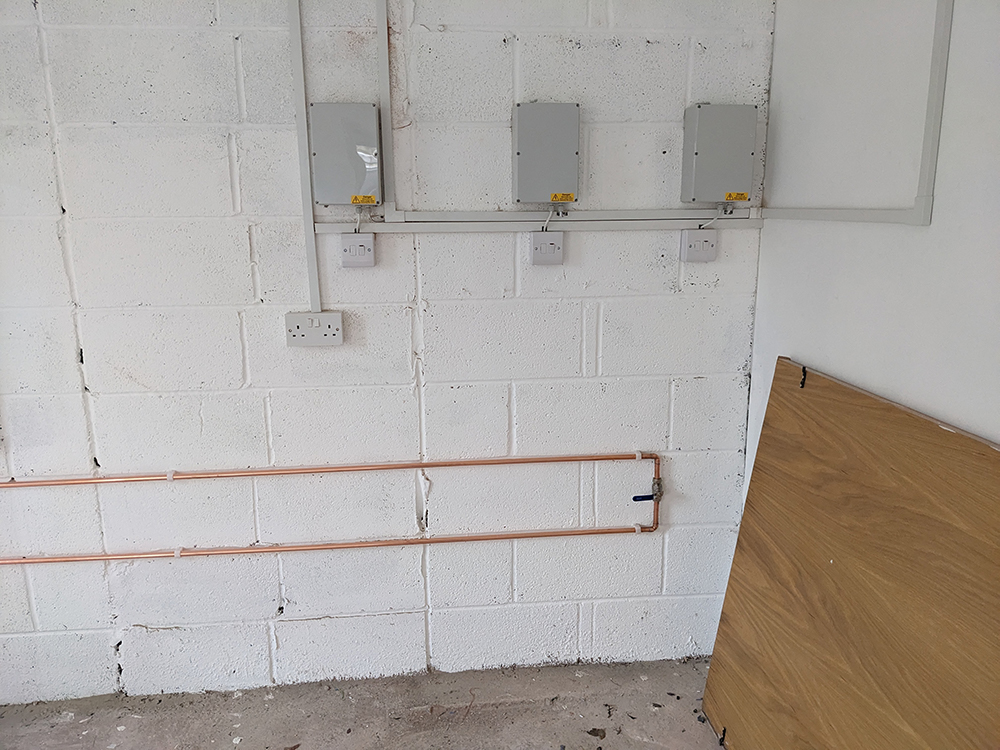
If you have been following us on social media or are signed up to our newsletter, you will know that we have been working on a large whole home project since March 2022. This project originally began with the task of decorating and adding blinds and furniture before the family moved into their new home. It has since grown to include more renovation and bespoke design elements, such as a unique headboard in the main bedroom and an impressive chandelier in the double height hallway. The most recent work has been to design and install a home gym in one half of the double garage which is attached to the property. Here’s what the space looked like before we began work: |
||
 |
||
|
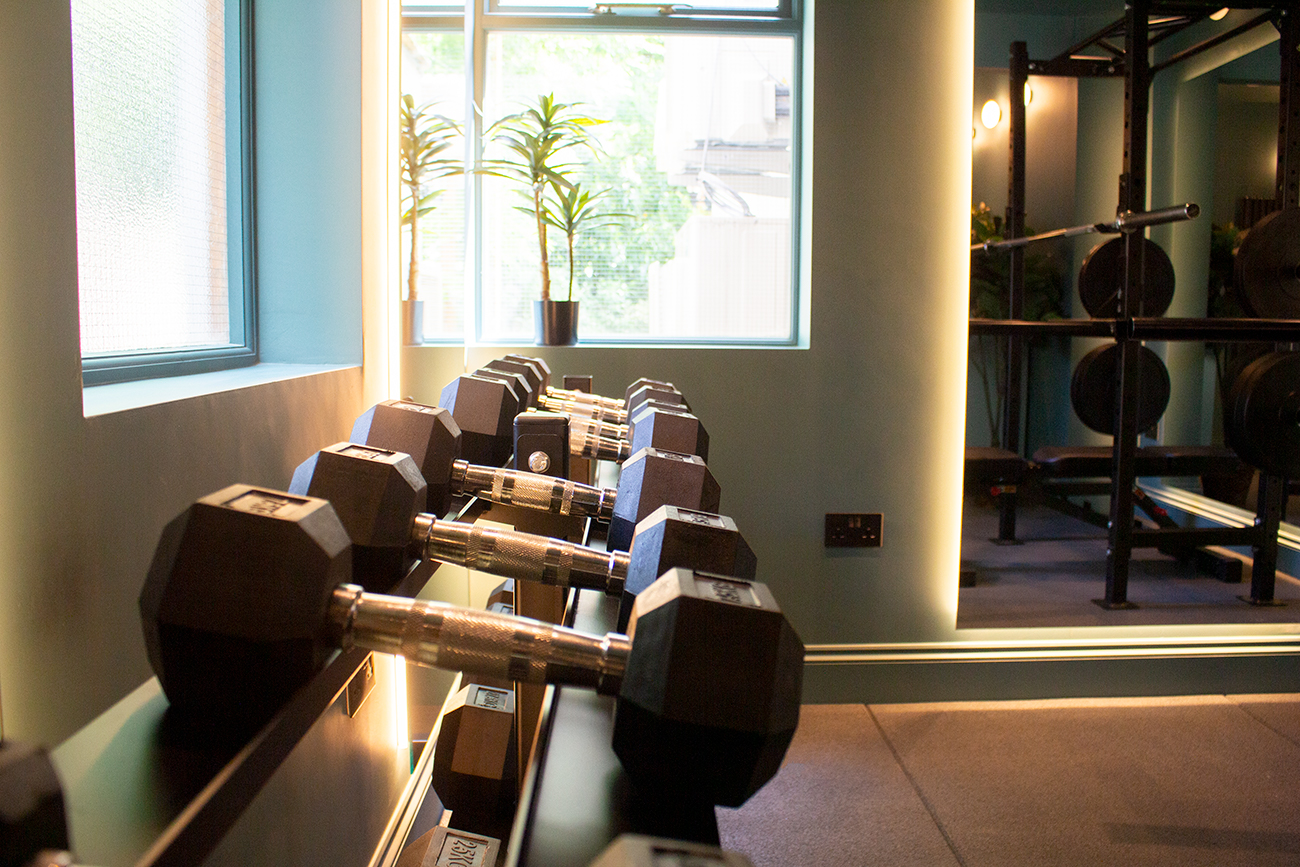
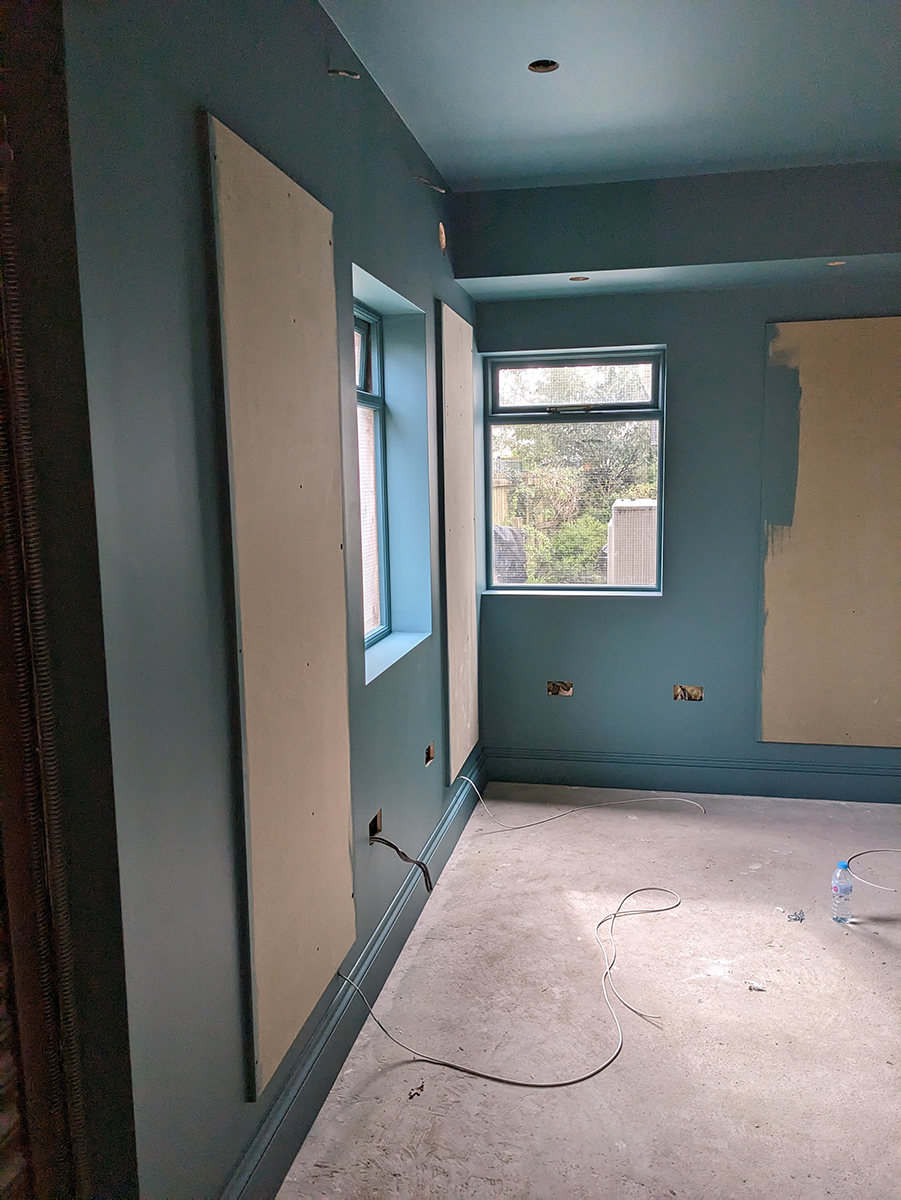
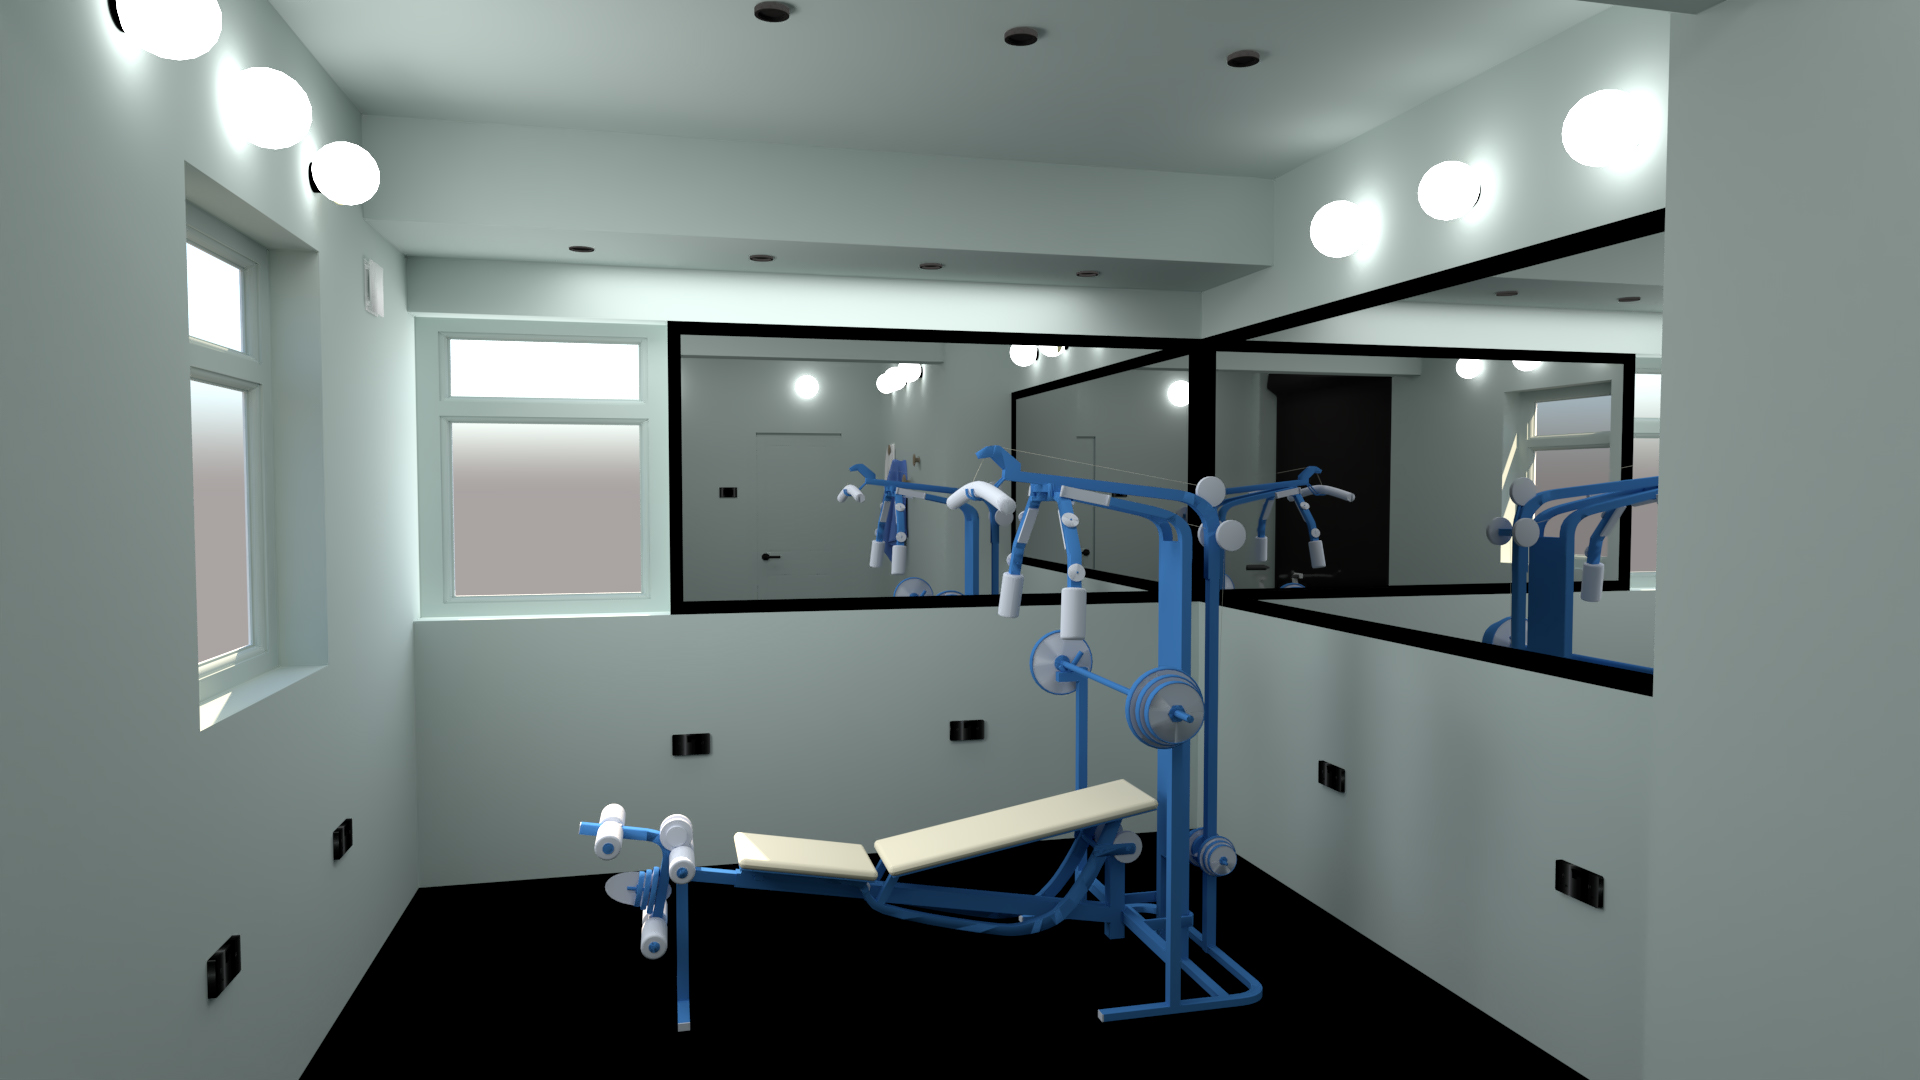
The clients asked us to convert this empty shell into a functioning home gym, with flooring and equipment installed. On their wishlist were new lighting, mirrors, extra plug sockets, black flooring, and painted walls. The room is to be mainly used for weightlifting, so we needed to bring in a specialist company to determine what type of equipment could fit in the space, but other than that, the brief was fairly straightforward. At first, the clients suggested nothing too fancy, and that the walls (which were a single layer of breezeblock on two sides of the room) could be painted as they were. I knew that this gym could look spectacular if we took a more comprehensive approach, and given that the clients wanted extra plug sockets and lighting added, we could also find a way to make these practical elements look good too. When adding plug sockets and lighting to a space, the cables for these either have to be chased into the walls and then plastered over or left exposed and encased in trunking. I’m not a big fan of trunking as it can look messy and as though the electrics were added as an afterthought, so I decided to do things differently. It made sense to make the two single layer walls into more regular cavity walls with two layers, as building wooden studs, adding plasterboard and insulation, and then plastering over the top would give us somewhere to bury the cables and make everything look neat. The added insulation would make the room warmer in winter and cooler in the summer, and the newly plastered walls would give us a great finish to paint on. I also suggested adding a fan with a humidity sensor, to keep the space ventilated and feeling fresh, and chose black plug sockets, light switches and light fixtures, as this would tie in with the black flooring, and would be a little more unusual than the white walls and fixtures found in most gyms. After all, the rest of the house was shaping up to be quite quirky, and I felt this gym should reflect the client’s personalities as much as their home does. Getting the lighting right was quite important too, as the clients wanted the overall feel to be warm and not overly bright. To avoid them staring into a bright bulb when lying on the bench and lifting weights, I chose lighting which didn’t have a high glare. I specified recessed downlights from Astro Lighting, which give off plenty of light, and because the bulbs are behind a grid and recessed back from the ceiling, they don’t have a hard glare. The clients agreed the walls should be painted something other than white, and as they are both fond of blues, I suggested a warm light blue - Mylands ‘Beaufort Gardens’. You can see this colour on the walls in the design visual we produced for the clients: |
||
 |
||
|
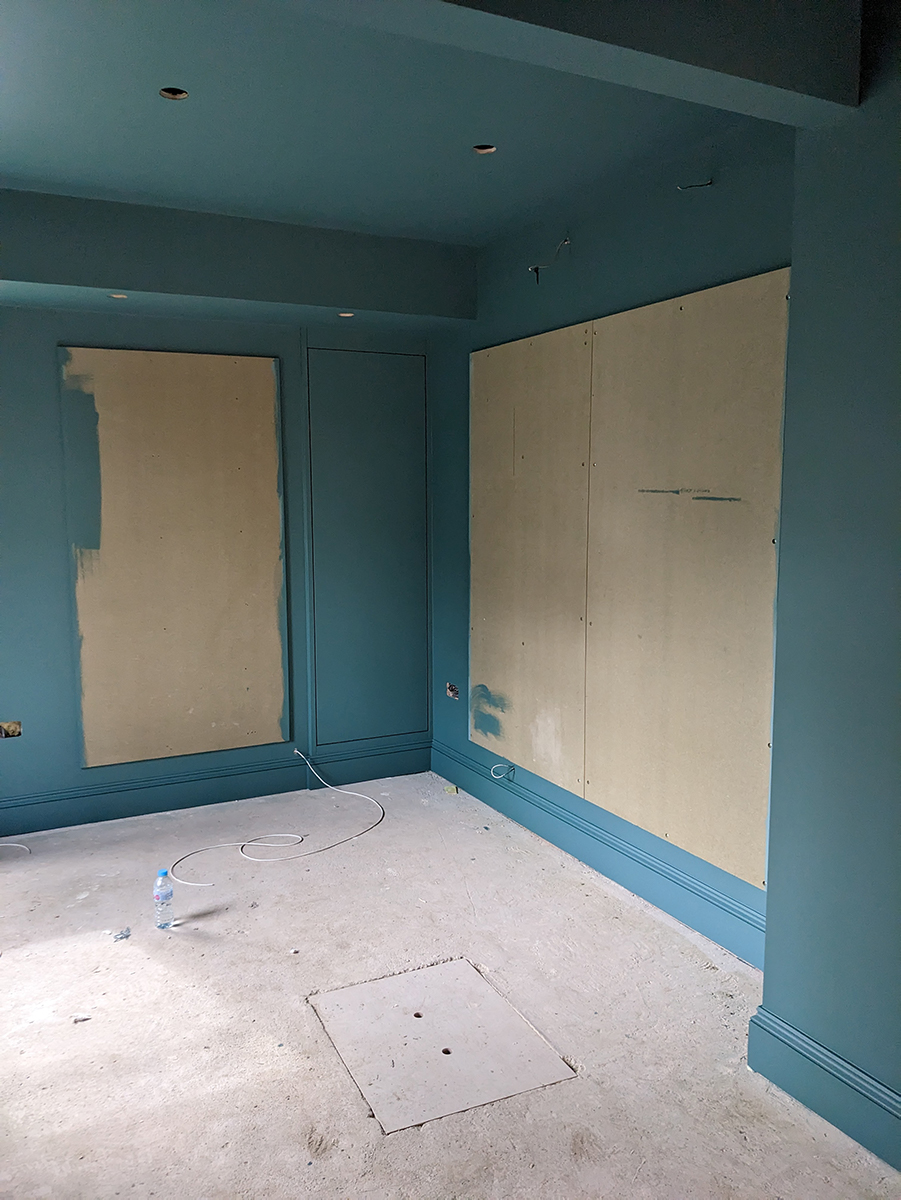
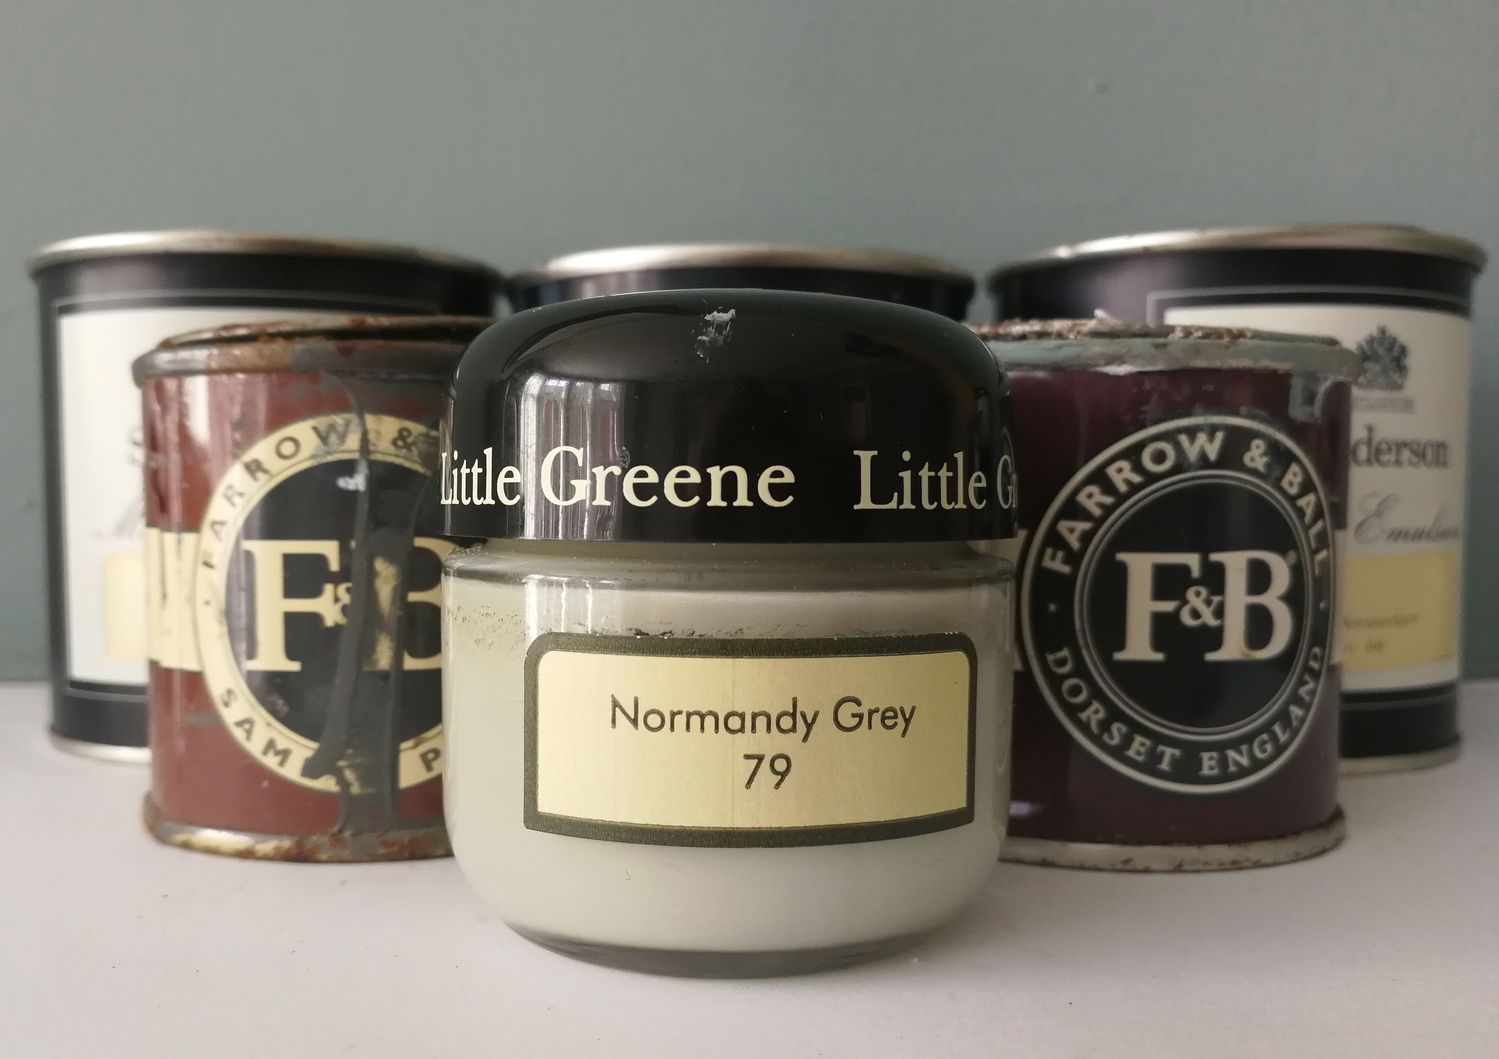
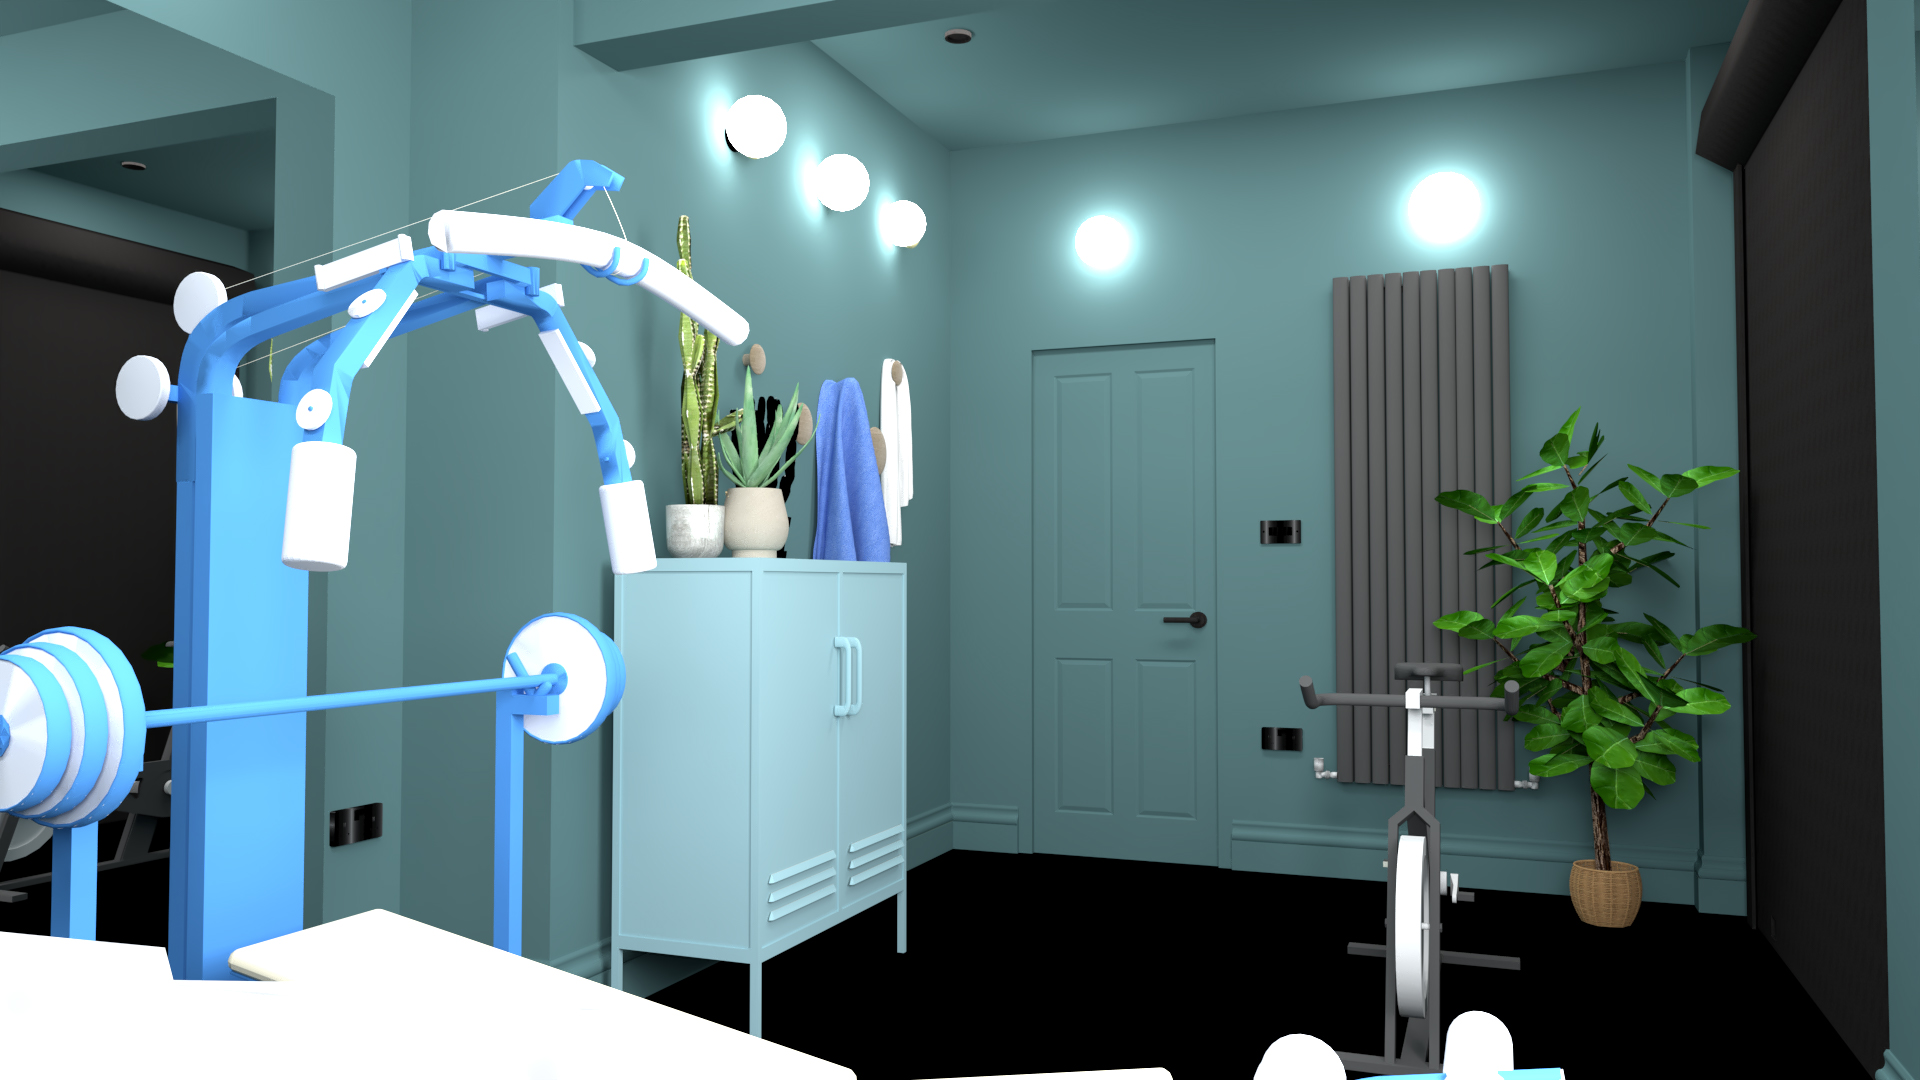
However, when the tester pot arrived the colour looked much lighter and was a cooler blue than we had imagined (it always pays to get a tester pot), so after spending some time looking at paint charts, we settled on Little Greene’s Tea With Florence, which is a stronger teal, with more warmth. Coincidentally, it’s also the colour the clients chose for their main bedroom and en suite, so I guess they really liked it! The clients also asked for more mirrors than we had added to the first version of the design, and for them to be taller, which would help with their workouts. So, we changed the mirrors and also added a hidden cupboard in the space between the original outside wall and the new wall to house the electrical bits and bobs. We chose a sleek electric radiator to keep the gym warm in winter, as it would have been too complicated to get central heating into this part of the house. This radiator is connected to the Wi-Fi, so the clients can turn it on from the house and allow the room to warm up before going to work out. The clients also requested some storage, some plants to soften the space, more weights and some hooks to hang towels etc. You can see all these changes in the newer version of the design here: |
||
 |
||
|
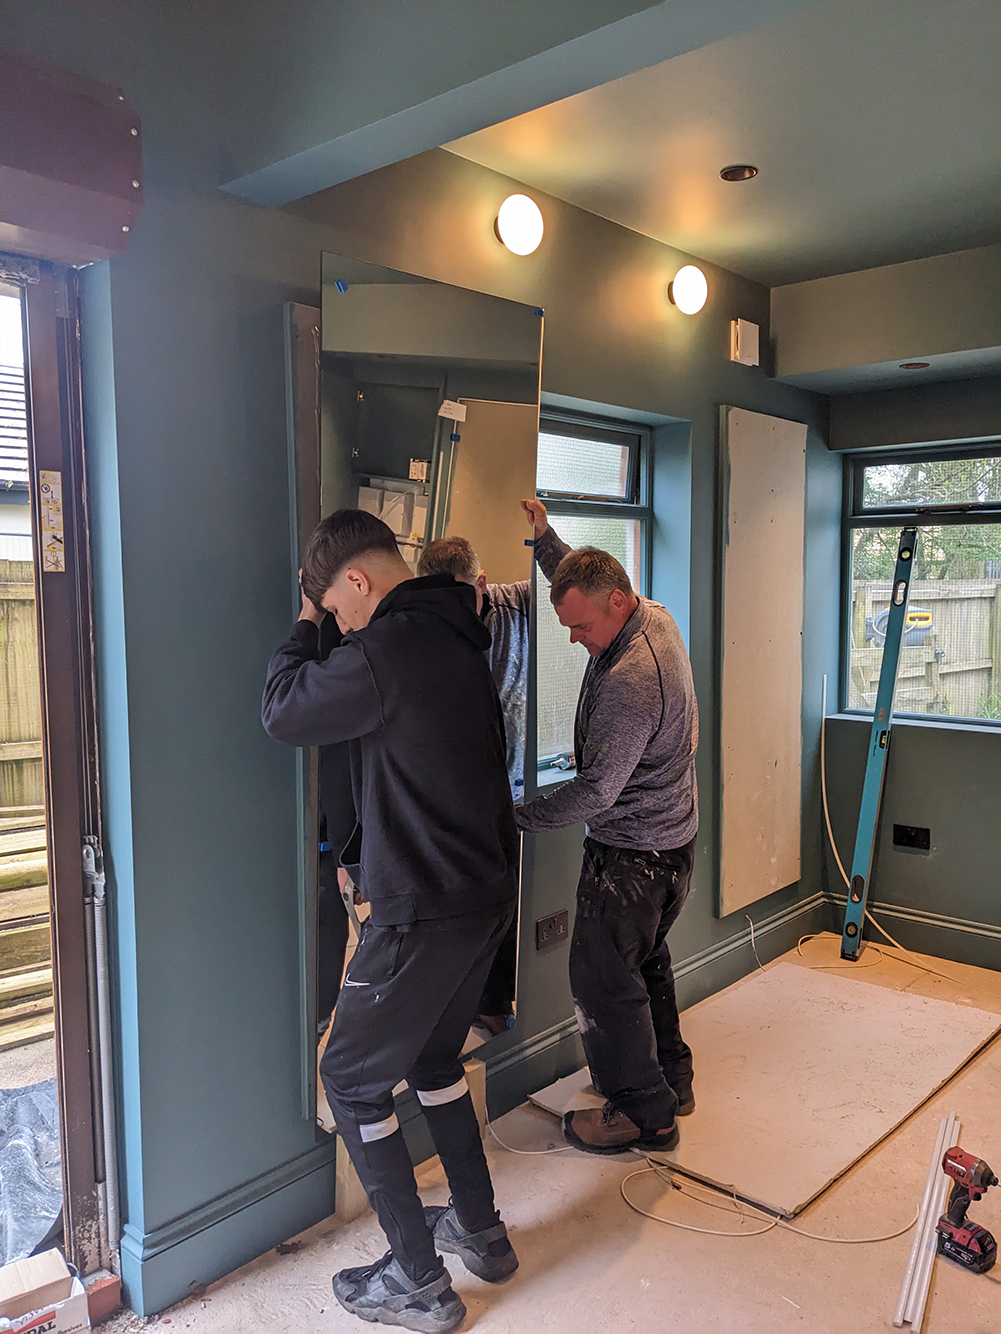
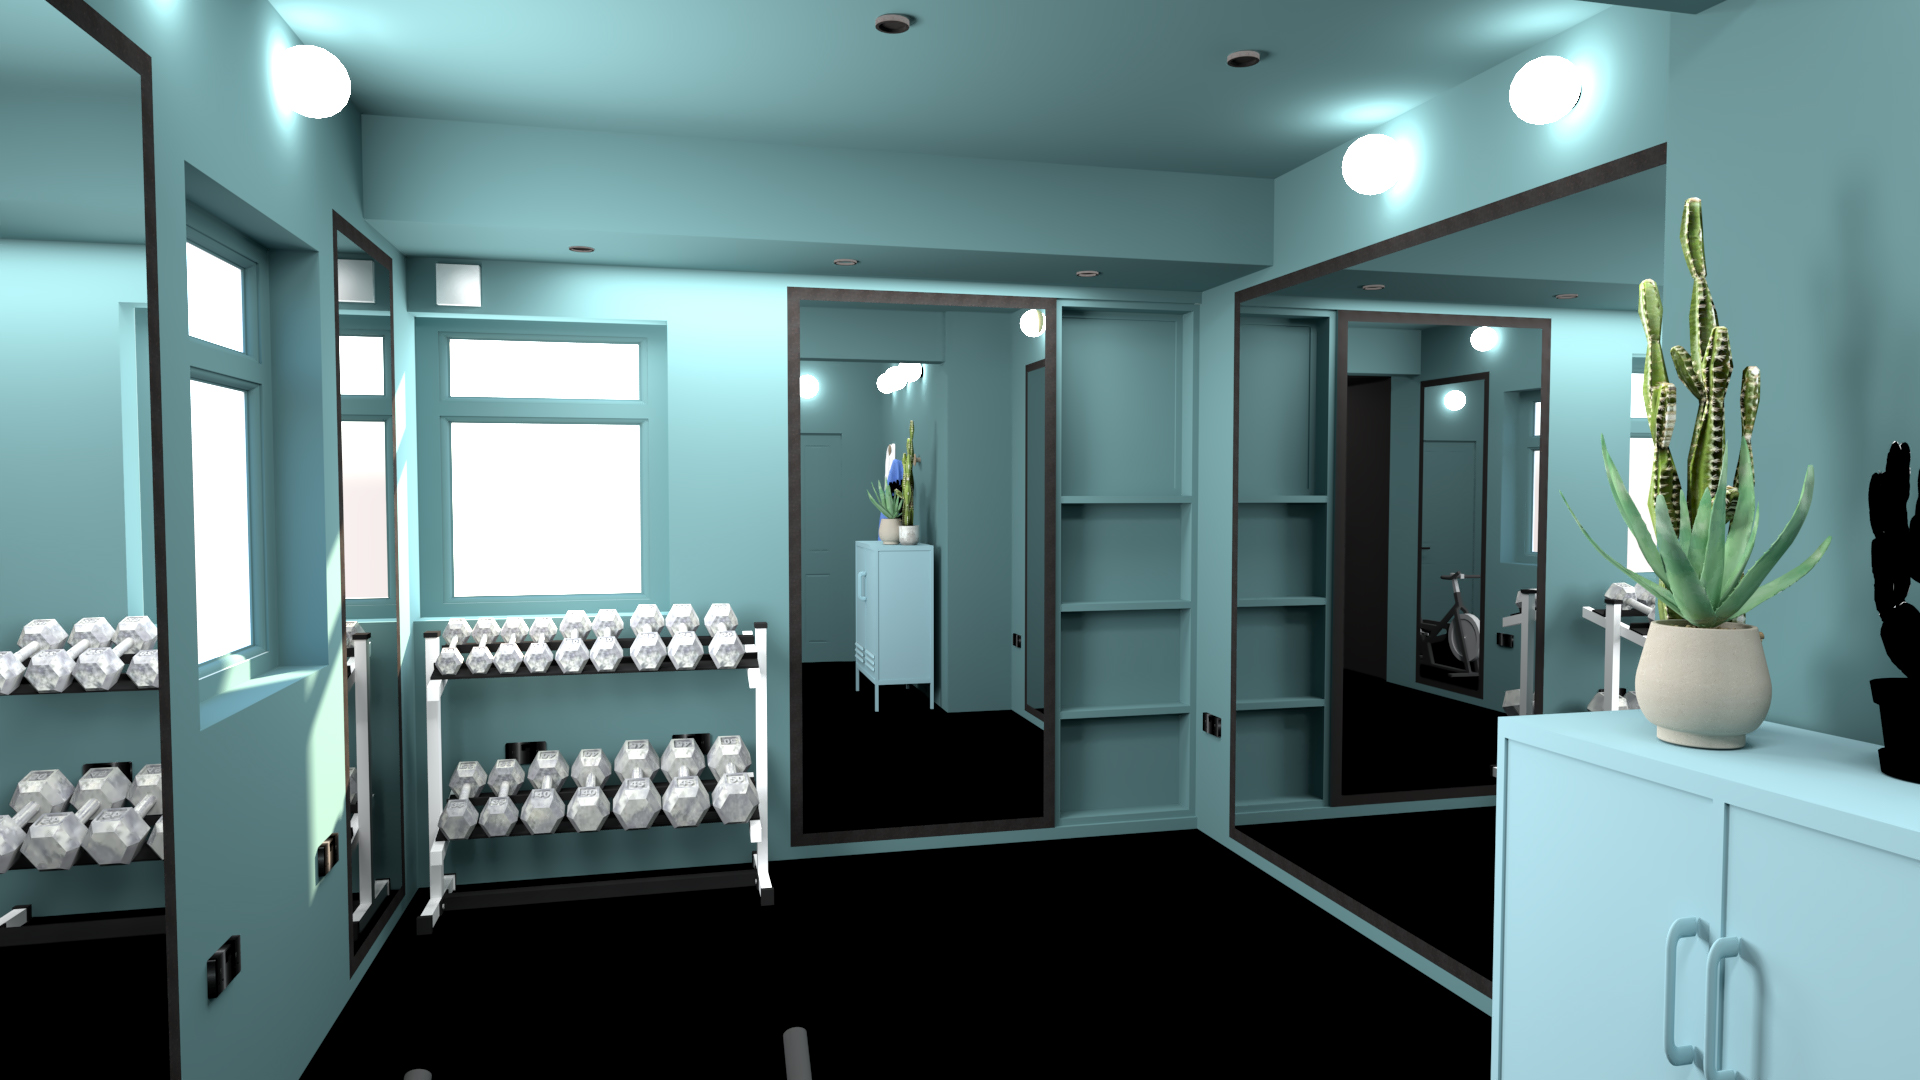
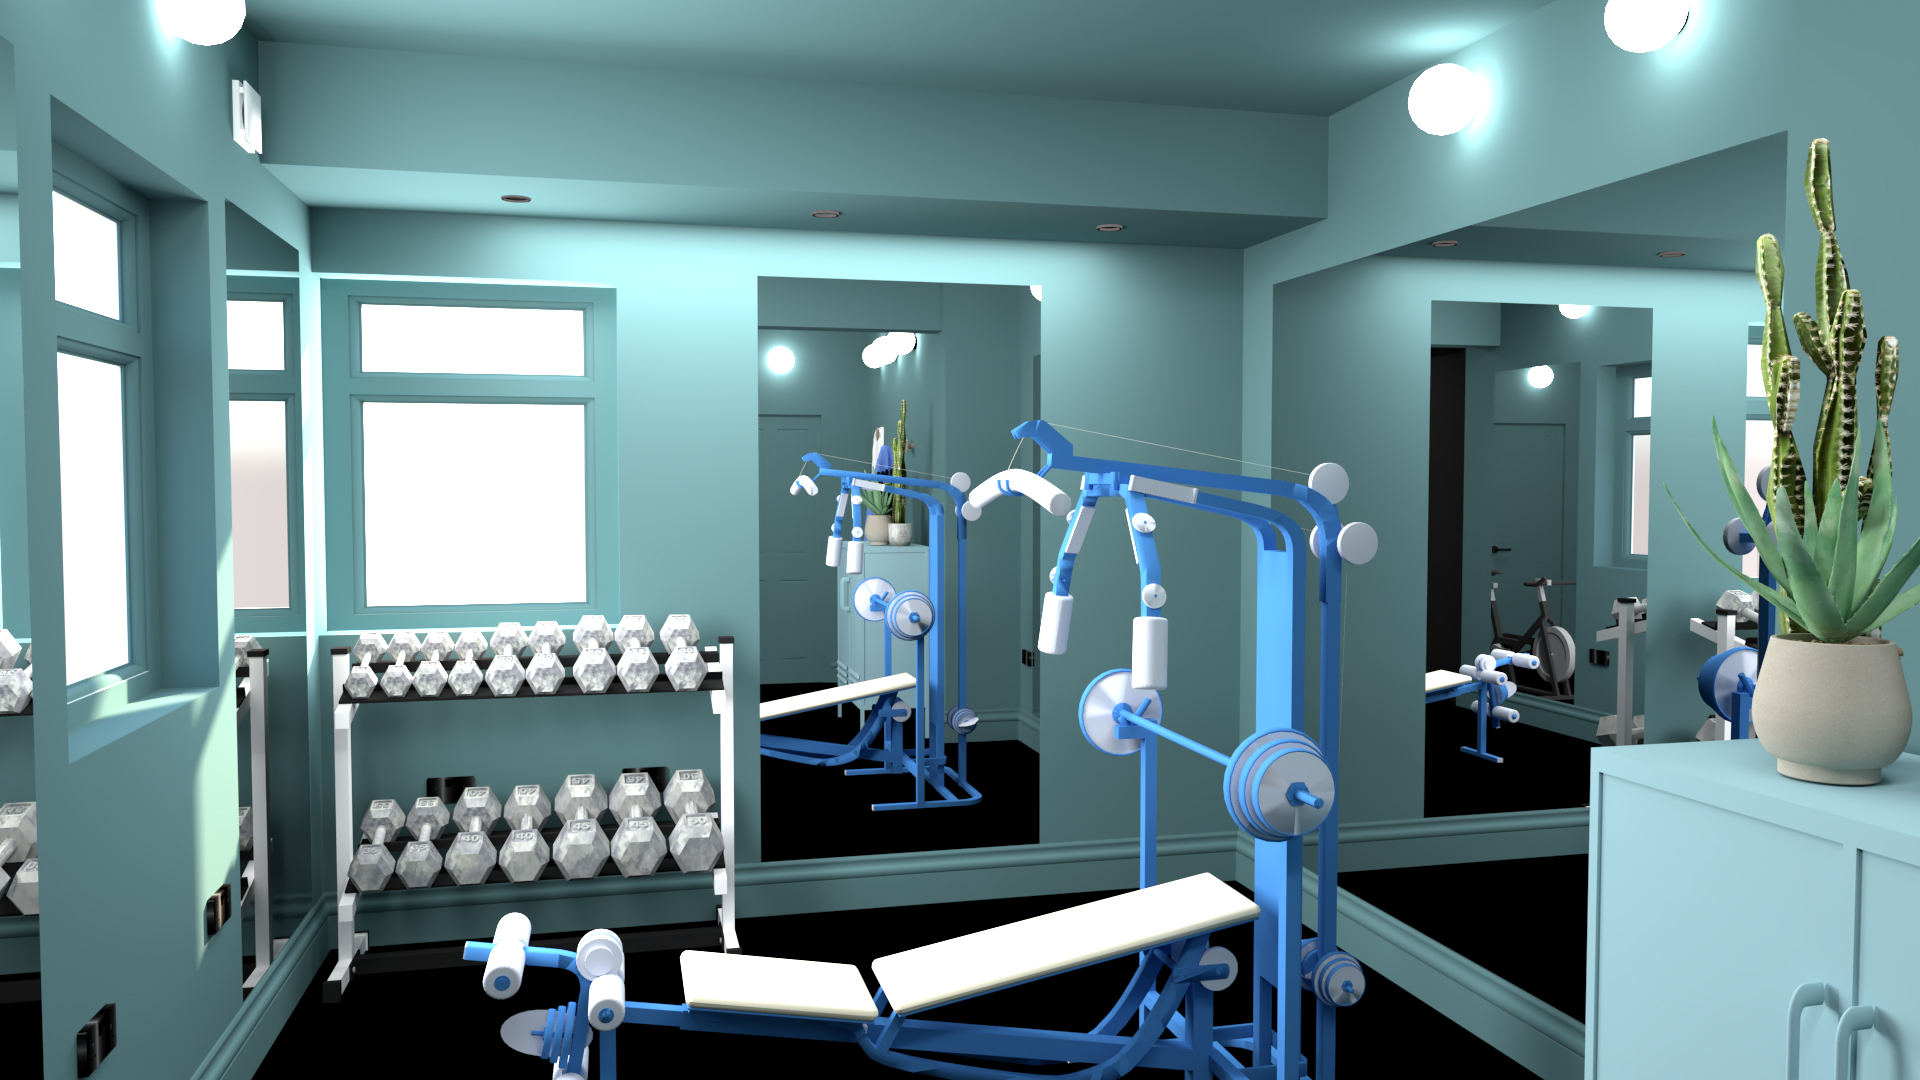
We all loved this design but I decided the mirrors would look much better without the black border around them, so they would be frameless and appear to float. We made all of these changes, and you can see the final design visuals below: |
||
 |
||
 |
||
|
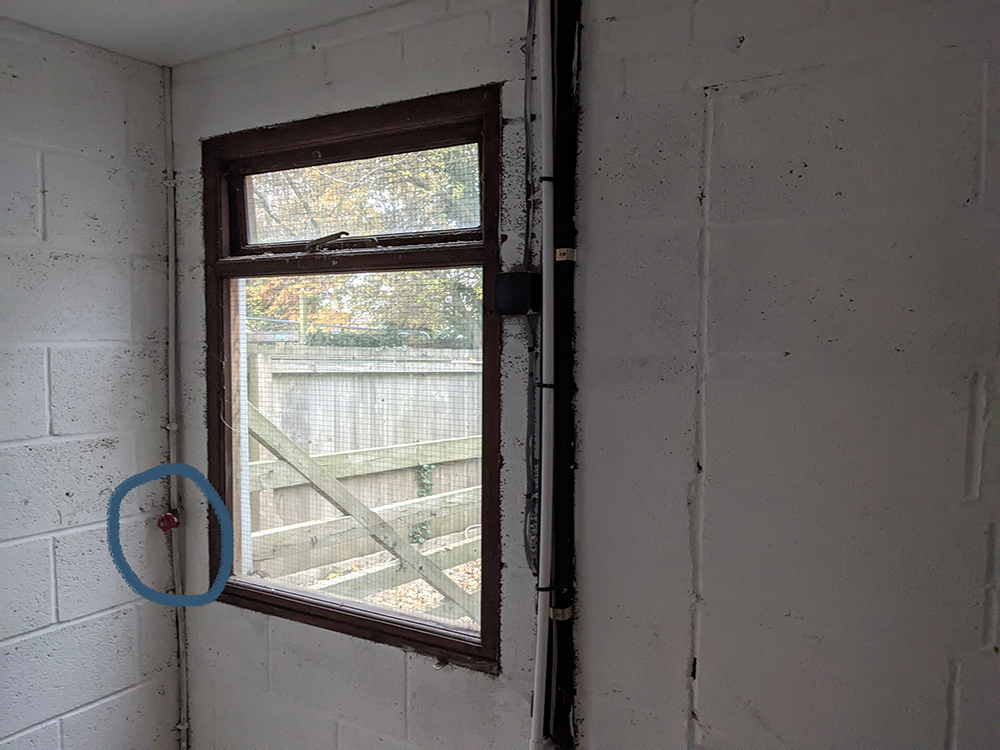
Once the design plan was agreed upon, we had a couple of technical issues to overcome before getting to work. Running along the corner of one wall was the shutoff valve for the outside tap in the garden, which, if left in that position, would be buried inside the new wall when we added the framing and insulation. The valve is circled in blue below: |
||
 |
||
|
We called in the plumber, who originally planned to move this valve outside, which made sense as the tap it controls is also there. However, this was more complicated than expected and would have involved digging up the very long garden. The solution we came up with was to move it along the wall and inside the hidden cupboard, giving the clients access to it when needed. |
||
 |
||
|
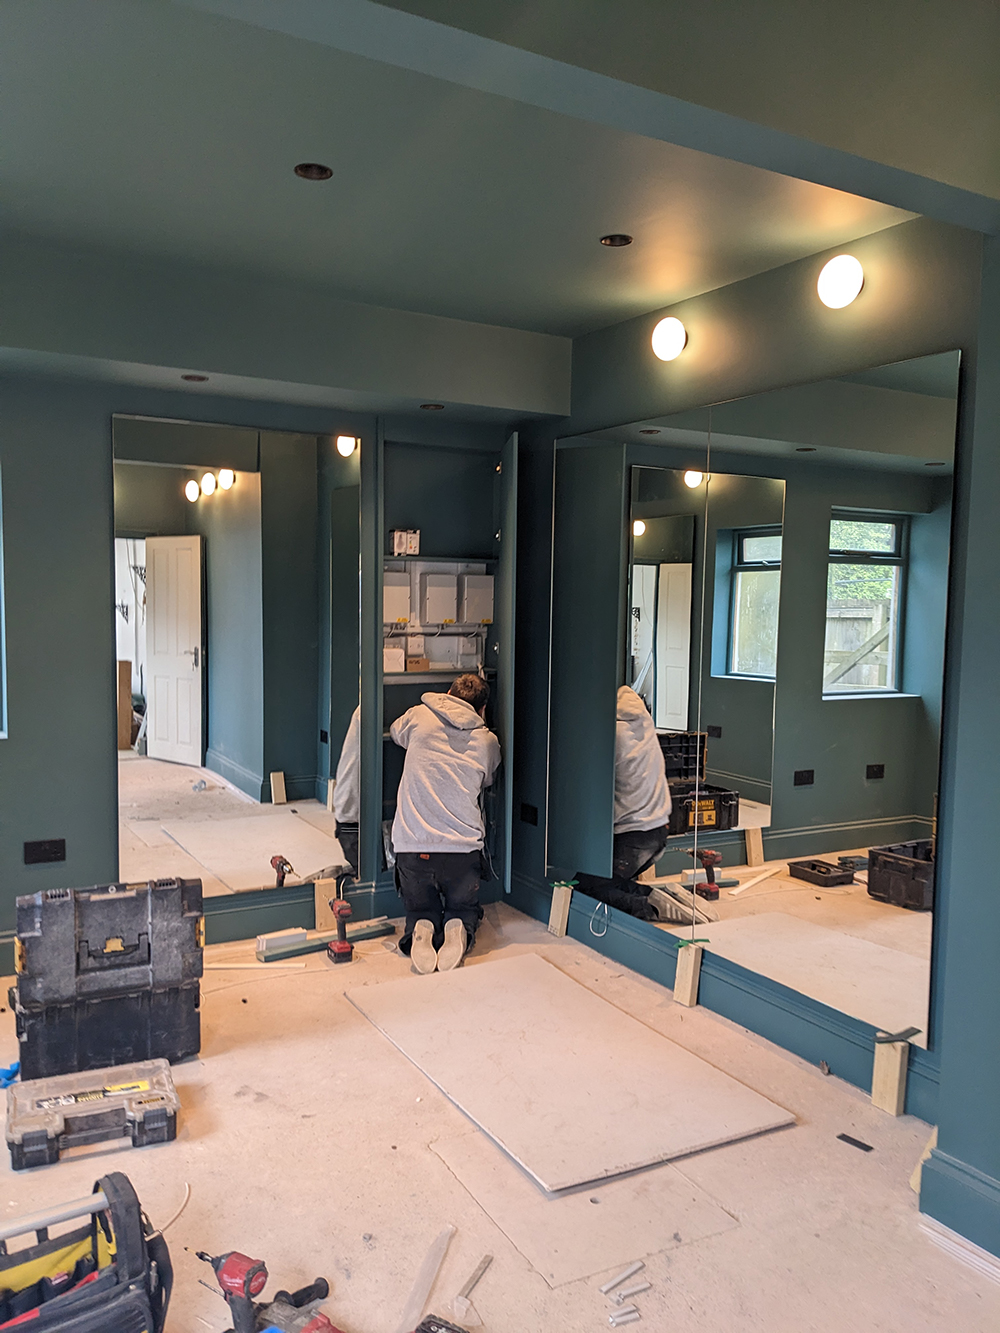
Next came the carpentry work. Our fantastic carpenter built the frames for the two new internal walls, shaved 15 mm off the bottom of the door so that the new flooring would fit underneath it, and built the hidden cupboard with a push-click opening mechanism so there would be no handle visible, as per our design. It was then time for the electricians to work their magic. Using our drawings, they placed all the cables for the new ceiling and wall lights, radiator, light switches and the LED strips which would be going around the mirrors. Then the room was then plasterboarded ready for plastering and decorating. |
||
Things were going well, but it was at this stage that we noticed a couple of problems. The first was a leak from the ceiling. After some investigation, we realised it was coming from the bathroom above, so we called in the plumber and he worked out it was caused by a cracked shower tray in the main en suite. The clients were then faced with taking up all the wall and floor tiles in the en suite to replace the shower tray and installing new tiles to fix the problem. As the layout of this room wasn’t the best use of the space, and the fixtures were also poor quality, I suggested installing a new bathroom instead. This might sound drastic, but it was something the clients had been planning to do in a couple of years’ time, so they decided it made sense to do it sooner. We have now finished designing the new en suite and will be installing it soon, so more on that in the future. Once the plastering was done, the carpenter came back to add the skirting boards and the MDF frames which would hold the new mirrors. These had to be carefully planned out and measured, as we wanted each mirror to have LED lighting strips all the way around them, to appear as if they were floating off the walls. I’d spoken to the people cutting and installing the mirrors, and we’d agreed on their sizes. The plan was to install MDF boards which were just smaller than the mirrors to allow space for the LEDs around the edges, with the strips themselves being hidden by the overhang of the mirrors. |
||
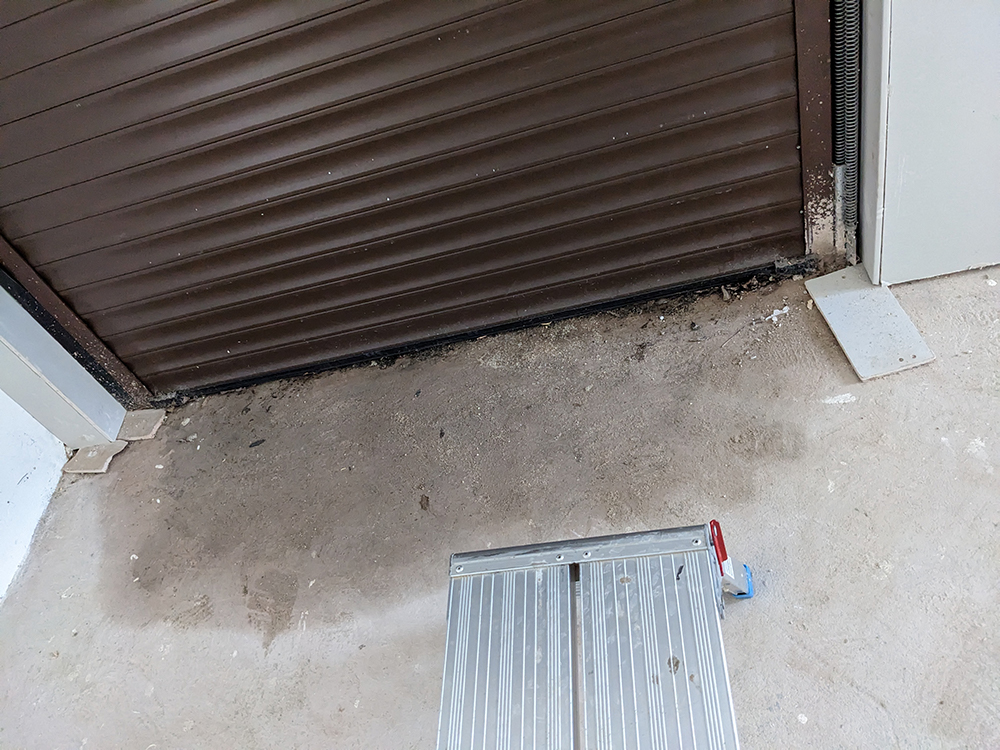
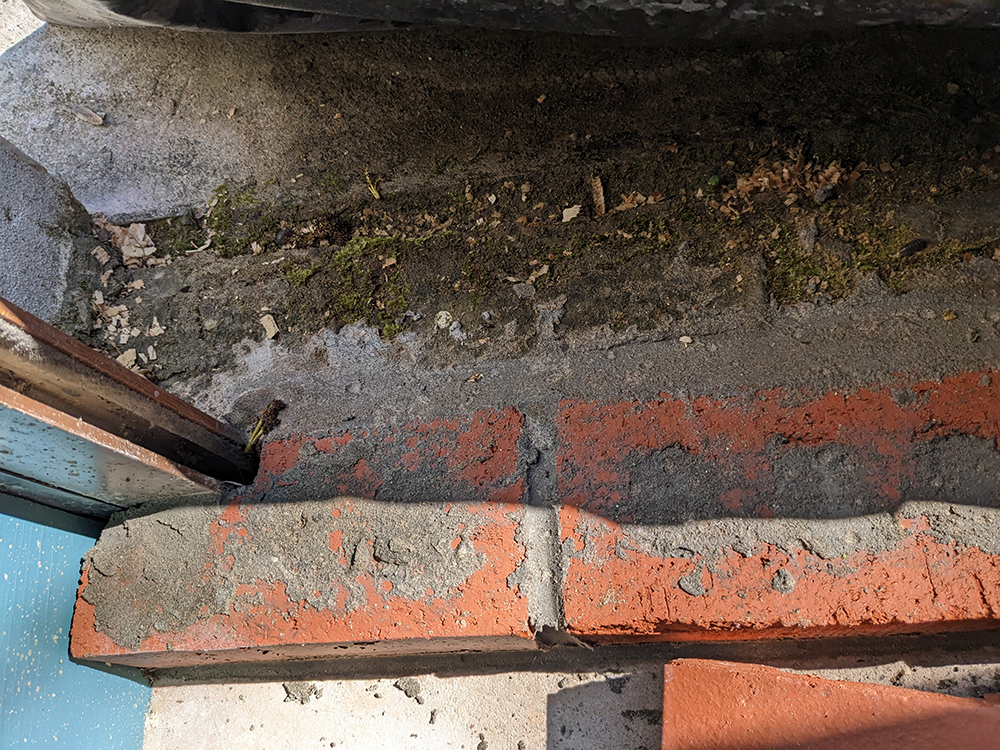
The second problem we noticed was a small amount of water coming under the garage door which led out to the side of the property. As the new floor and expensive equipment would be going in this spot, we stopped work whilst we figured out what the problem was and how to fix it. I called out the garage door installer, who confirmed that rain water was coming in because the garage door threshold was lower than the floor level outside. He suggested building up the inside threshold so the rain couldn’t come over the top of it. I called in a bricklayer to do this for us, and he did a great job, but it wasn’t the prettiest solution and didn’t fit in with my vision for a sleek finished space. |
||
 |
||
 |
||
|
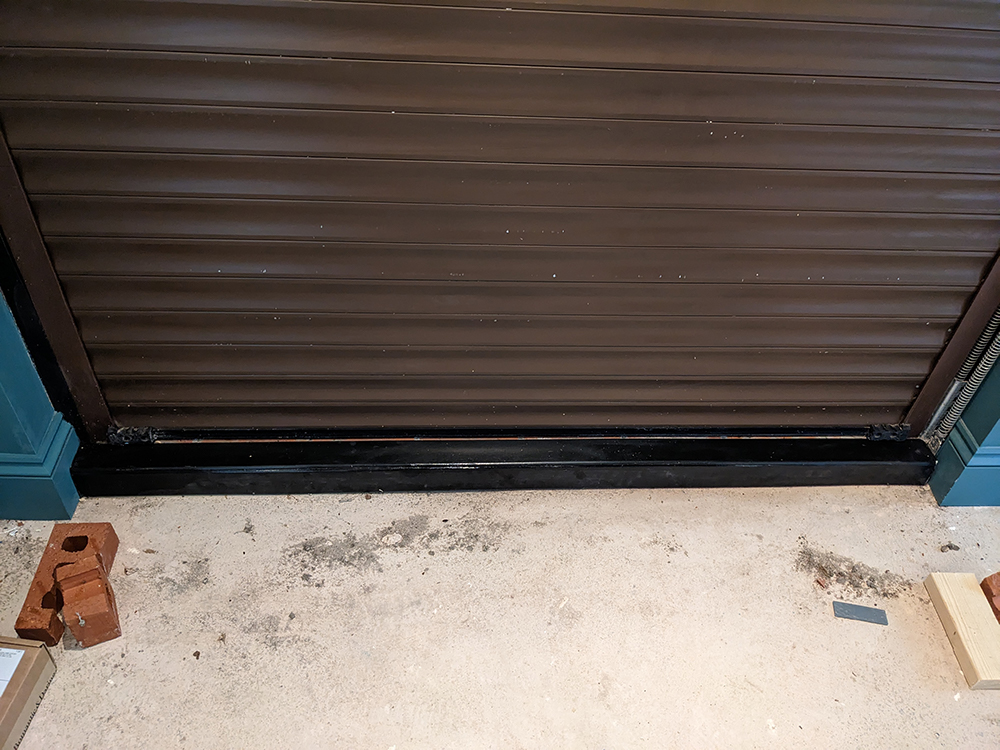
I spoke to the plasterer and asked if he could render over the bricks, but the area was too small to get a good finish. Instead, he suggested using PVC edging strips to hide the bricks and create a neat look, so this is what we did. I felt that black PVC would look best, as it would blend in with the new black gym floor, and look as seamless as possible. |
||
 |
||
|
Once those problems were fixed, the carpenter came back to finish off the cupboard, and the electricians added the radiator, the plug sockets and light switches, and all the wall and ceiling lights. We’d ordered the lighting a few weeks before, and when they were delivered we checked them over and discovered that seven of the nine wall lights were broken inside. We had replacements sent out to us in time for the installation, but it just goes to show why every delivery should be opened and physically checked for damages on the day it arrives. |
||
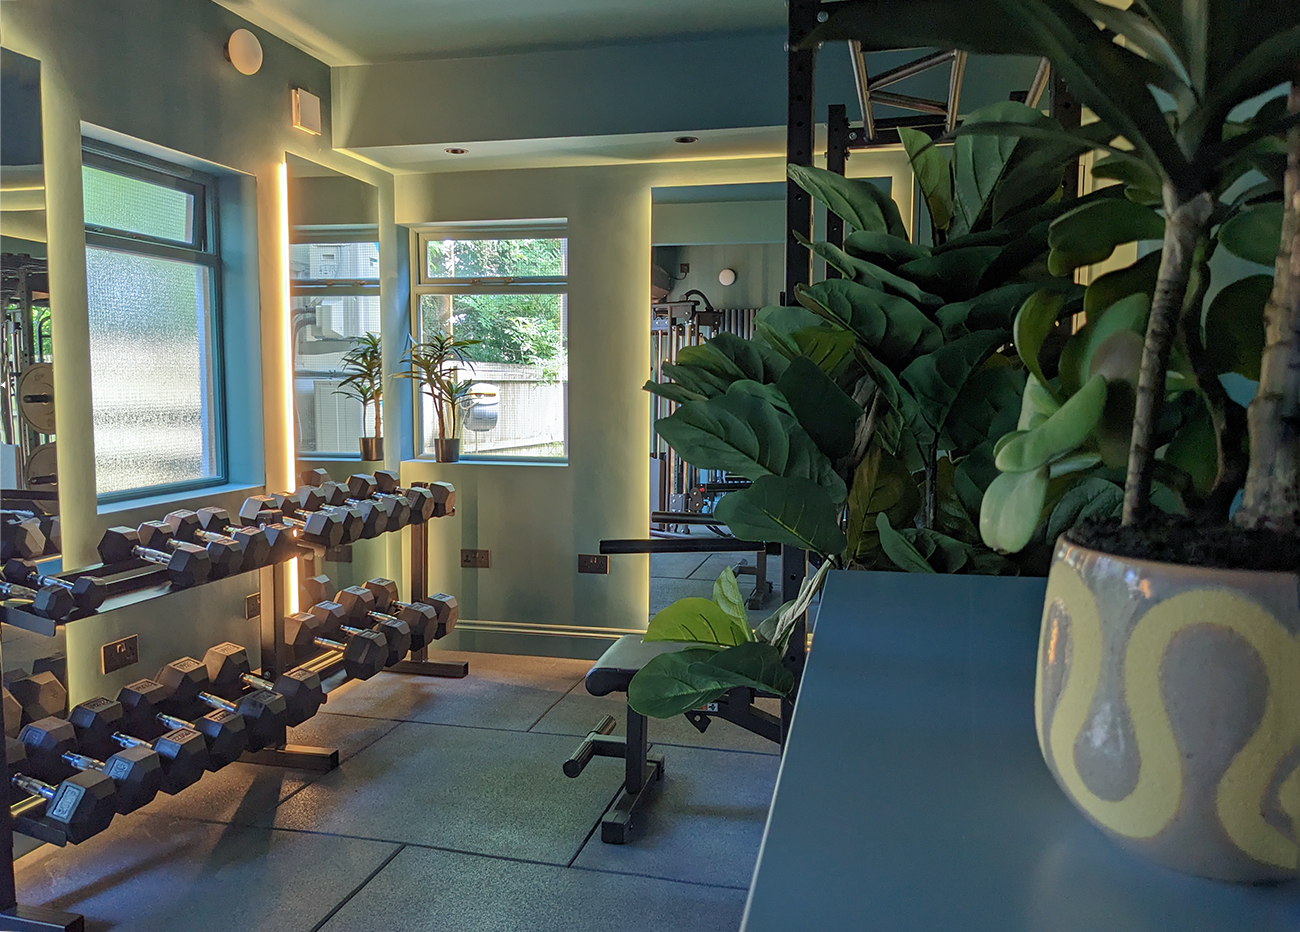
Once the lighting and the mirrors were installed, our brilliant decorator came back to touch up the walls and make sure everything was perfect. We called in the gym company to install the floor and the equipment, then the handyman and I built the storage locker, hung the new hooks on the walls, placed the plants in their pots, and did the final bits of styling, and everything was ready to go. The clients are absolutely delighted with the space and have been using it a lot already. Here’s what they said when they saw it: “Just got back and checked out the finished gym. Absolutely amazing! It’s stunning and so slick, and it’s going to be a real joy working out in that space. Thank you so much, it’s incredible!" |
||
 |
Welcome to the design blog, where you'll see posts about anything from the projects we are working on, to the latest fabric and wallpaper collections, and all things interiors related. We love colour, pattern, architecture and old buildings, and we love to share our finds with you.
Happy reading!