Work in Progress - the garage to gym conversion
 |
||||
|
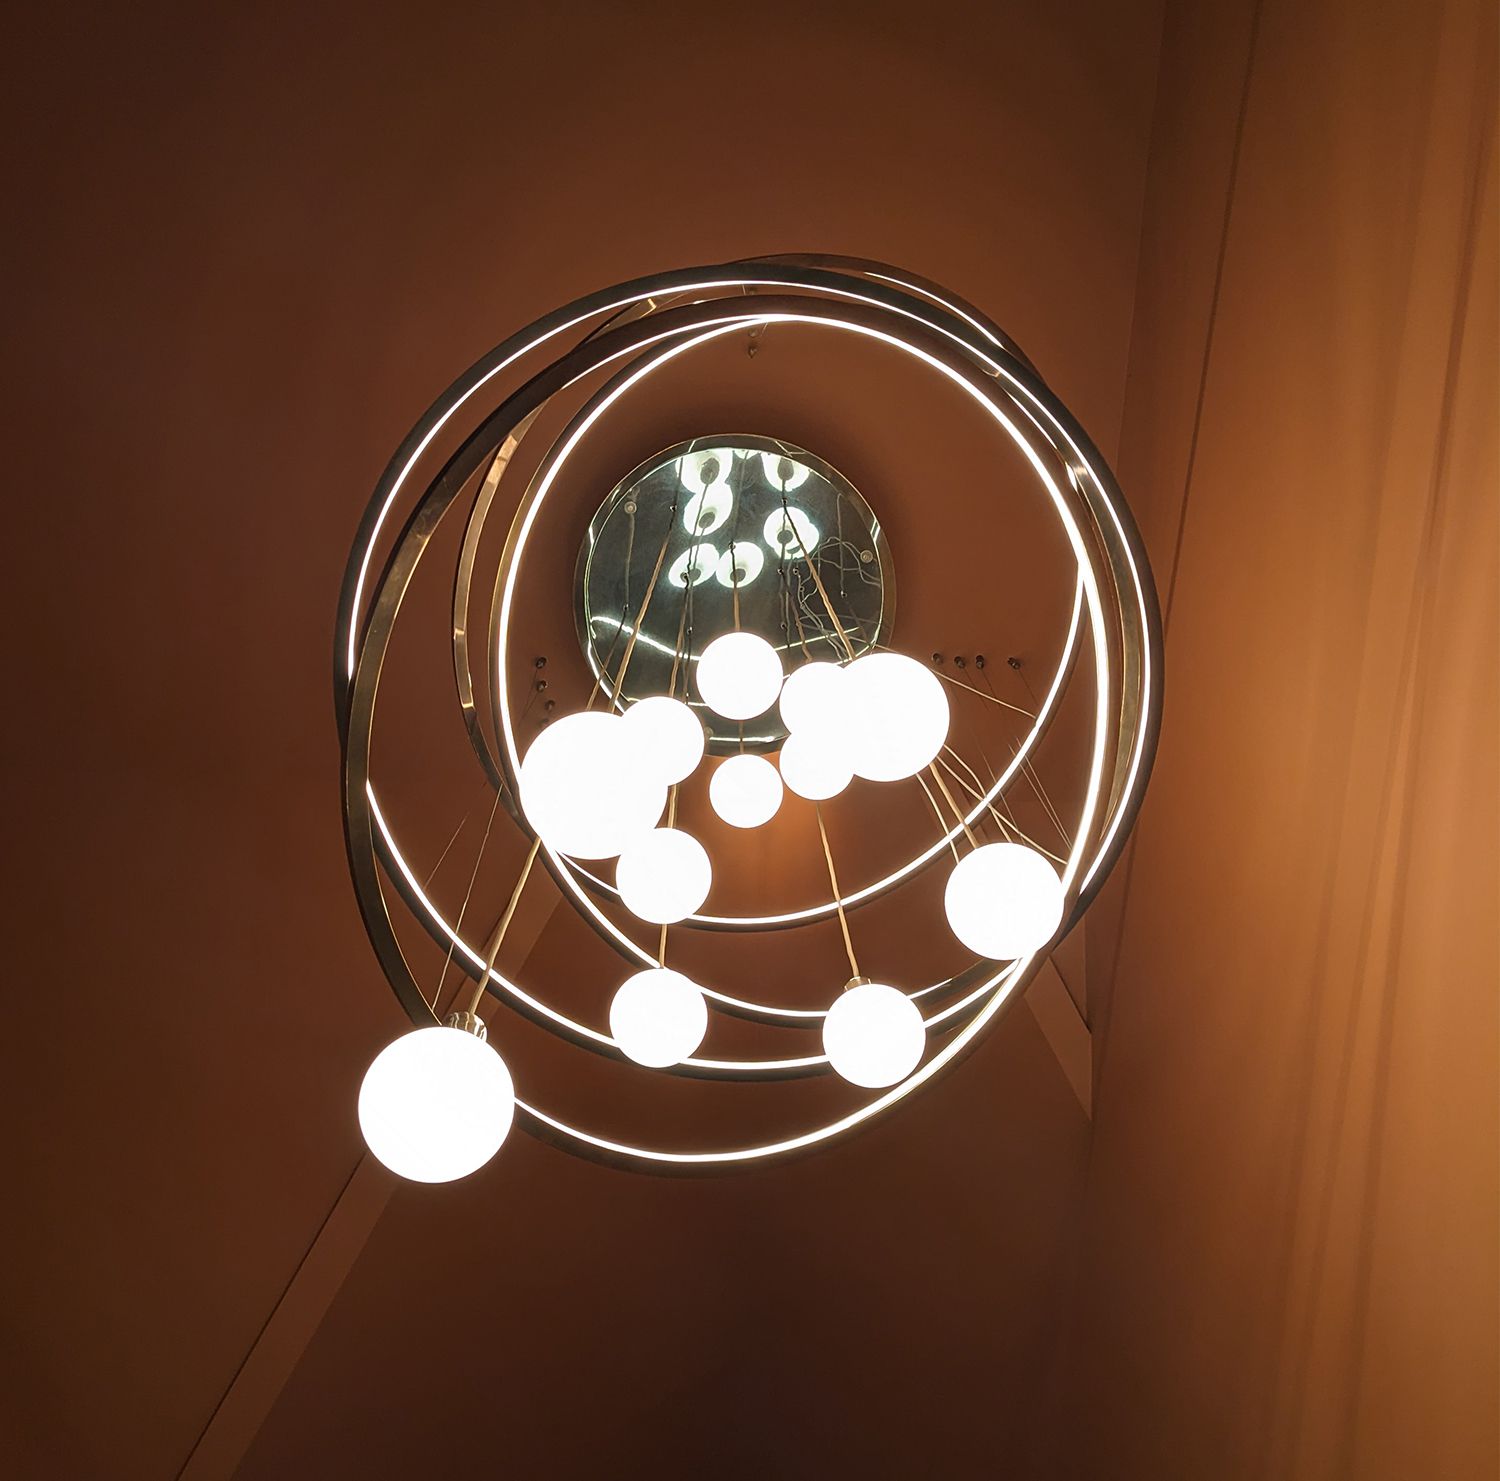
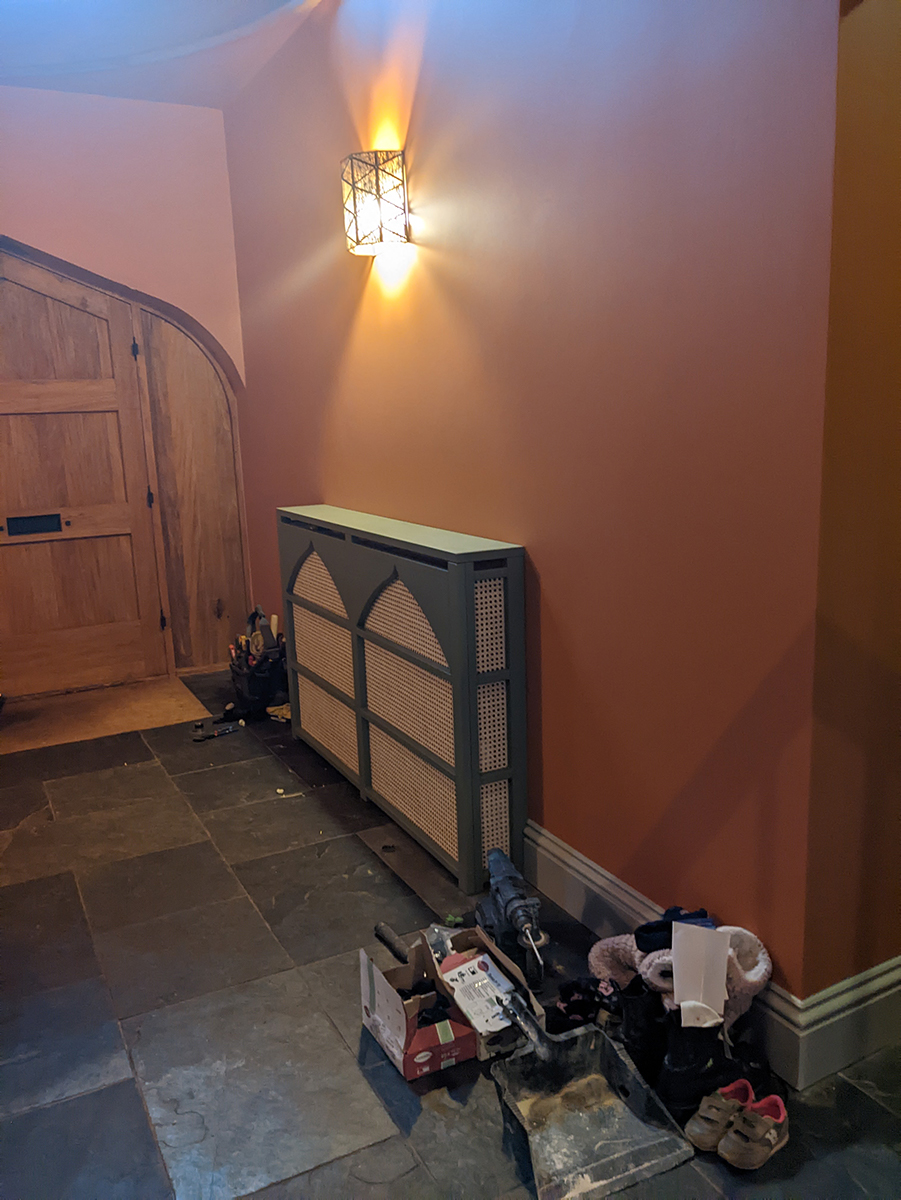
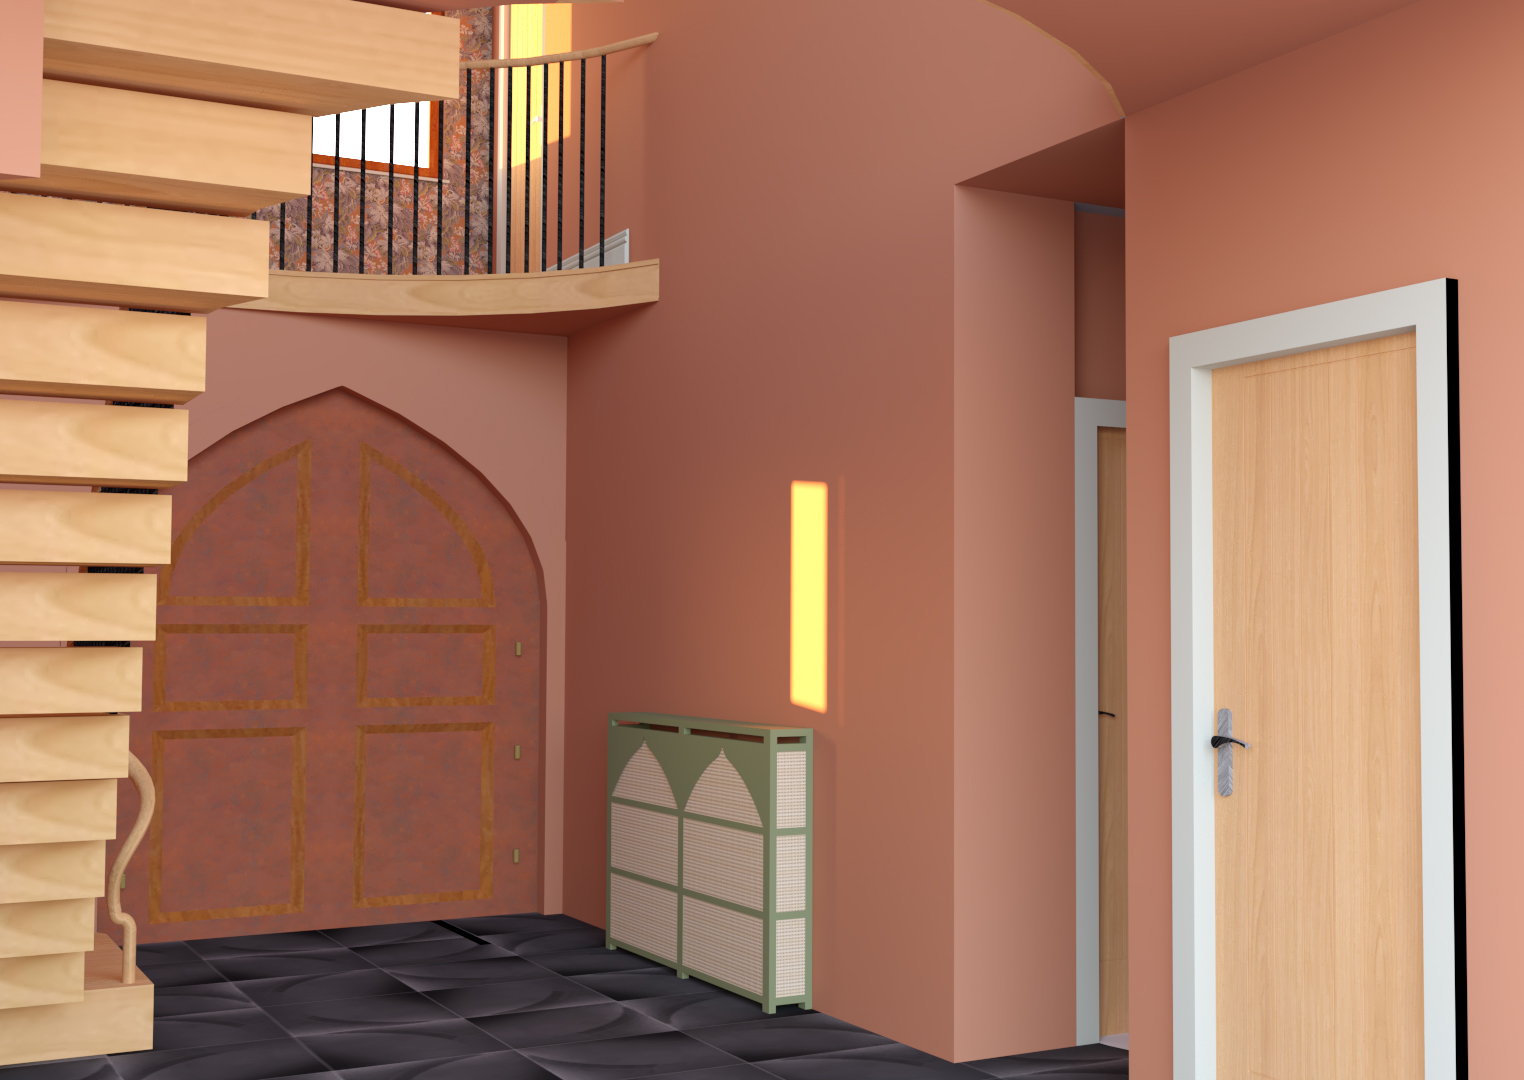
As I mentioned in part one of the blog about our Unique Family Home project, the basics for the house were completed before the family moved in, meaning we decorated, furnished and added window dressings before they arrived. The plan was always that the bespoke or handcrafted elements of our design were to be completed after their move in date, because they would take longer to design and make. These elements were to include bespoke radiator covers, a bookcase/window seat for the mezzanine area on the landing, a wooden showpiece headboard for the main bedroom, a waney edge or living edge dining table to seat 10 people, and a show stopper bespoke chandelier for the double height hallway space. The chandelier for the grand entrance space was designed first, as this would take the longest time to make. As soon as the design was approved by the clients we began getting the piece commissioned and made. You can read all about the design process and installation of the chandelier in this blog. The design for the radiator covers came next, in tandem with the bookcase/ window seat as the bookcase would be sitting alongside one of the radiator covers. Having looked at many of the ready made covers on the market, it’s clear that they aren’t the prettiest of things. They often have very square edges, with lots of chunky panels and use MDF fretwork to let the warm air from the radiator through. The fretwork sheets can block some of the air from the radiators, making them less efficient, and the diamond pattern of the fretwork often used in these designs wouldn’t have worked well with the style of this house, so bespoke was the only way to go for this project. These bespoke radiator covers would provide important shelf space for items like keys etc, but they would also be designed to fit in seamlessly with the design style we’d chosen for the rest of the house. Here’s what the hallway looked like before the covers were added: |
||||
|
||||
 |
||||
|
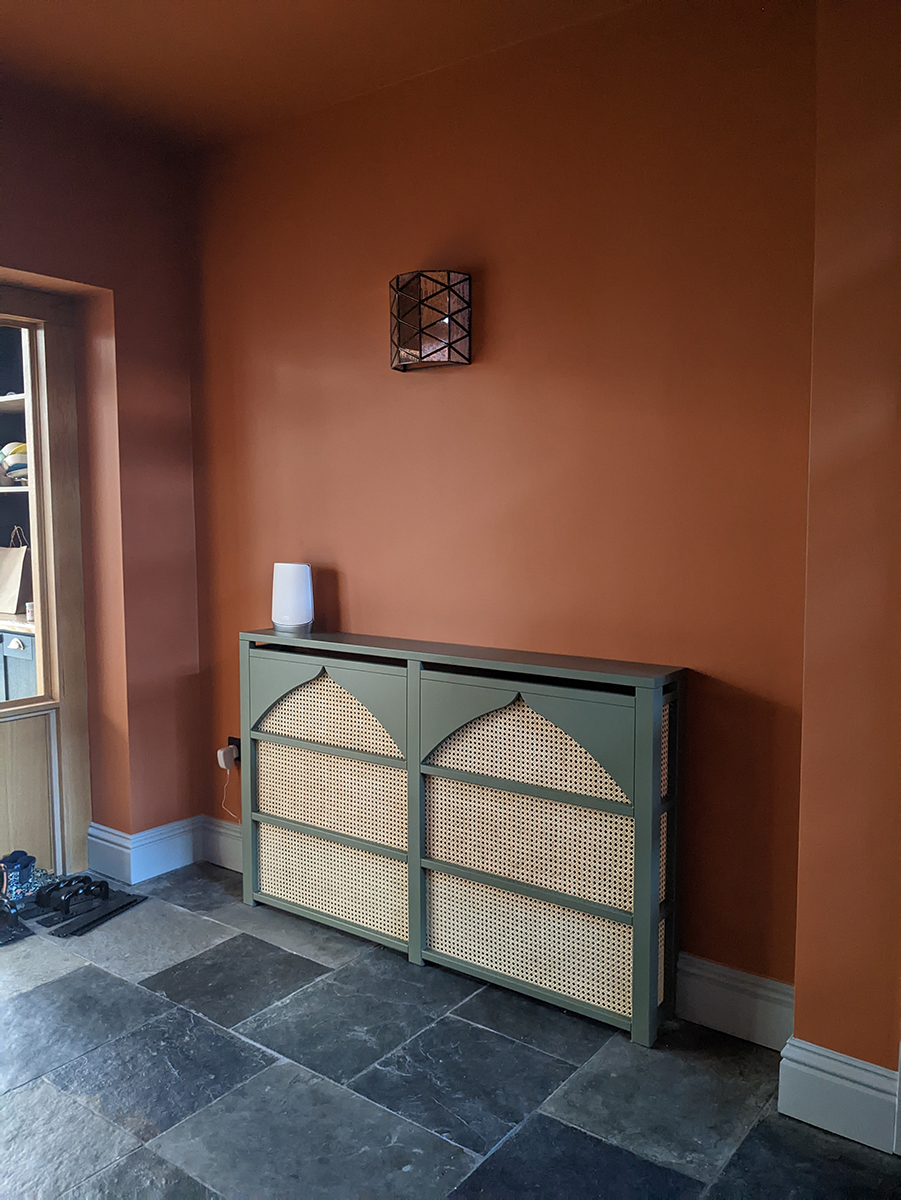
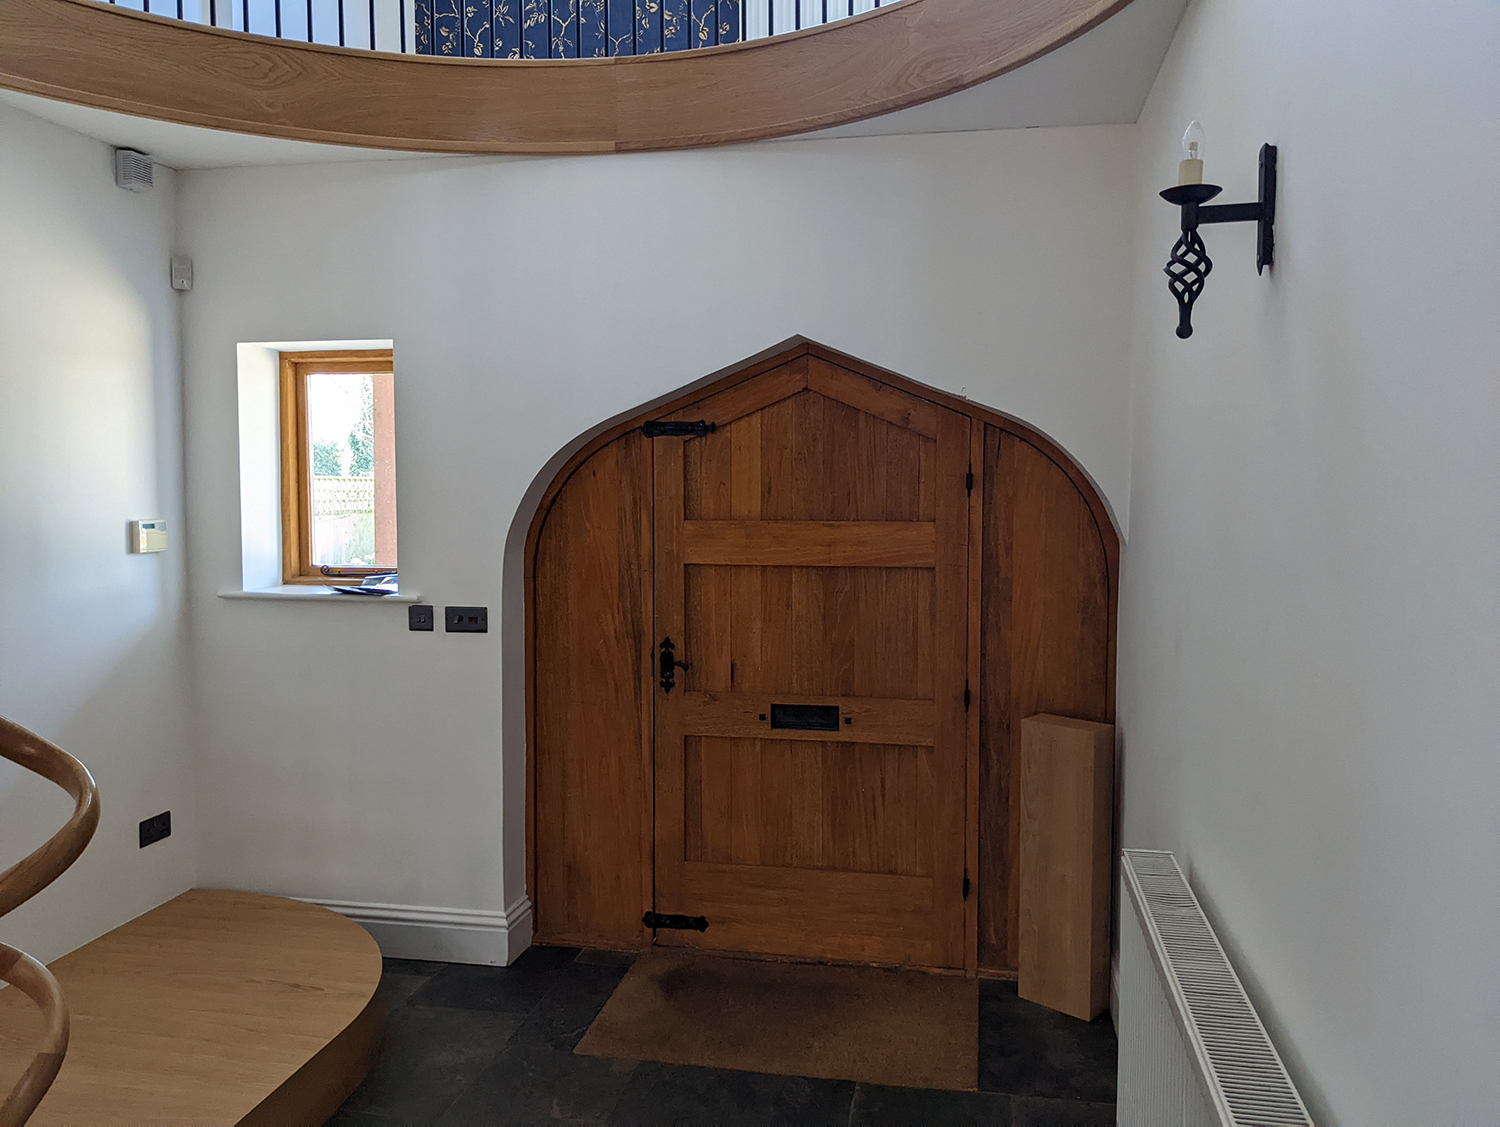
The clients needed the covers to be functional above all else, so we considered what we could use instead of MDF fretwork for the air grilles. We had to consider how to allow the maximum amount of heat from the radiators to come through the covers, and what would be the best material to achieve this. Rattan or cane is a very on trend and much used material in interiors at the moment, but it is also perfect for the grilles in radiator covers as the many small holes in it let the heat through. It’s lightweight and wouldn’t be damaged by being close to the heat, so it is perfect for this use. We chose spray painted MDF for the main body of the covers as it is another lightweight and durable material, and the solid spray painted colour would look great when paired with the more delicate cane. Materials decided, next came the shape, colour and style. Colour wise, we opted for a green which contrasts with the orange based red we had chosen for the walls of the hallway and landing, as green is opposite red on the colour wheel and compliments it well. The red on the walls is Little Greene’s Pot Red, which isn’t a vibrant red at all, it’s a muted and quite restful shade. We felt a similar ‘knocked back’ or toned down shade of green would work well with the muted red on the walls, so we chose Sage Green from Little Greene. The colour has some black added to it, which desaturates it and makes it another restful shade, whilst still providing the contrast we wanted. Next, we thought about the shape of the covers - they needed to be slightly larger than the radiators themselves to allow air to flow around them, and as the radiators are long rectangles, the new covers could be in danger of looking fairly square and boxy. We wanted a softer shape, so we took inspiration from the unusual front door of the house, which has a curved arch at the top and looks quite Moorish in design. Here’s the front door: |
||||
 |
||||
|
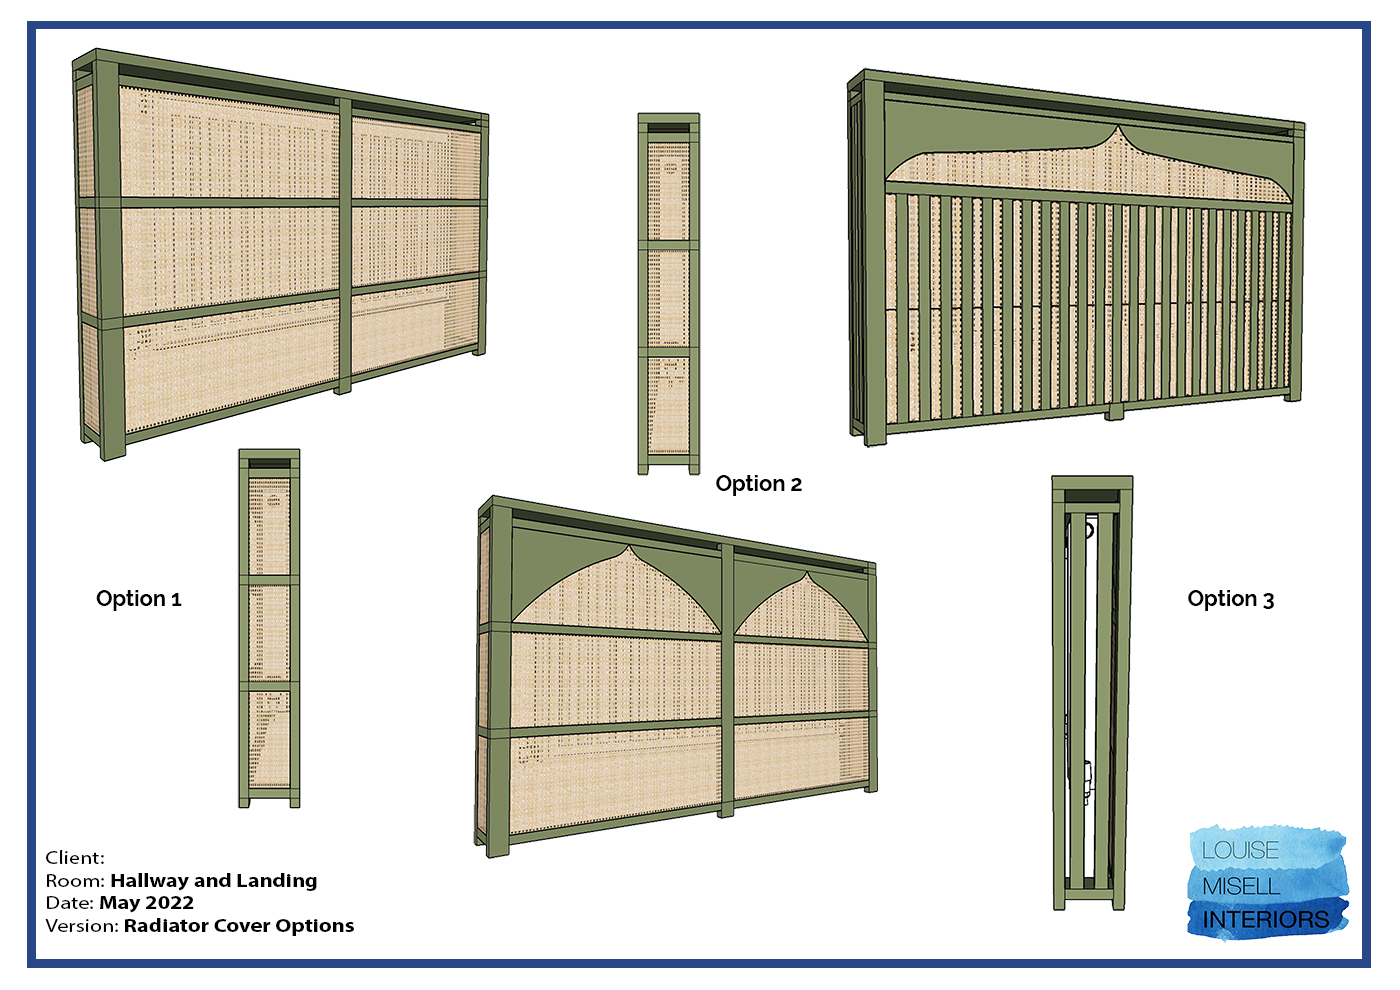
We used this arch shape as a motif for the radiator covers, and eventually for the bookcase. We produced three design options for the radiator covers which the clients could choose from, with two based on the curve of the front door and one with straighter lines in case they weren’t keen on the curve. |
||||
 |
||||
|
This is the one they loved and we had made for them: |
||||
 |
||||
|
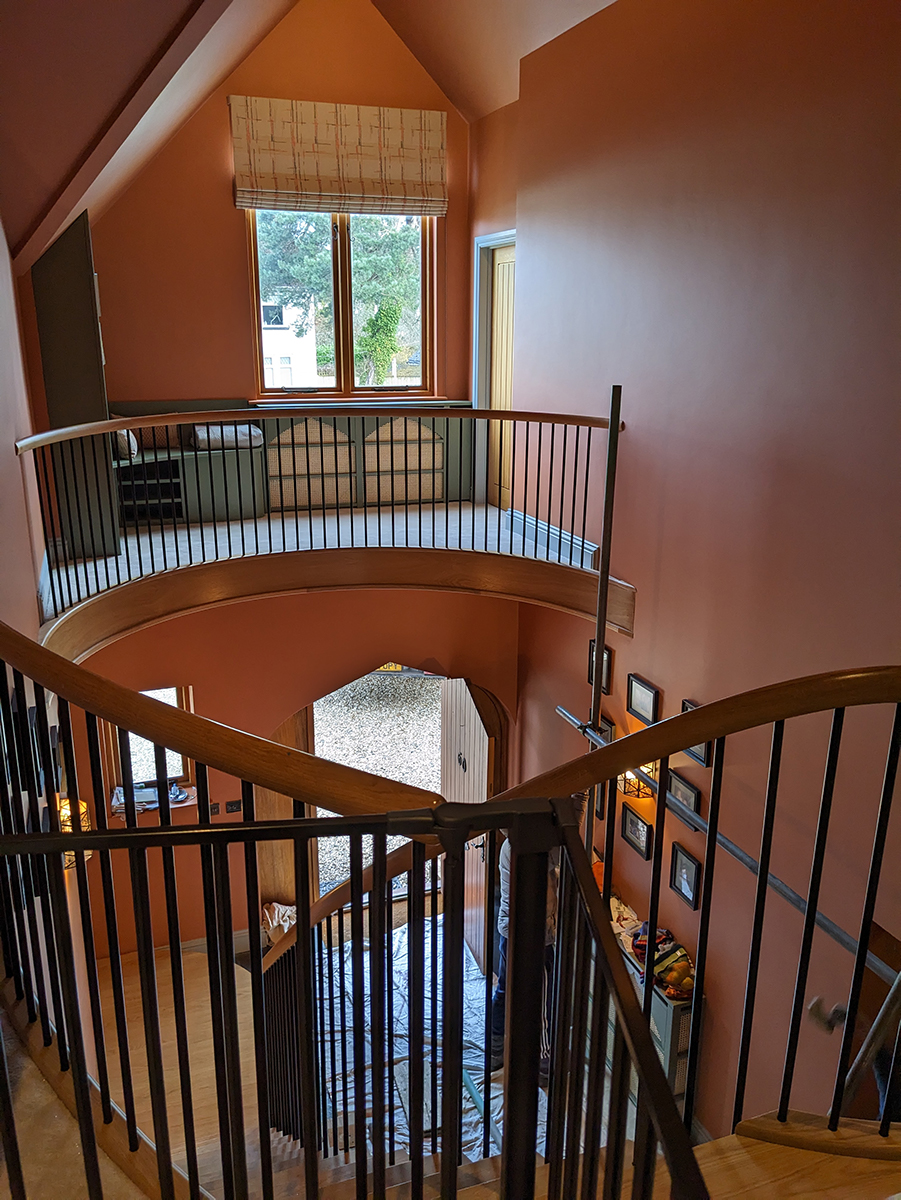
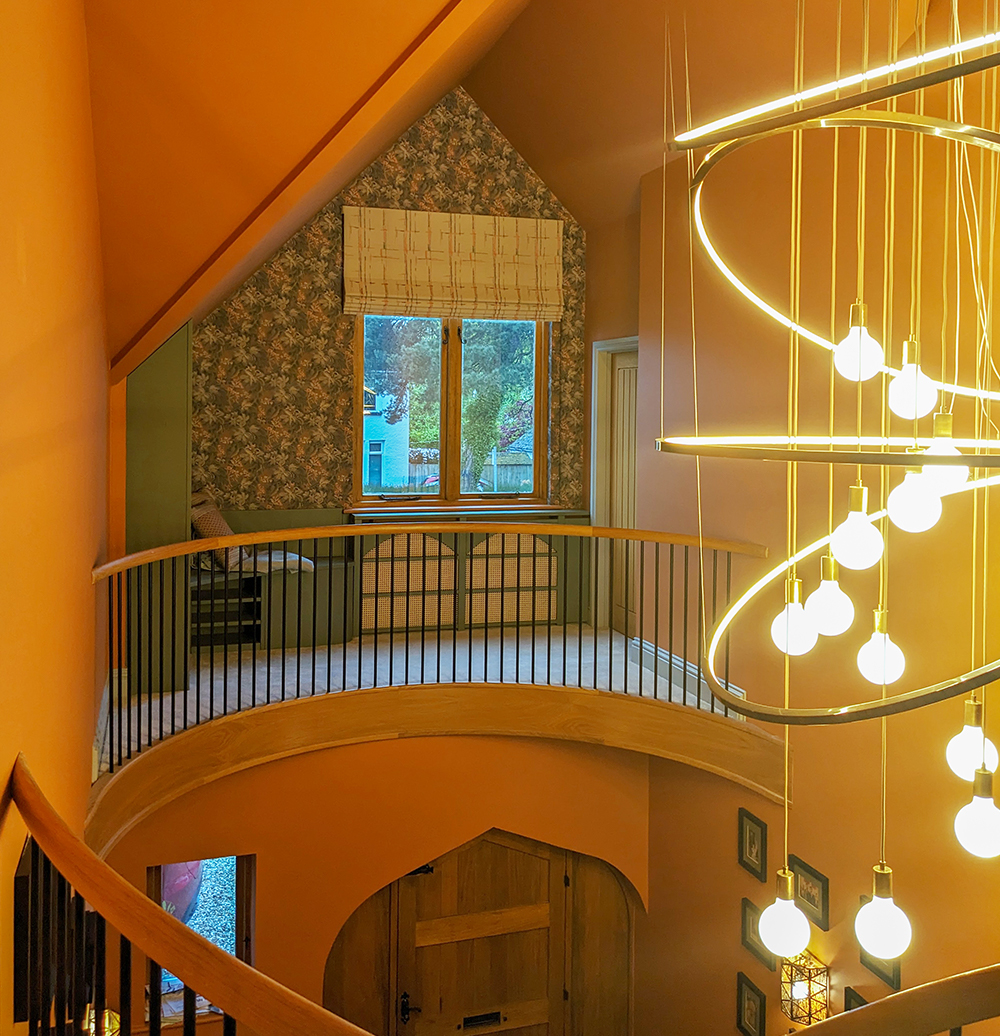
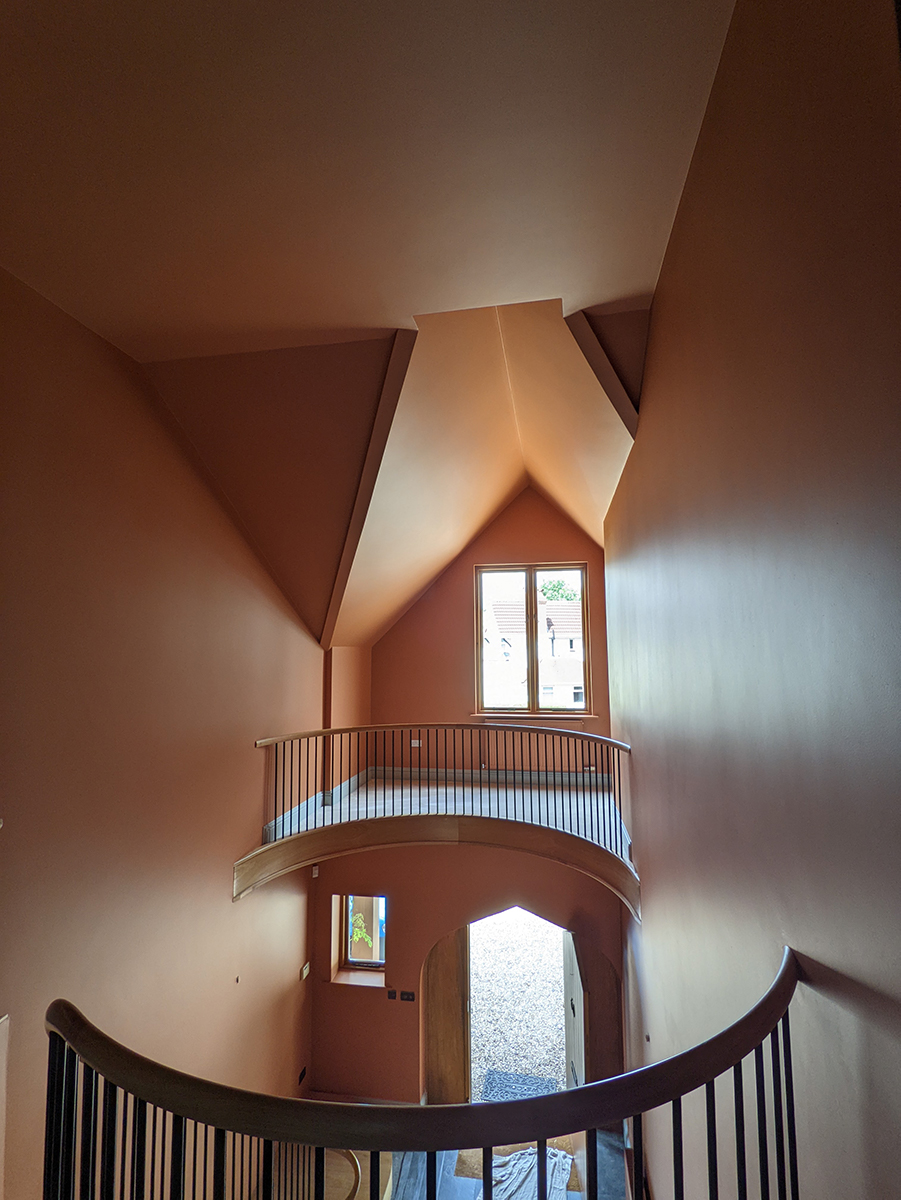
Once the design of the radiator covers was agreed, we then had to design the bookcase/window seat for the mezzanine, as this would be built by the carpenter at the same time as the radiator covers. The shape of this piece was largely dictated by the space - the slope of the ceiling, the width of the mezzanine and the space left after the radiator cover was added. Here’s the mezzanine before the bookcase was built: |
||||
 |
||||
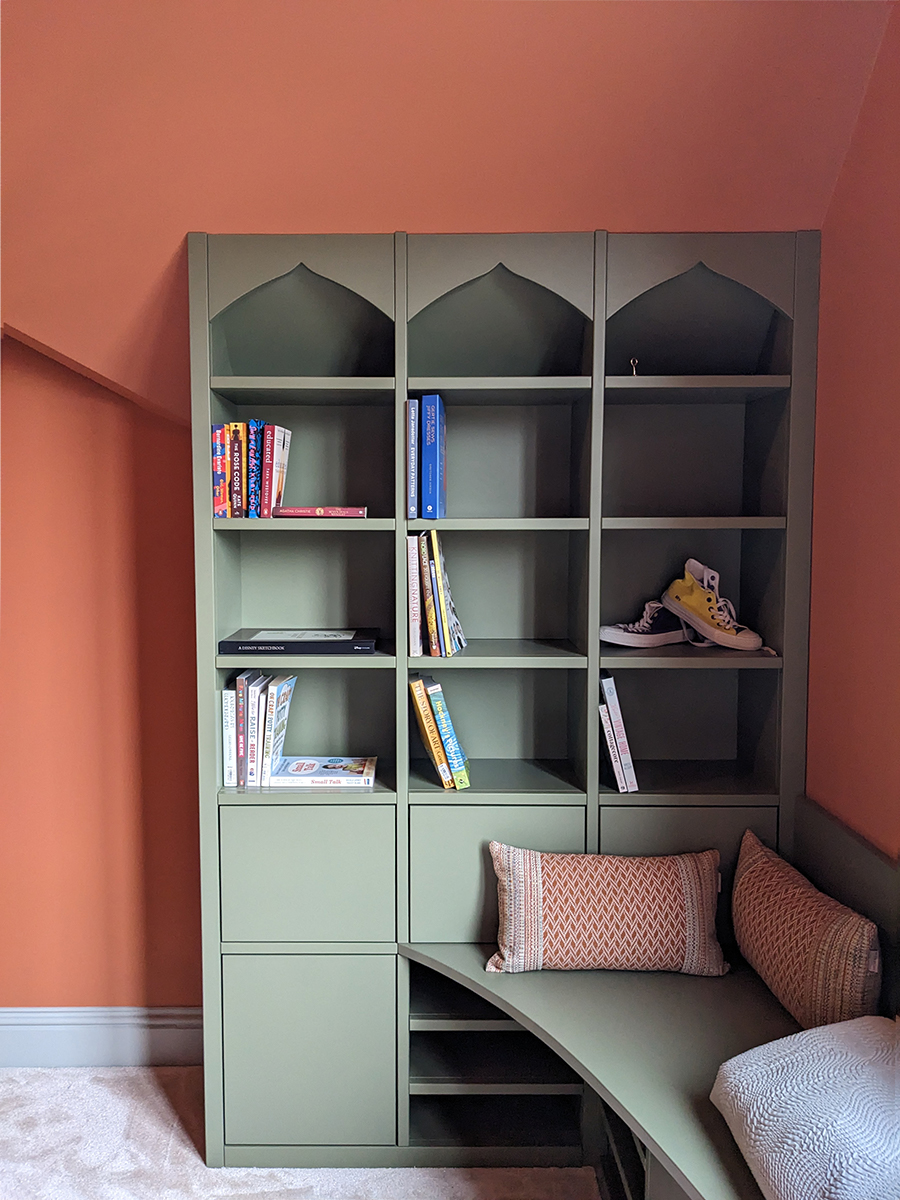
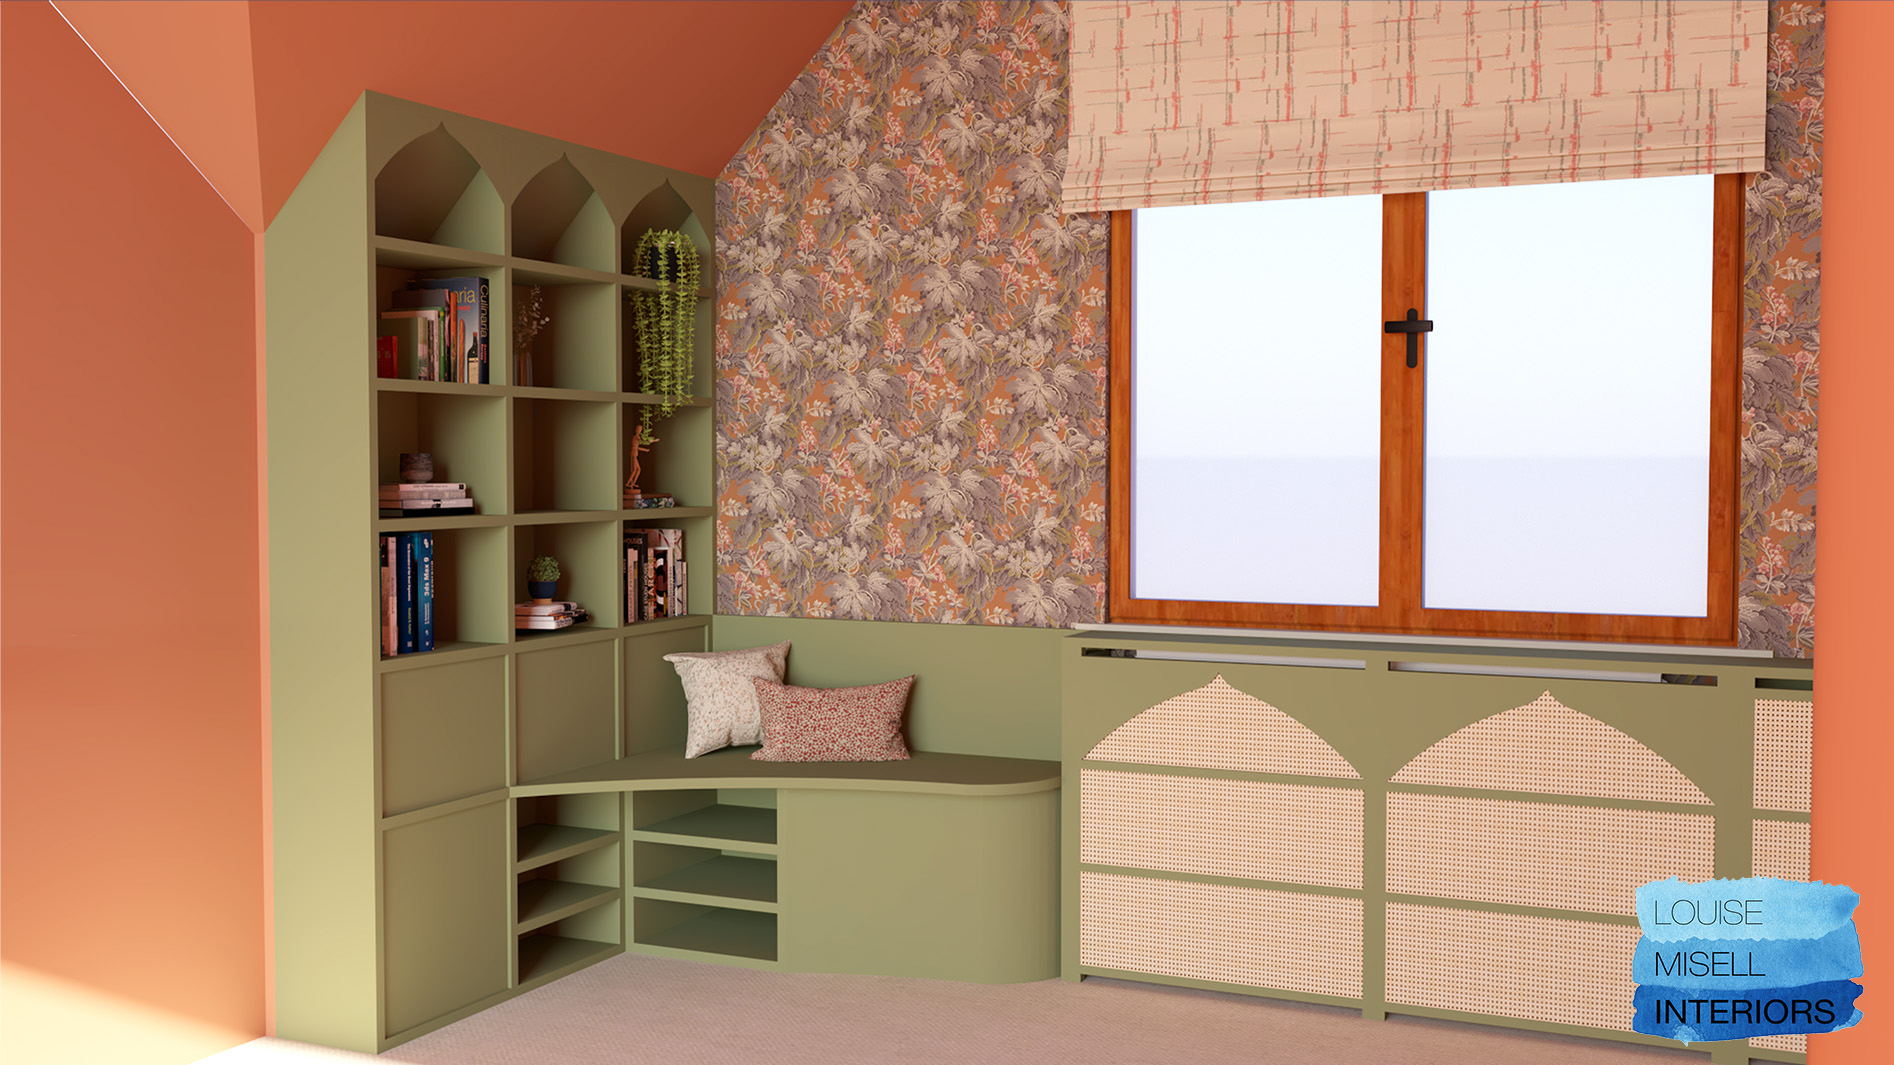
We used the same arch shape as we had on the radiator covers, so that the pieces would use the same visual language and work together cohesively. The clients wanted a mixture of storage and open display space, along with the seat positioned to look out of the window. The radiator was under the window, so this meant the only place for the window seat would be to the left of the window, and the bookcase itself would be along the small ‘nib’ of wall at the end of the ceiling slope. It was important that the bookcase didn’t protrude too far across the mezzanine as we were conscious that it was next to the balustrade, and we didn’t want to provide an opportunity for the couple’s young children to climb on the bookcase and go over the railings. |
||||
|
We designed a mixture of open shelving and cupboards with doors so that some items could be hidden away. We added a curve to the window seat to soften the angular lines but also to provide a seamless transition from the depth of the bookcase to the depth of the radiator cover. We added some lower level shelving under the window seat and below the main body of the bookcase which was for the children to store and access some of their own books. The whole concept was that the family could sit here and read together, or the space could be used by the adults for a peaceful moment when the children weren’t around. |
||||
 |
||||
|
The lower parts of the bookcase formed part of the back support for the window seat, which meant the three cupboards with doors would be leant upon when someone was sitting there. We wouldn’t be able to place handles on these cupboards as they would be uncomfortable to lean against, so we decided to use push-click concealed opening mechanisms instead of handles. That solved one problem, but the design of the seat meant that the cupboard closest to the window would be the one most leant upon, and we were worried that someone leaning on it could easily push it open with their backs if we used the push click mechanism here. This would be inconvenient and uncomfortable, so we addressed this by using a separate magnet to open this cupboard. One half of the magnet was hidden inside the door, and the other half was stored on one of the shelves, ready to open the cupboard when needed. A simple but brilliant idea from our carpenter which solved the problem. |
||||
 |
||||
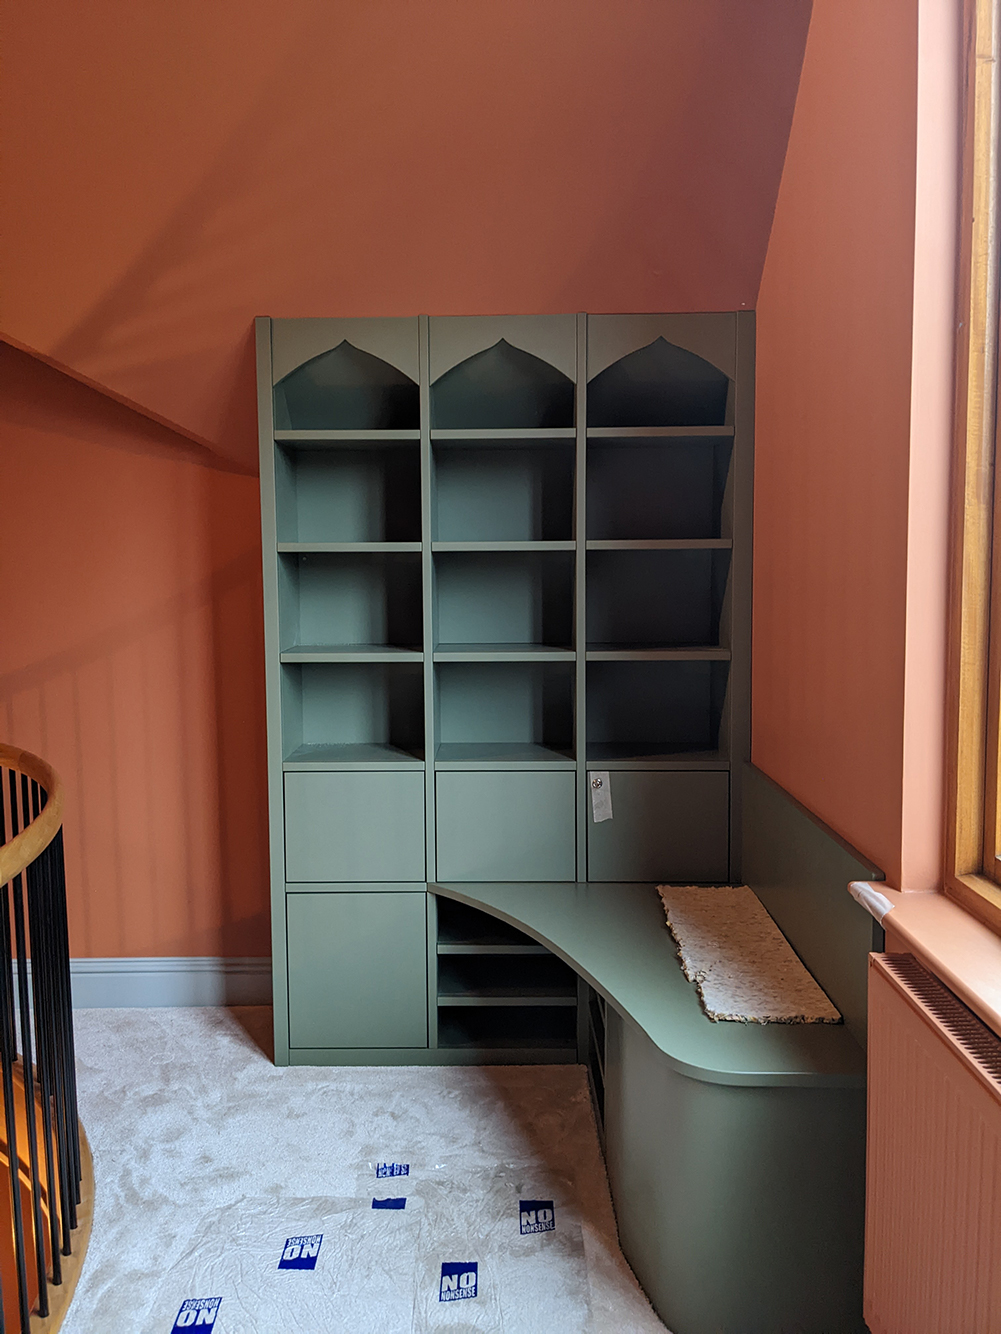
| the finished bookcase and the magnet taped to the front of the cupboards | ||||
|
We chose the same colour for the bookcase as we had for the radiator cover to make the pieces fit seamlessly together, so the design was ready to build. We called in our very talented carpenter and he made the covers and bookcase to perfection. These have yet to be styled and photographed properly, but here’s the finished carpentry: |
||||
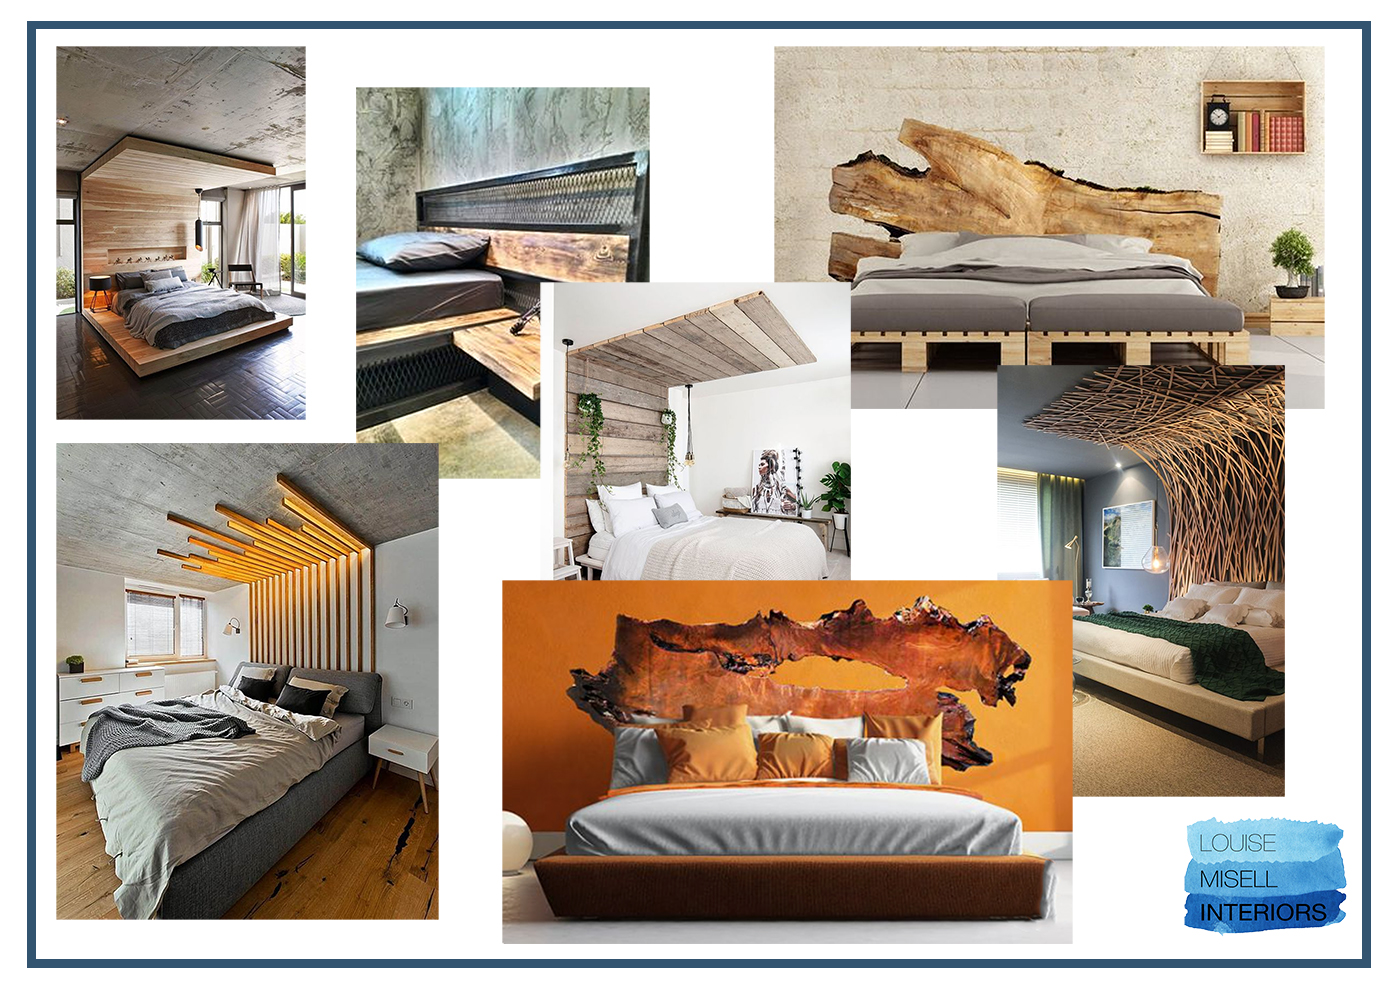
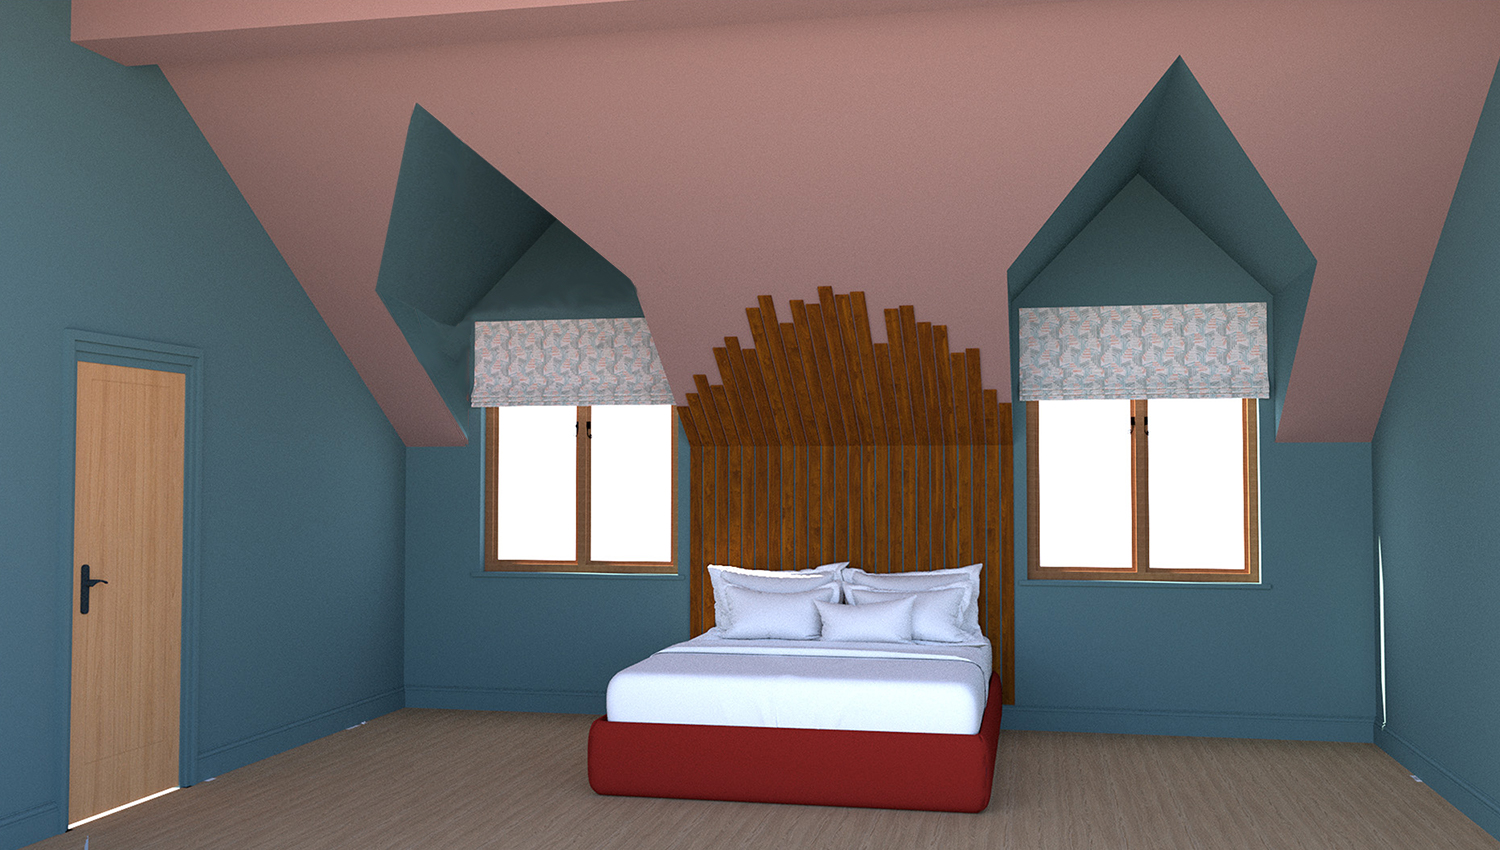
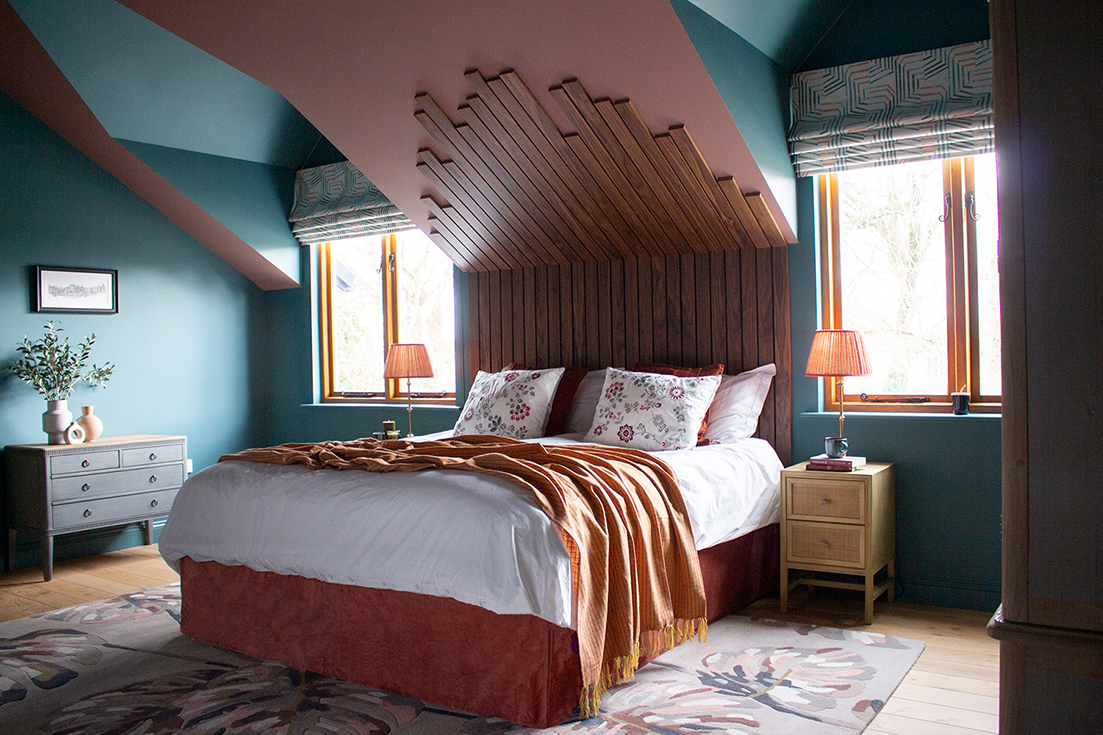
The final bespoke piece we designed for this home was the statement headboard for the main bedroom. We had decided to position the bed under the sloping roof and between the two windows to make the best use of the space, so the headboard would need to incorporate the slope of the ceiling. Placing the headboard here would be quite dramatic and make a real focal point of the bed. The client’s love of wood inspired this piece, with the Pinterest images they shared with us showing differing variations of headboards made from wood, and they requested that the piece not be blingy in any way. The headboard would have a relaxed style, but would still feel special and luxurious because it would be unique and made just for them. Here are some of the pictures from the Pinterest board they created and shared with me: |
||||
 |
||||
|
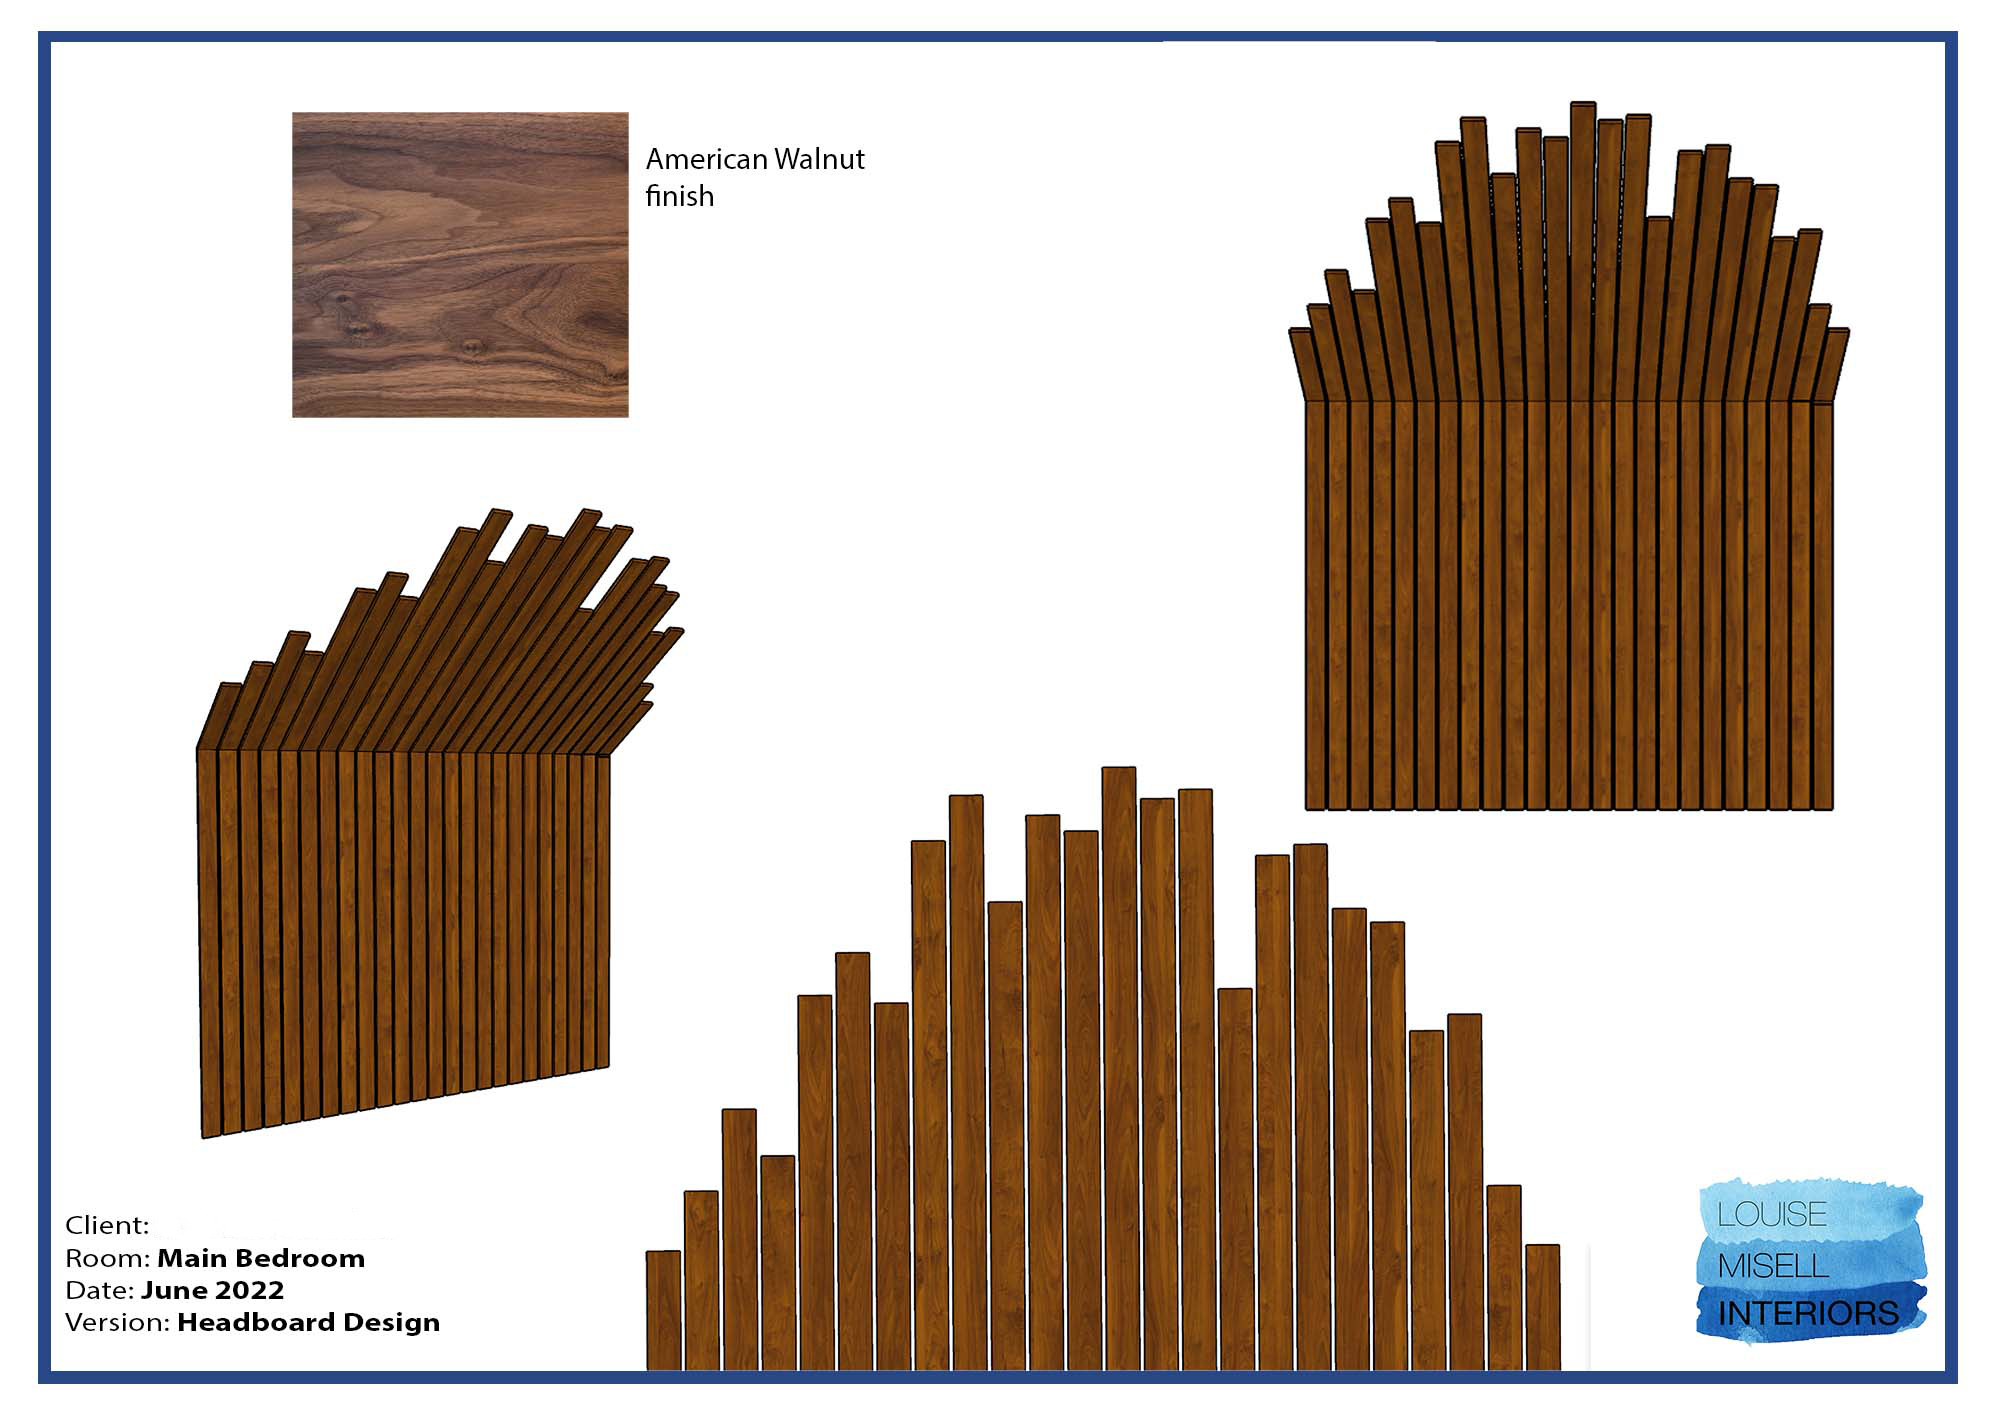
The clients both love waney edge or living edge wood, as you can see in a couple of the inspiration pictures they chose, and we actually commissioned a waney edge 10 seat dining table for them. However, there is already a lot of wood in the home with free flowing or organic shapes, and we felt that the headboard should be more structured. It would also mean that it would be more comfortable to lean against, as it would feel flat behind a pillow when installed. We suggested American Walnut as a finish for the headboard as it has a range and depth of colour similar to that of the waney edge table we were having made. It is also a contrast to the oak of the floor and door, and the woods used in other areas in the house, meaning the whole home wouldn’t be overwhelmed with oak. We had chosen Little Greene’s Tea With Florence for the walls, and we thought the darker wood looked great against the teal of the wall colour. Here’s our design for the headboard: |
||||
 |
||||
 |
||||
|
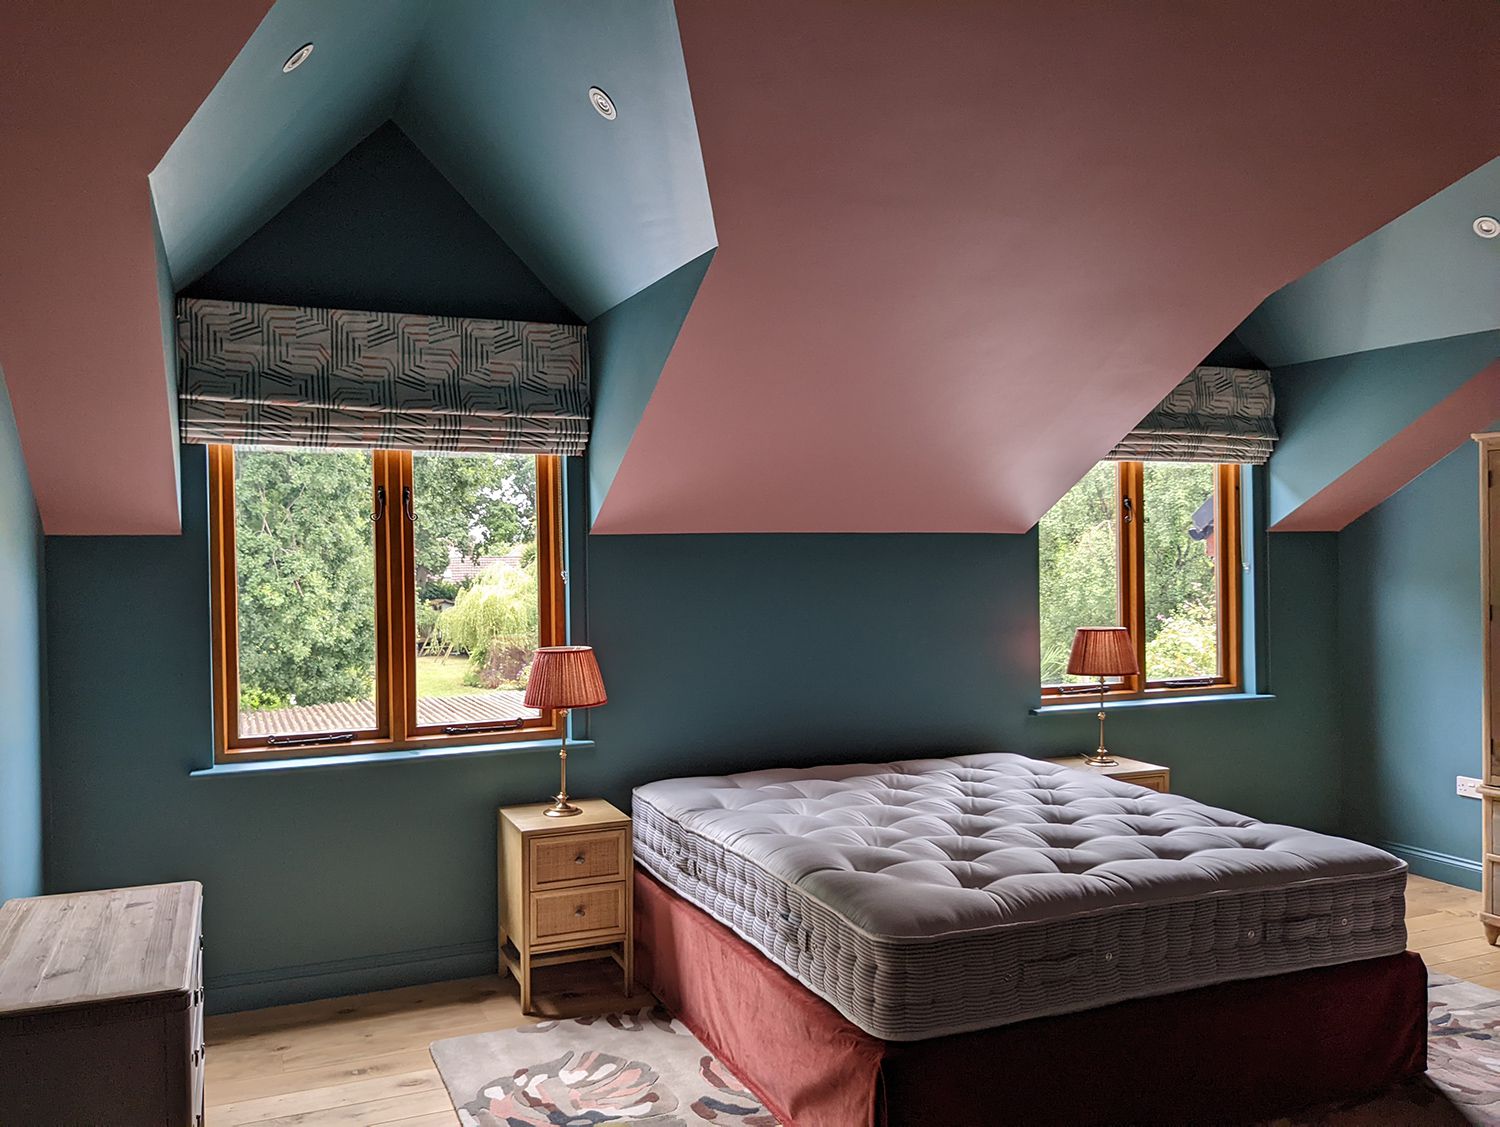
And here’s our design in the finished space: |
||||
 |
||||
|
These bespoke parts of the design of this home are now complete, but we are continuing to work with the family on this house, including installing a new main bedroom en suite and more bespoke storage in the hallway and landing. More blog posts are to come, so check back here for further updates. |
Welcome to the design blog, where you'll see posts about anything from the projects we are working on, to the latest fabric and wallpaper collections, and all things interiors related. We love colour, pattern, architecture and old buildings, and we love to share our finds with you.
Happy reading!