A week in the life of a designer

 |
|||
|
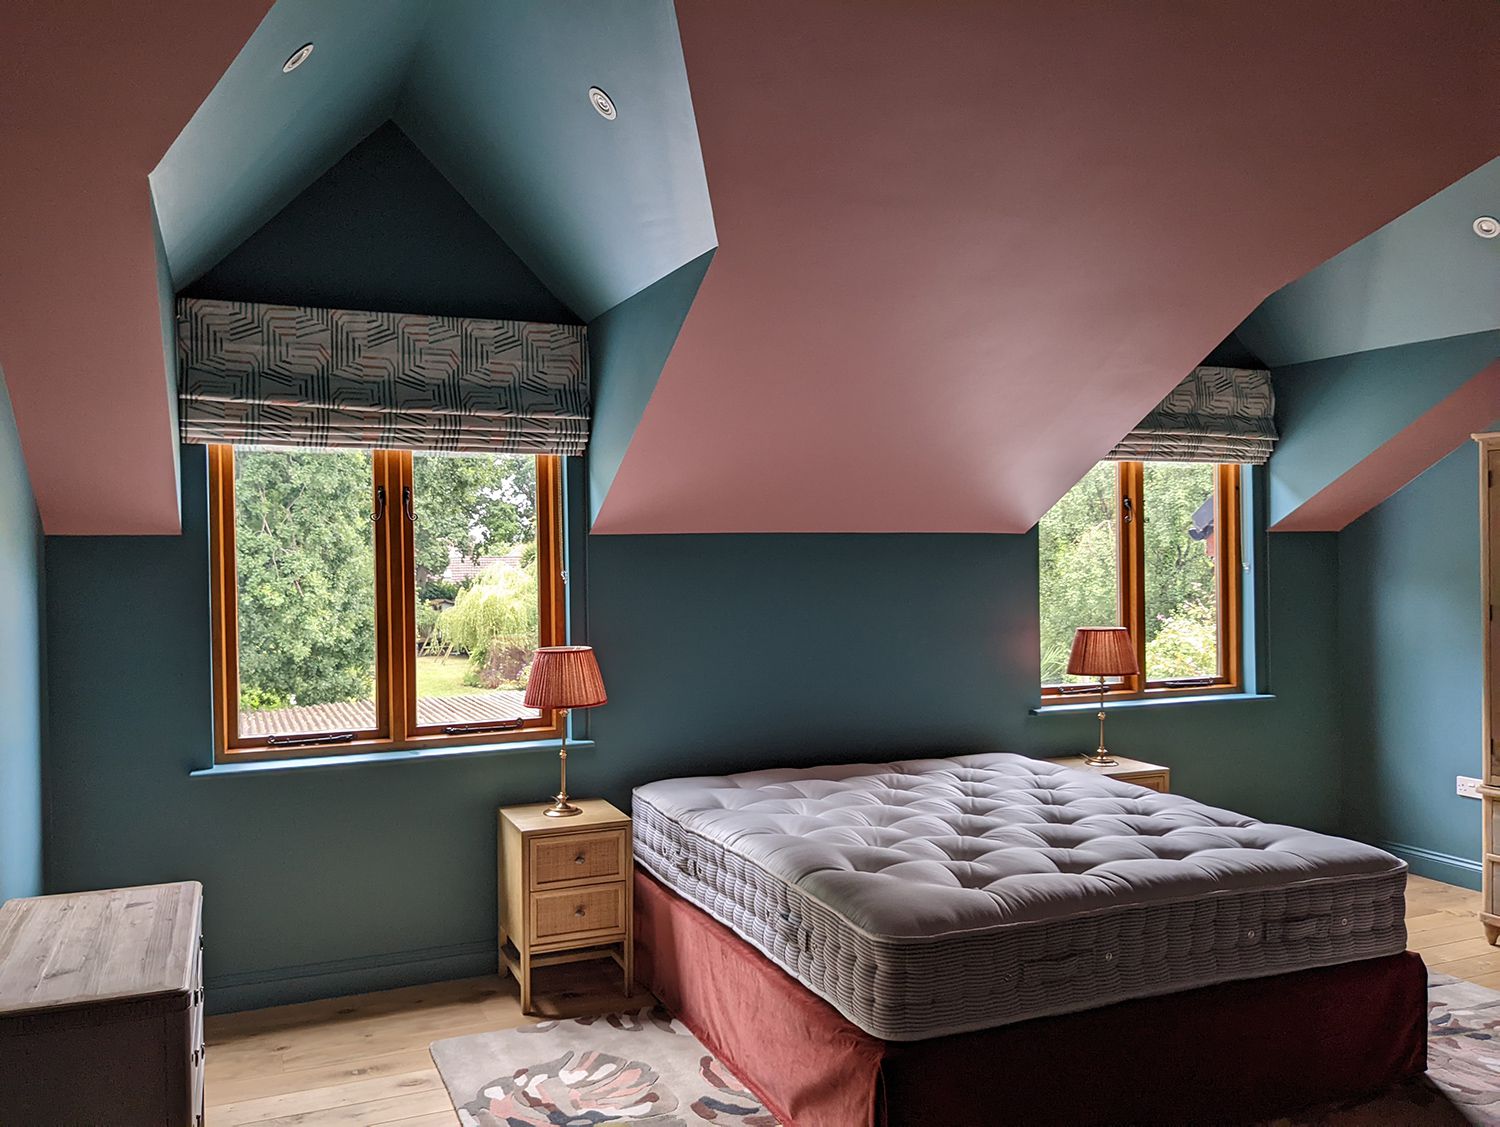
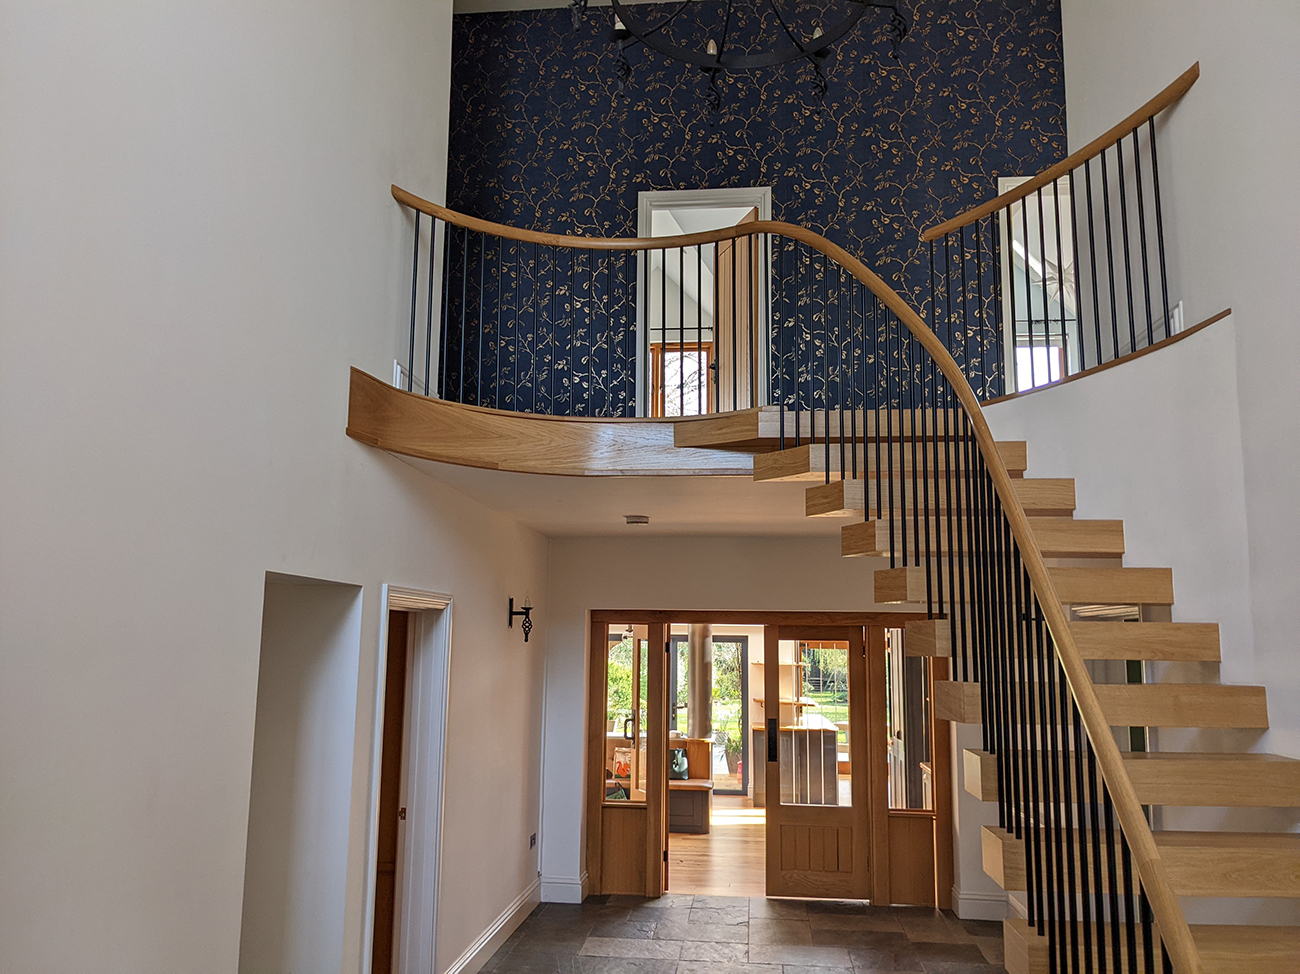
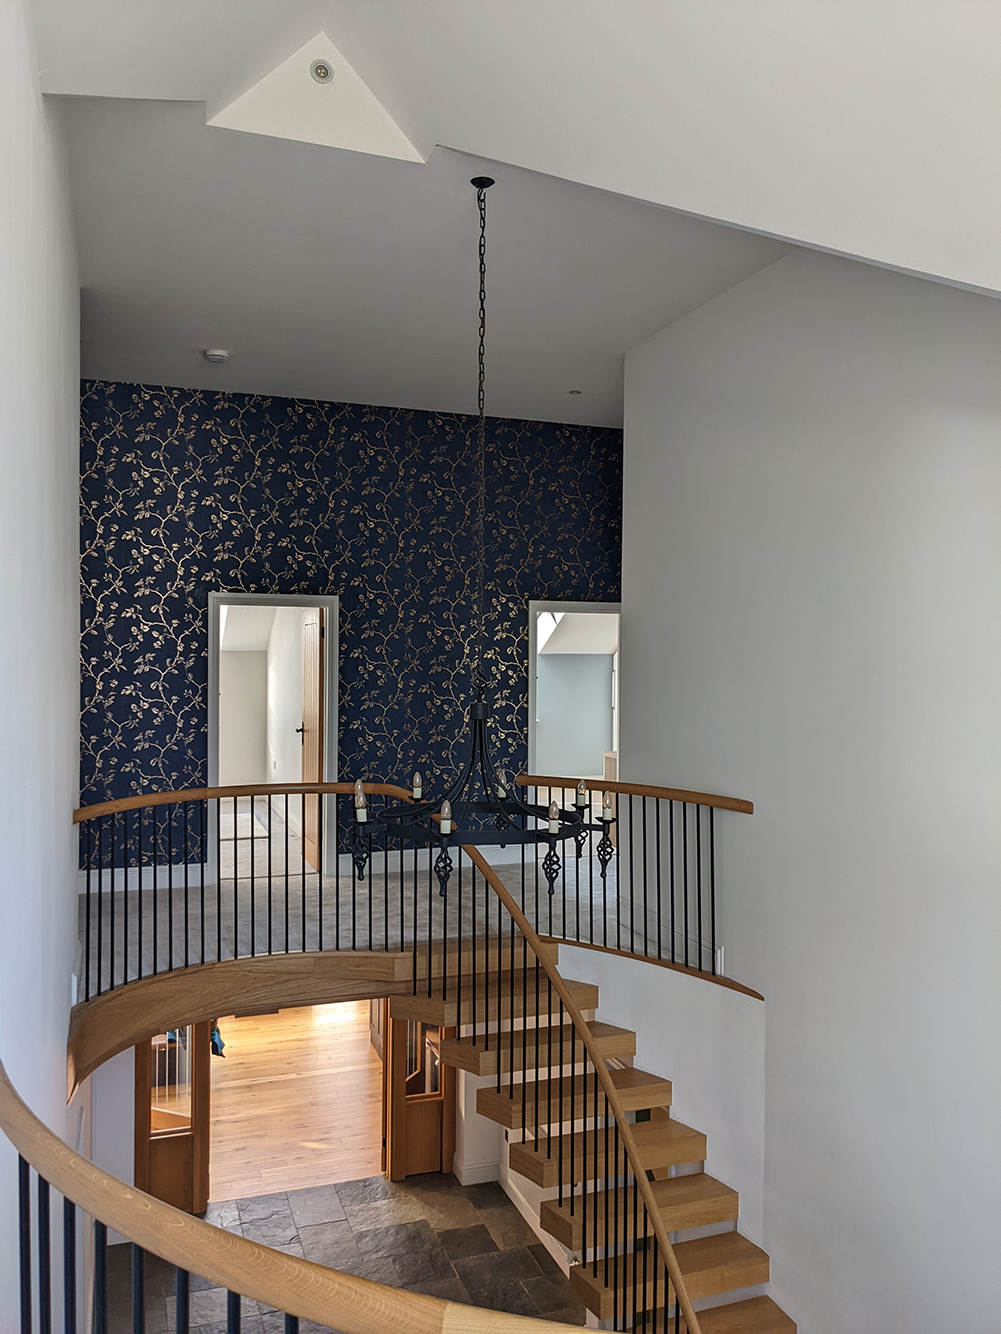
You may have seen from last month’s blog post that as part of the work on our ‘unique family home project’, we designed and installed a pretty special bespoke chandelier in the hallway. I thought you might be interested to see how this came about, and the steps that it took to get the piece made and installed. The first step was in our initial consultation meeting, when the clients said that they wanted us to design something unique for them. The house they had just bought had a double-height entrance hall, open from the ground floor to the roof level, which needed something large and impressive to suit the expanse of space. You can see from our ‘before’ pics of this hallway that the existing light fitting was just too small, dated in its design, and not tall enough to balance well with the impressive staircase. I agreed with the clients that something new and much larger was needed. |
|||
 |
|||
 |
|||
|
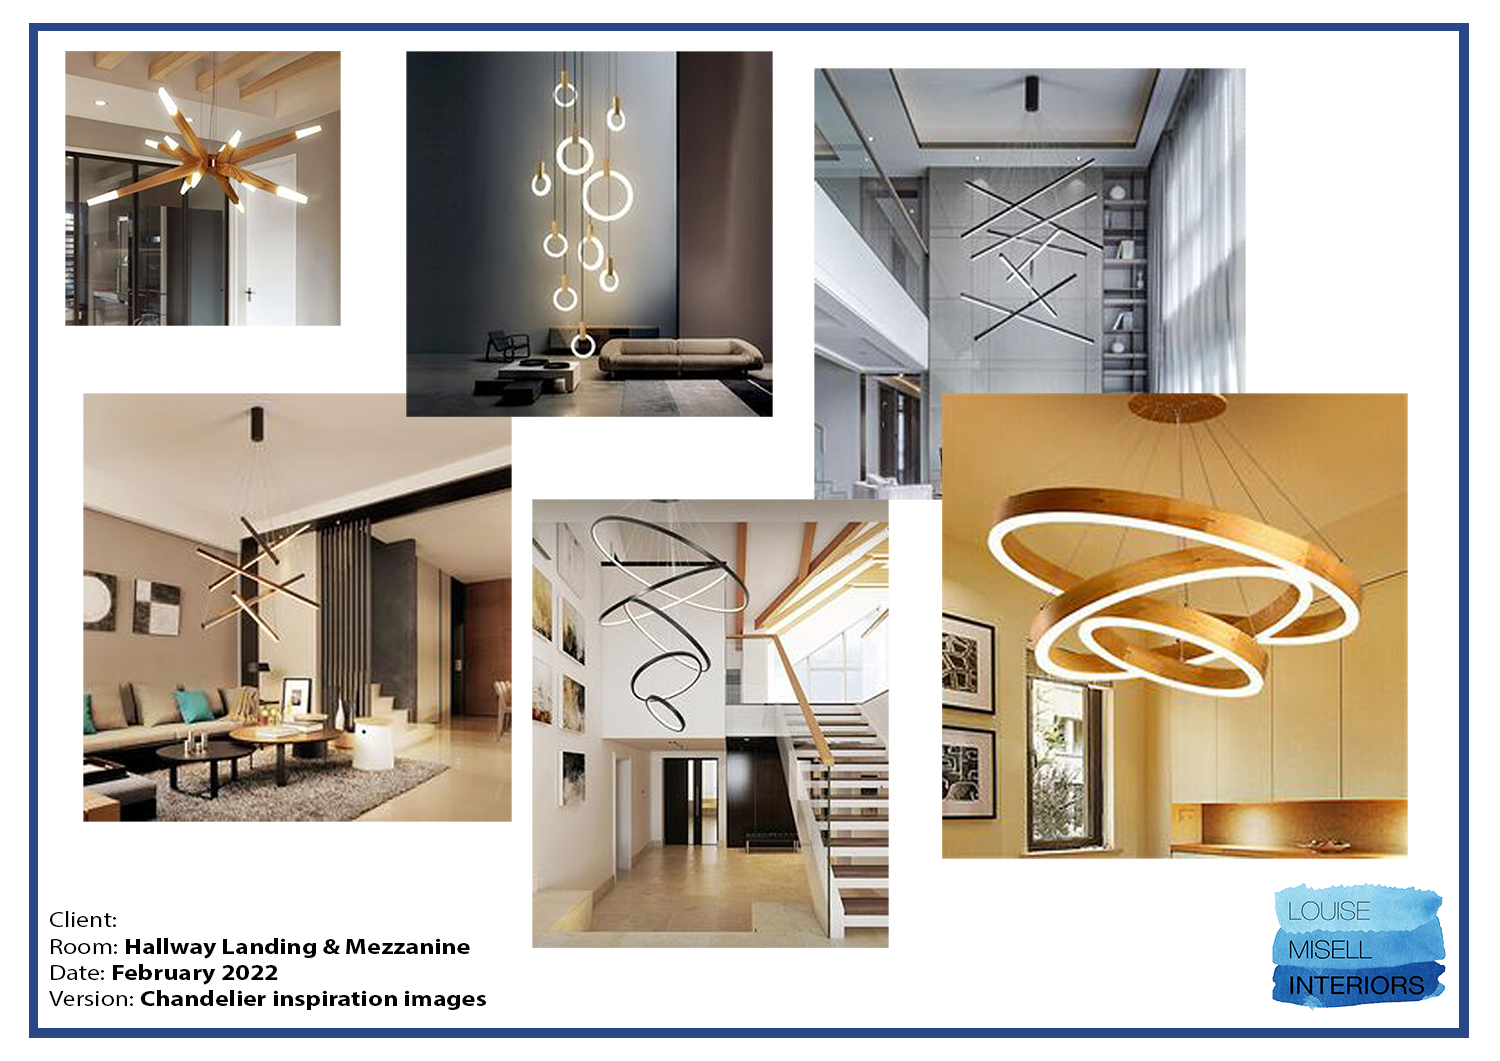
The clients had some ideas of what they wanted, and sent over some inspiration pictures and a short wishlist. They wanted something “modern, with a wow factor but nothing bling” (I feel this sums up their entire approach to this house, which has produced some beautiful results). They wanted long lasting LED bulbs (because who wants to be going up a ladder that high to change a bulb?), they wanted the fitting to give out lots more light as the hallway is quite dark, they also wanted the type of bulbs where the filament wasn't exposed (so opaque or covered), and something that their growing children wouldn’t be able to grab from the staircase. Here are the pics they sent to me to give me an idea of what they were looking for: |
|||
 |
|||
|
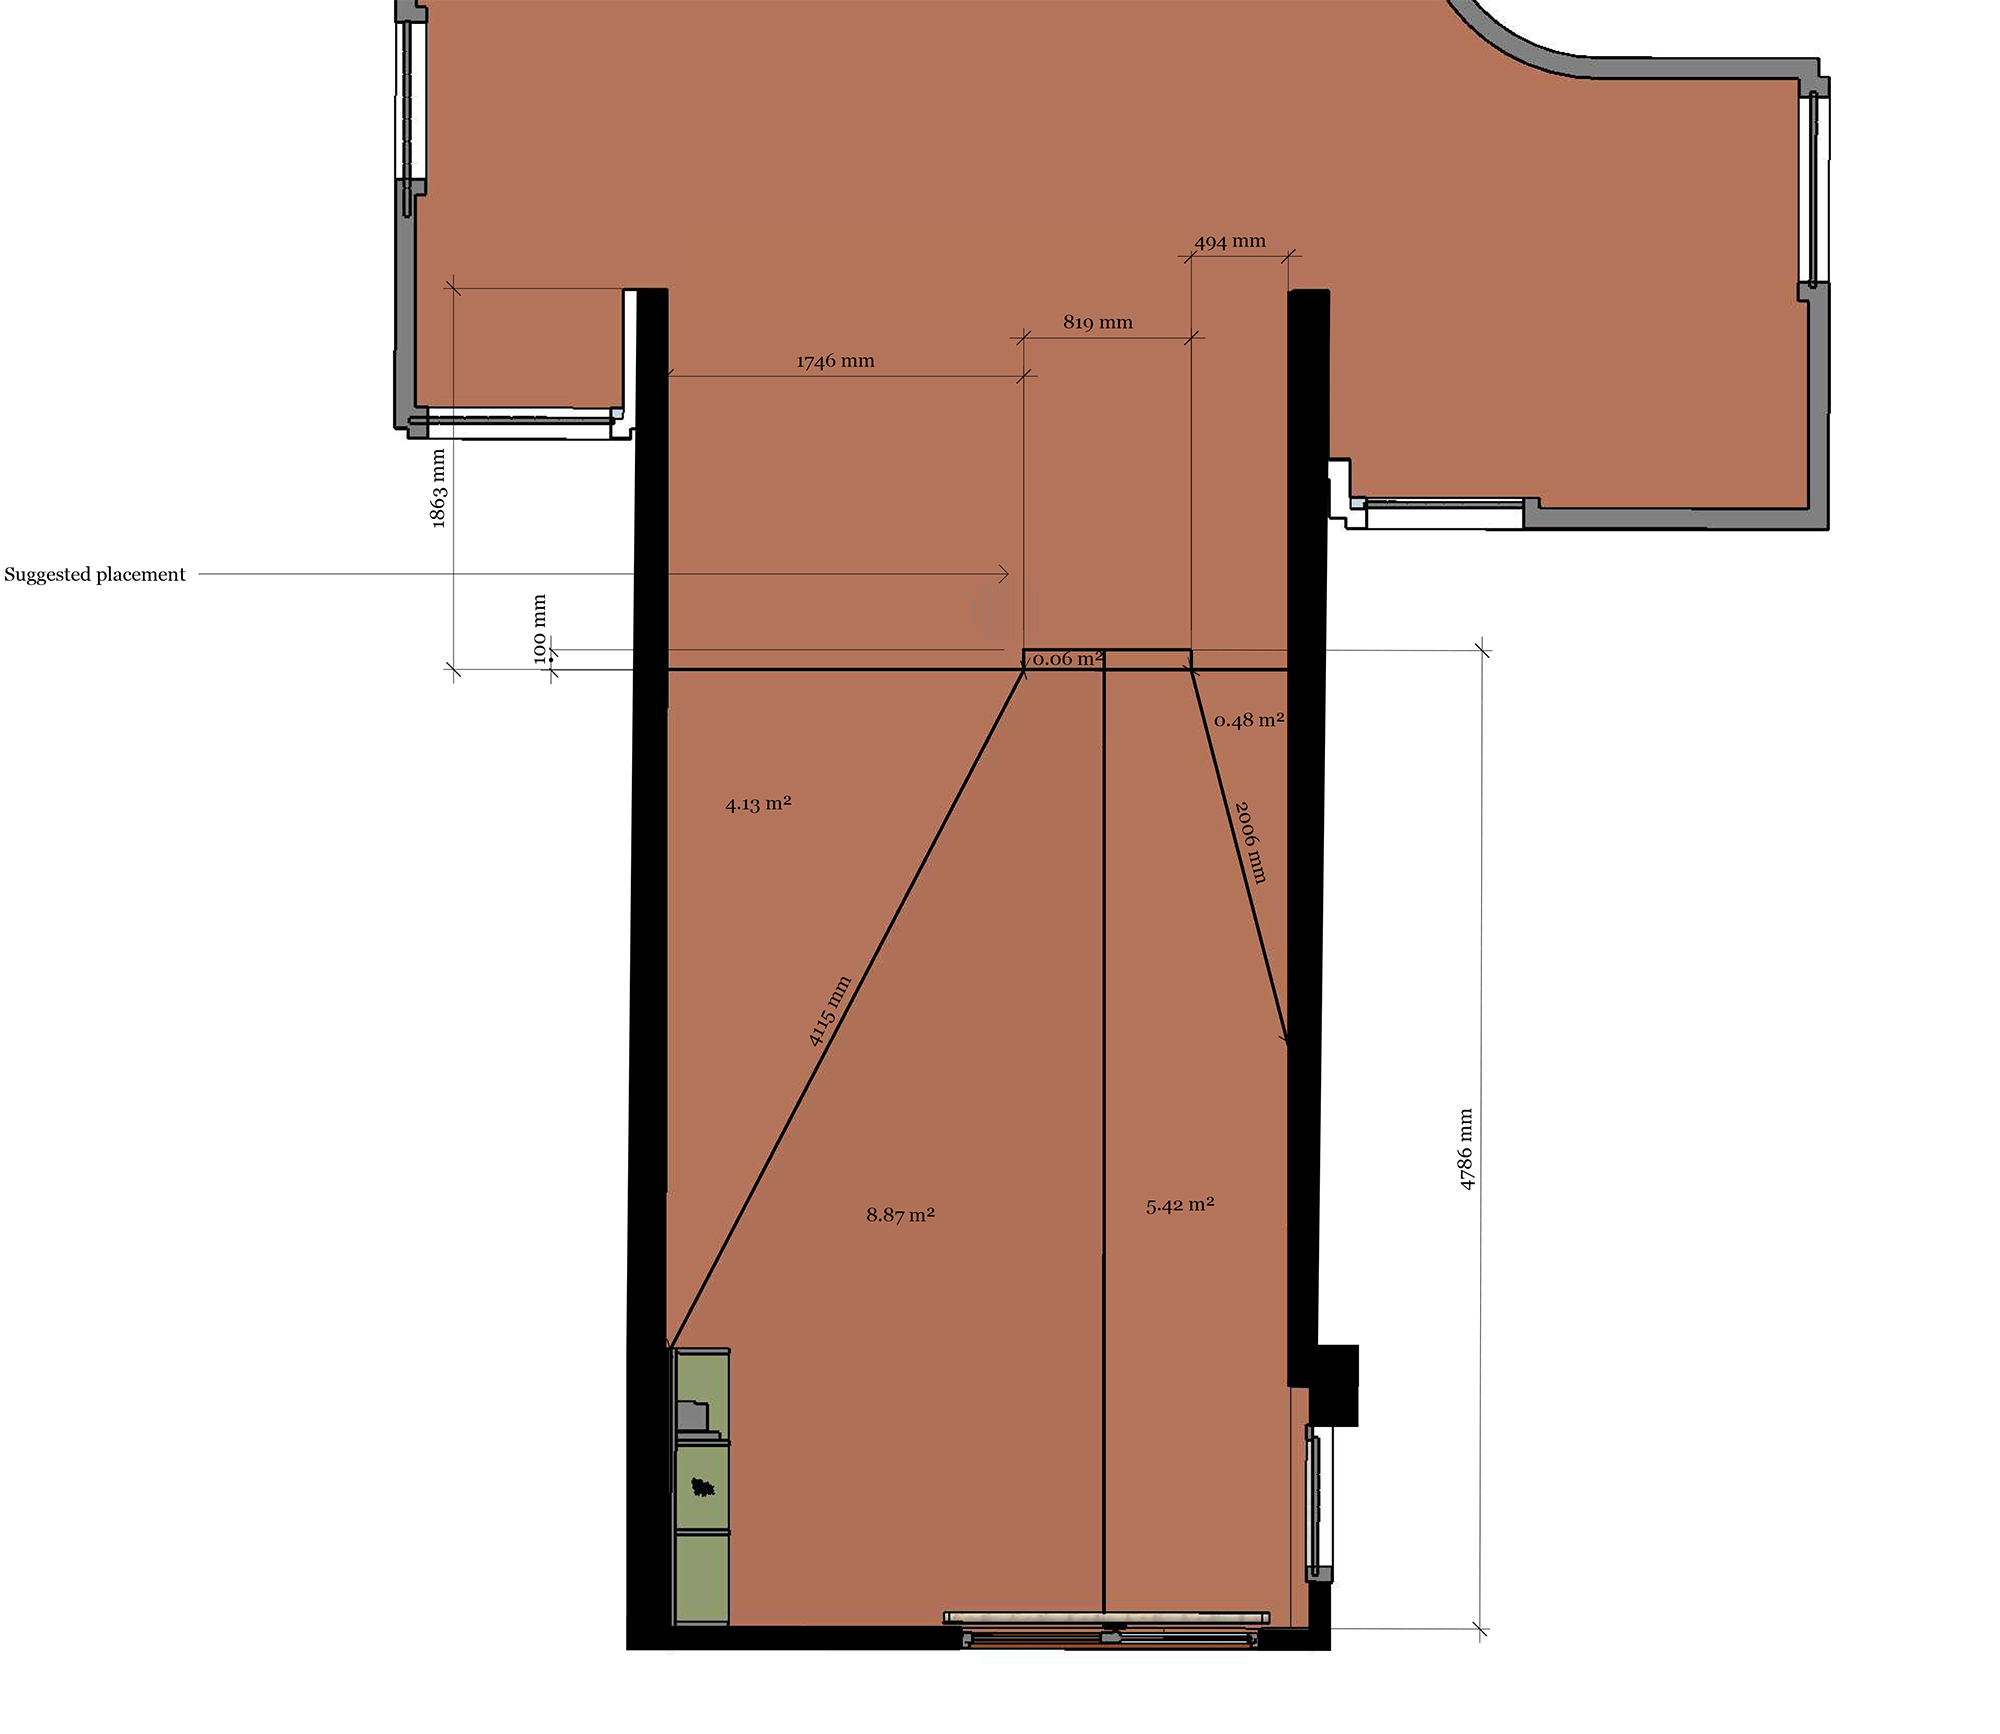
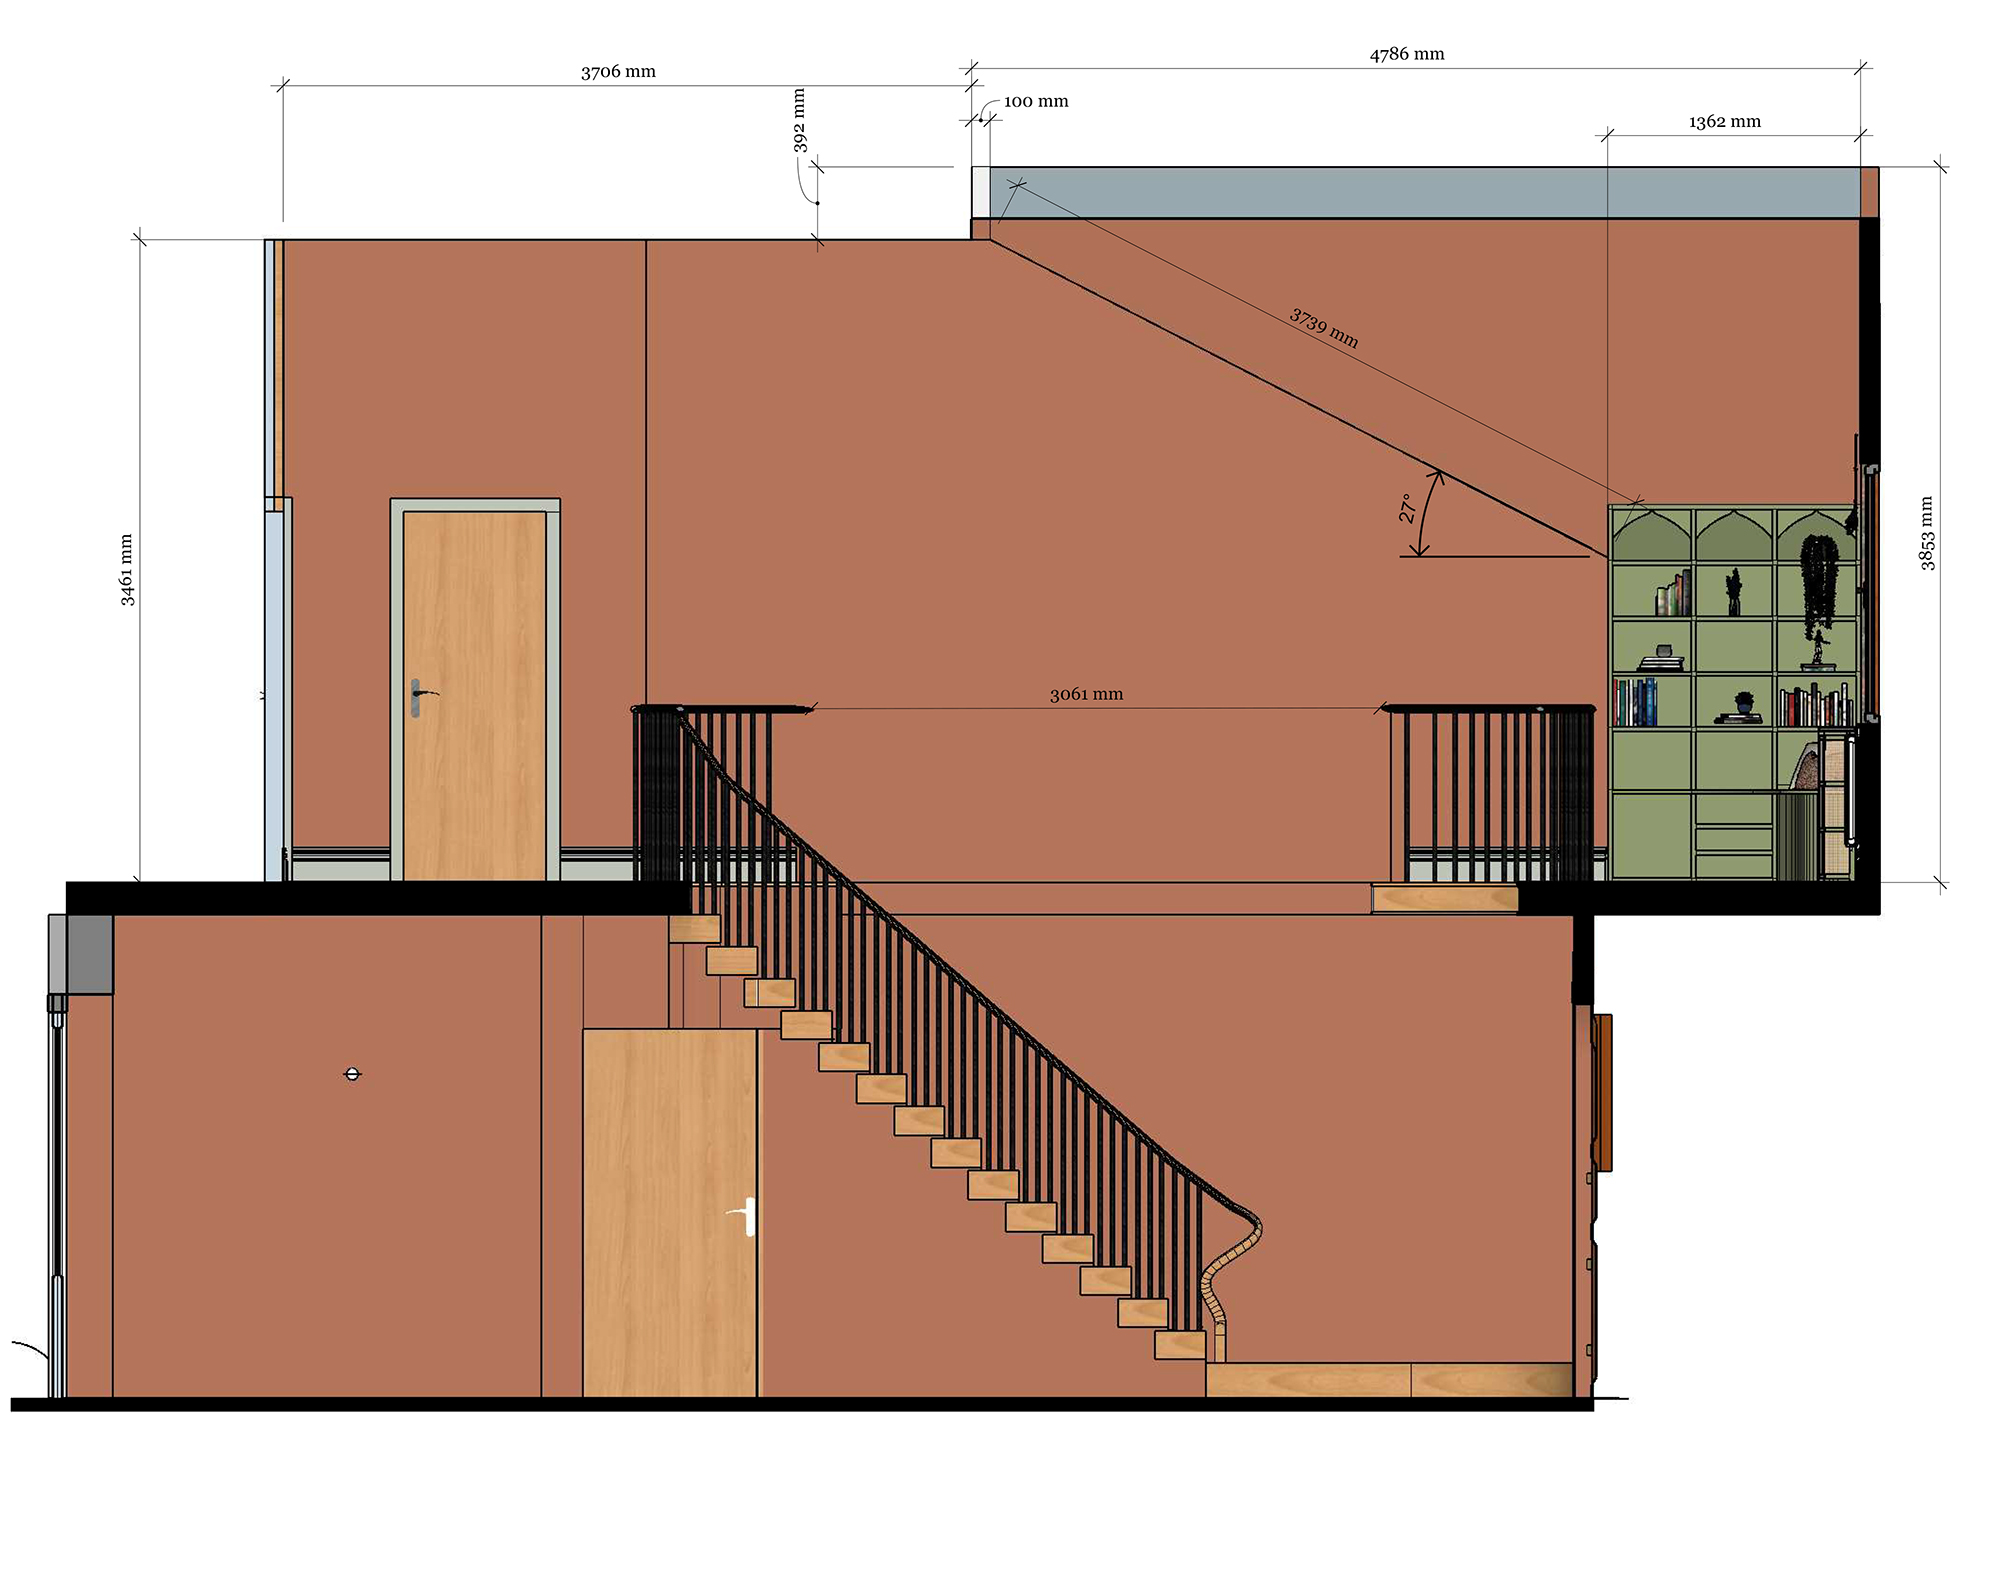
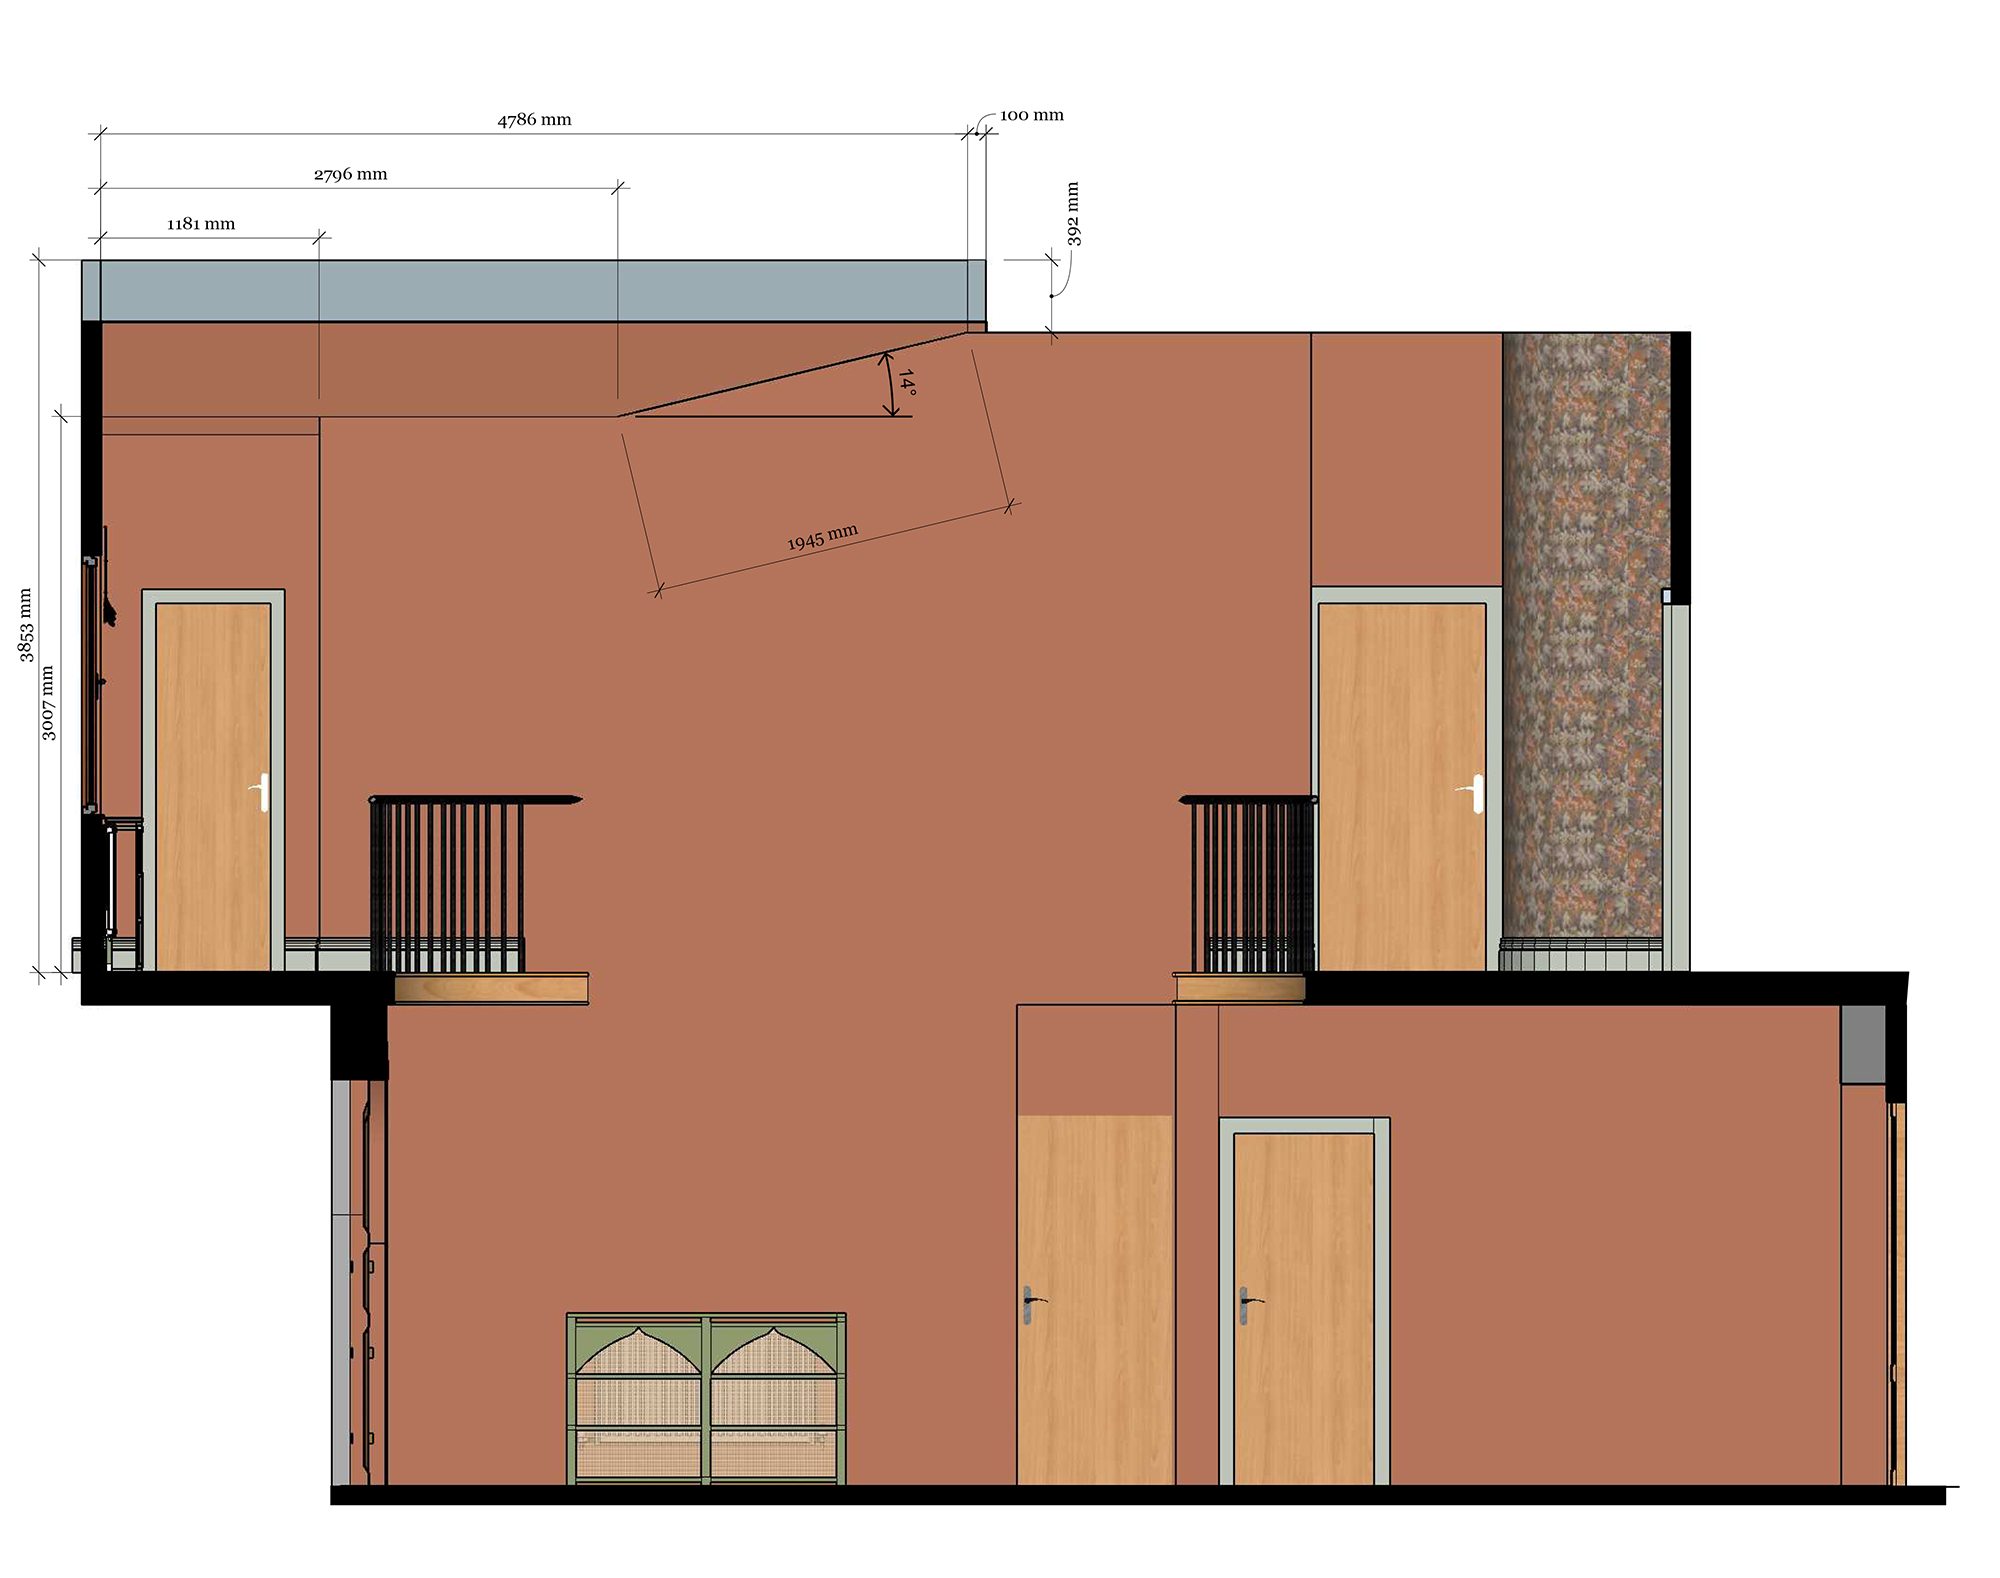
This house was already pretty unique before we started working on it, and had previously had a lot of beautiful wood installed (for example the staircases, the worktops in the kitchen, and the shaped front door) and although the clients were quite keen on the idea of a chandelier made from wood, I felt that adding more wood would be too much. A metal style would work well, as it would introduce a different finish and create a contrast with all the wood in the home. Once we’d discussed this and the clients had agreed, I set to work using my design software to create a scale model of the hallway (my assistant and I had fun trying to accurately measure and work out the angles of such a tall space). |
|||
 |
|||
 |
|||
 |
|||
|
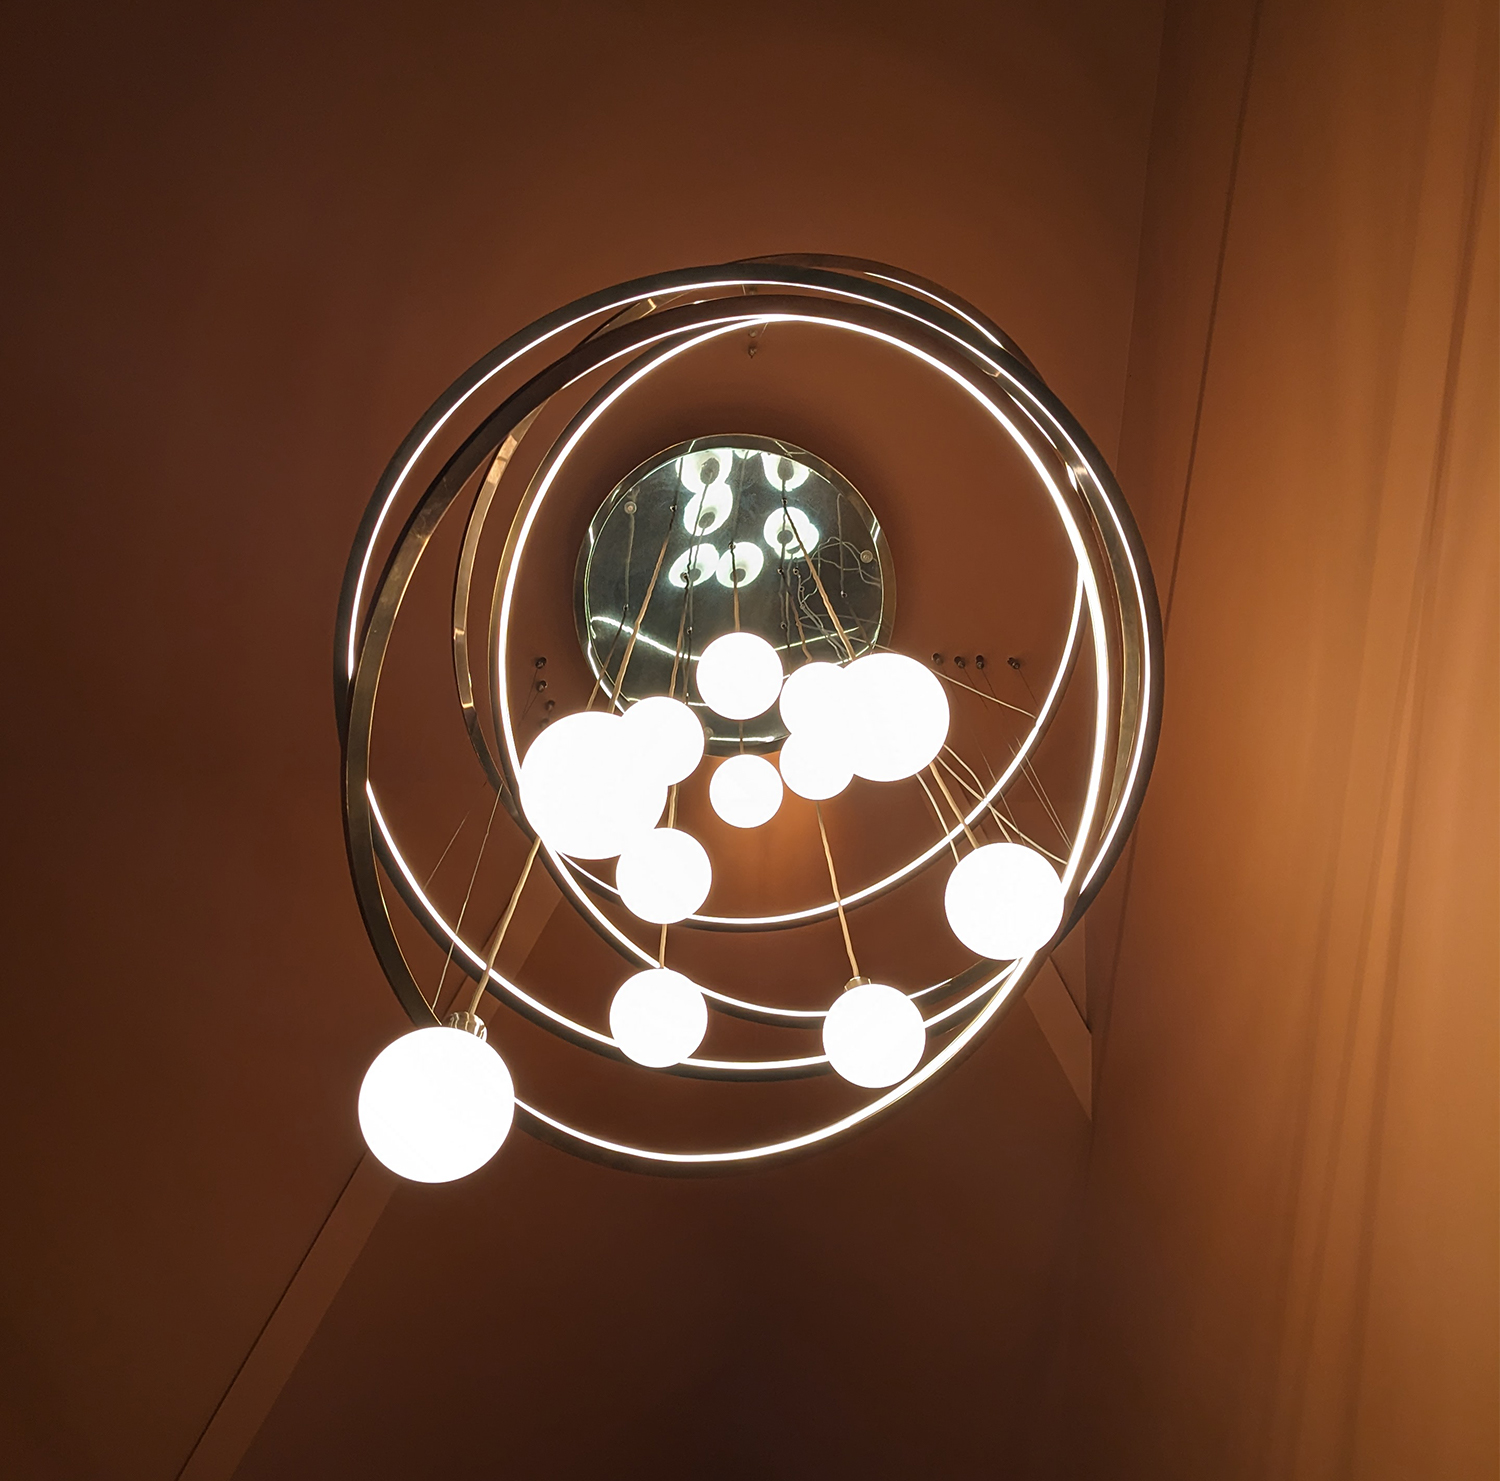
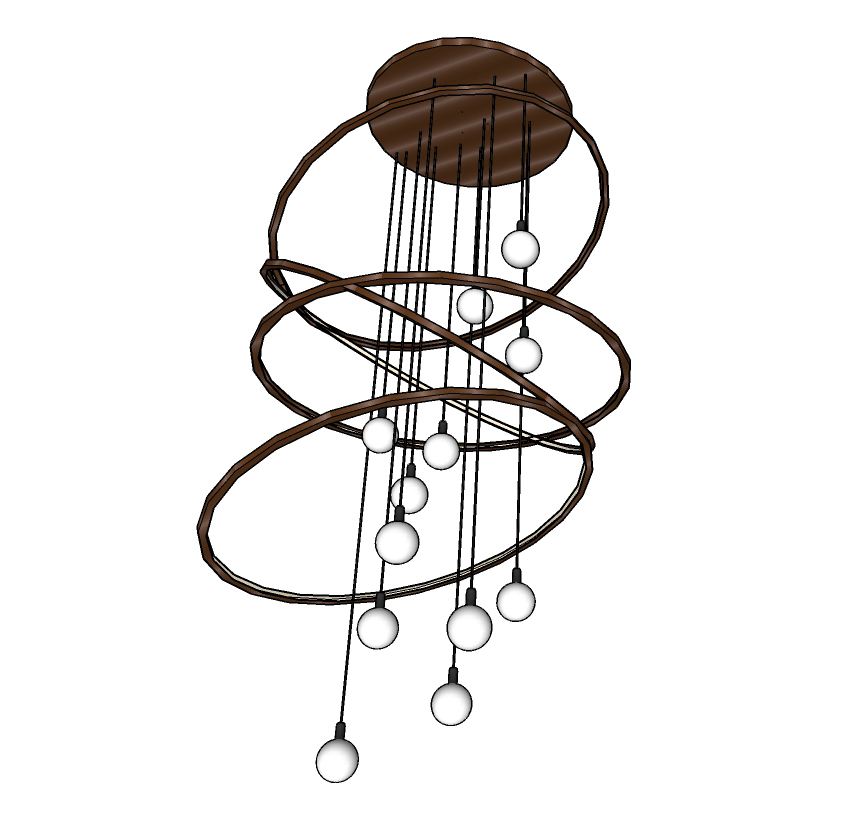
Once that was done, I sat down to design the light fitting itself. I loved the cascading rings in the client’s inspiration pictures, so I started there, adding LED strip lighting inside the rings to highlight them and give off light. It made sense to me to add extra light in the form of hanging bulbs, and that these would hang centrally inside the rings. Having them hanging at different heights would balance the size of the large rings, and also draw the eye up into the space to take in its impressive proportions. I drew out the design with my software and then placed it in the model of the hallway to see how it looked. I immediately knew that it was right for the space - it was wide enough to be in proportion, tall enough to connect the ground floor with the mezzanine floor, and it certainly had the wow factor the clients were looking for. The light given off would be warm and welcoming, and it met the brief perfectly. |
|||
 |
|||
 |
|||
|
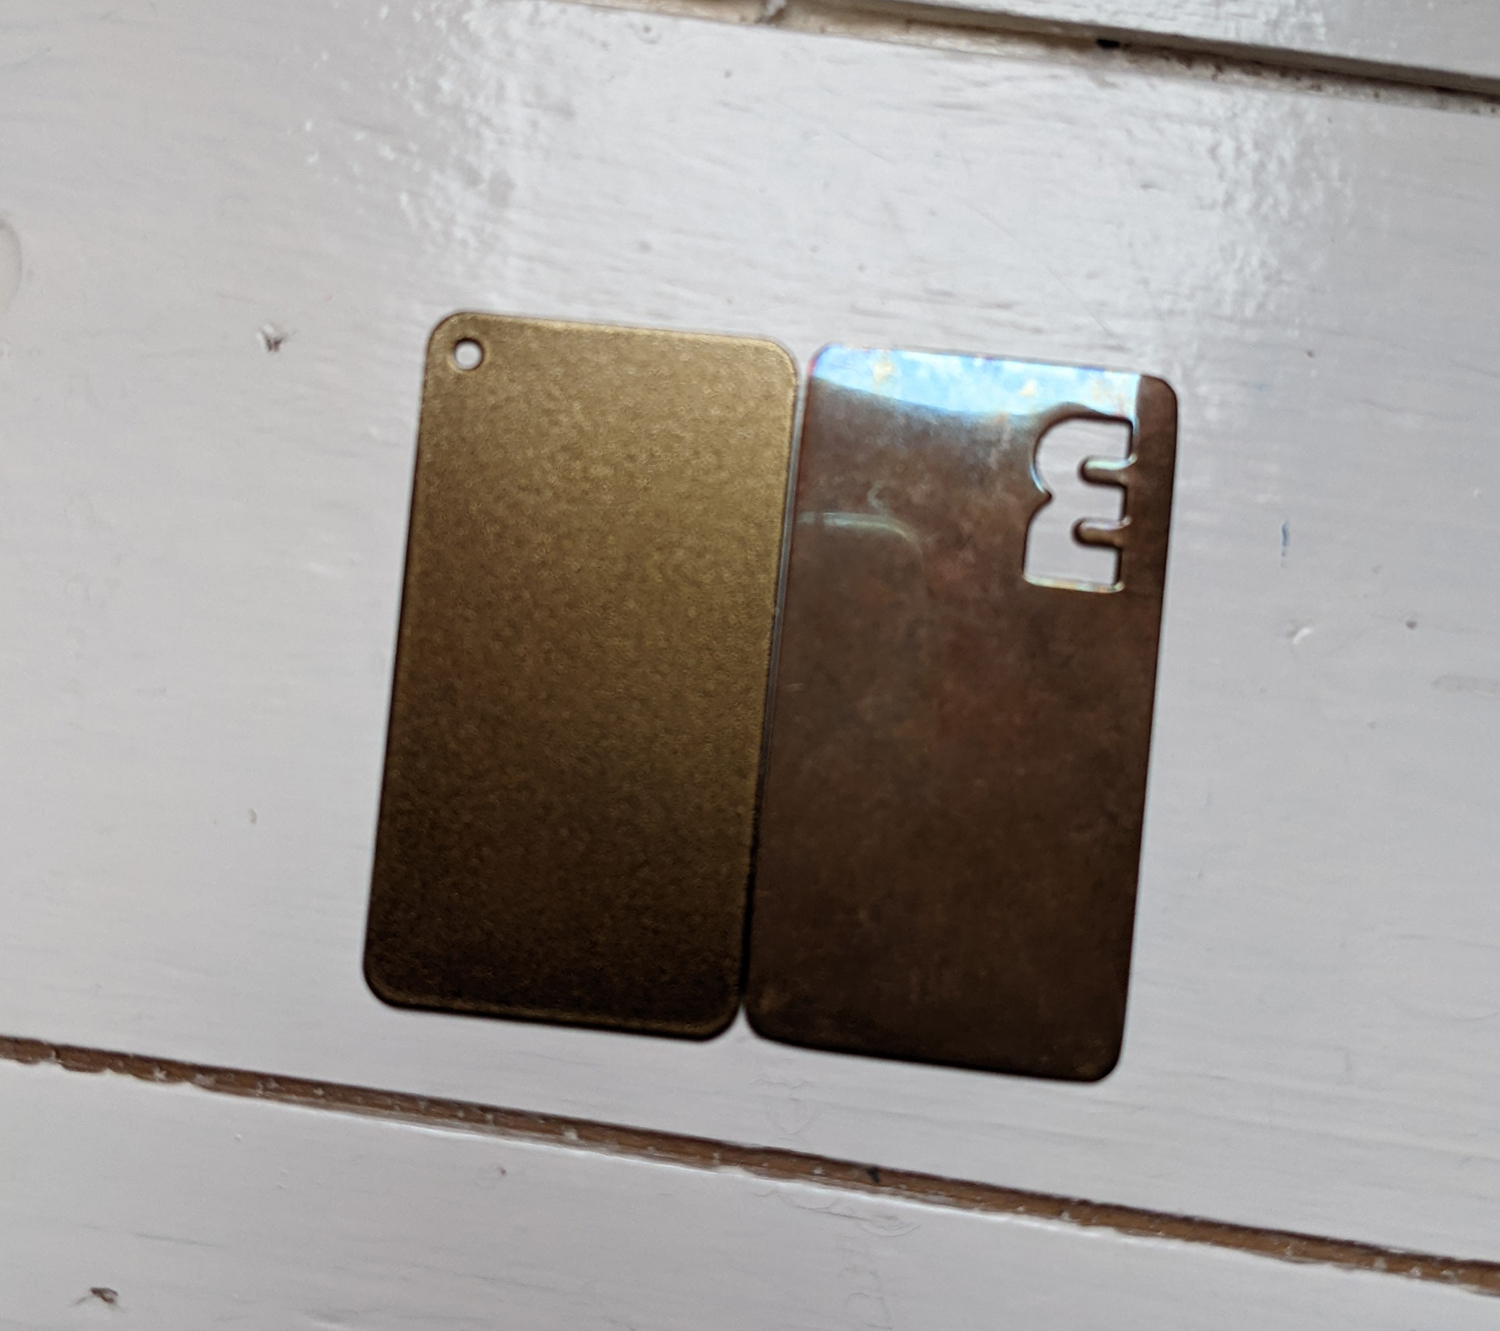
As we were working remotely at the time, I sent over my design and the images of it placed in the hallway to the clients, and they loved it! No changes were needed at all, which meant I had delivered what they had asked for, but combined it with my artistic input to create just the right piece. That was the easy part - now we had to get it made and installed. I turned to a long time trusted supplier of mine, Mullan Lighting, who are based in Ireland, as they design and manufacture all their own lights. I’ve used their lighting many times in previous projects and it is such good quality, so I knew they would be able to help. I sent them the drawings and described the finish we were looking for, and they suggested either their Antique Brass or Antique Bronze finishes and sent samples to us. |
|||
 |
|||
| the Antique Bronze is on the left, the Antique Brass is on the right | |||
|
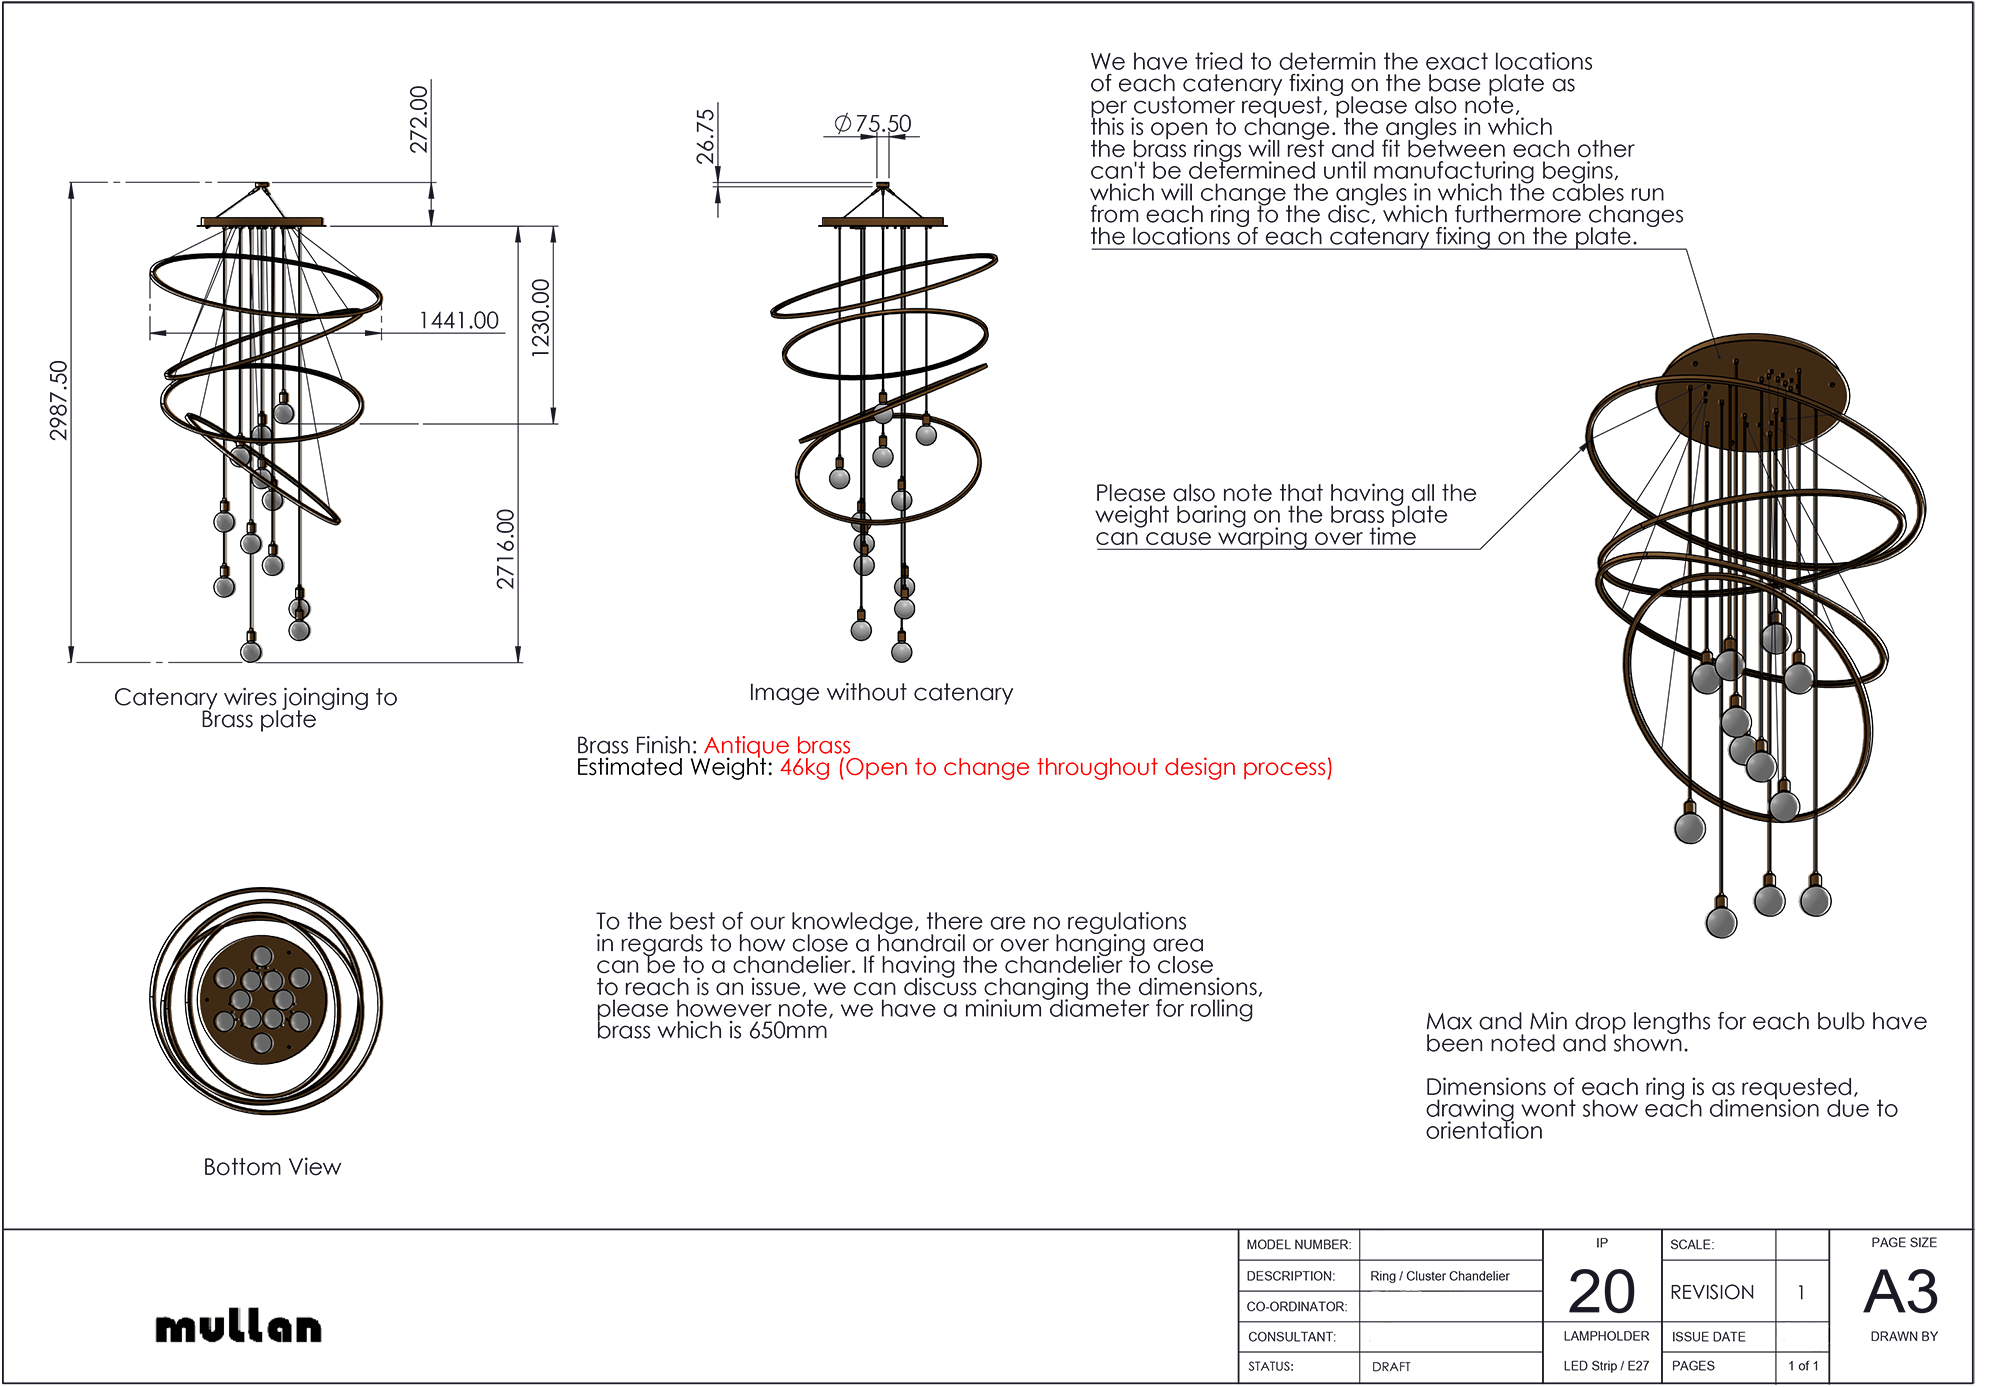
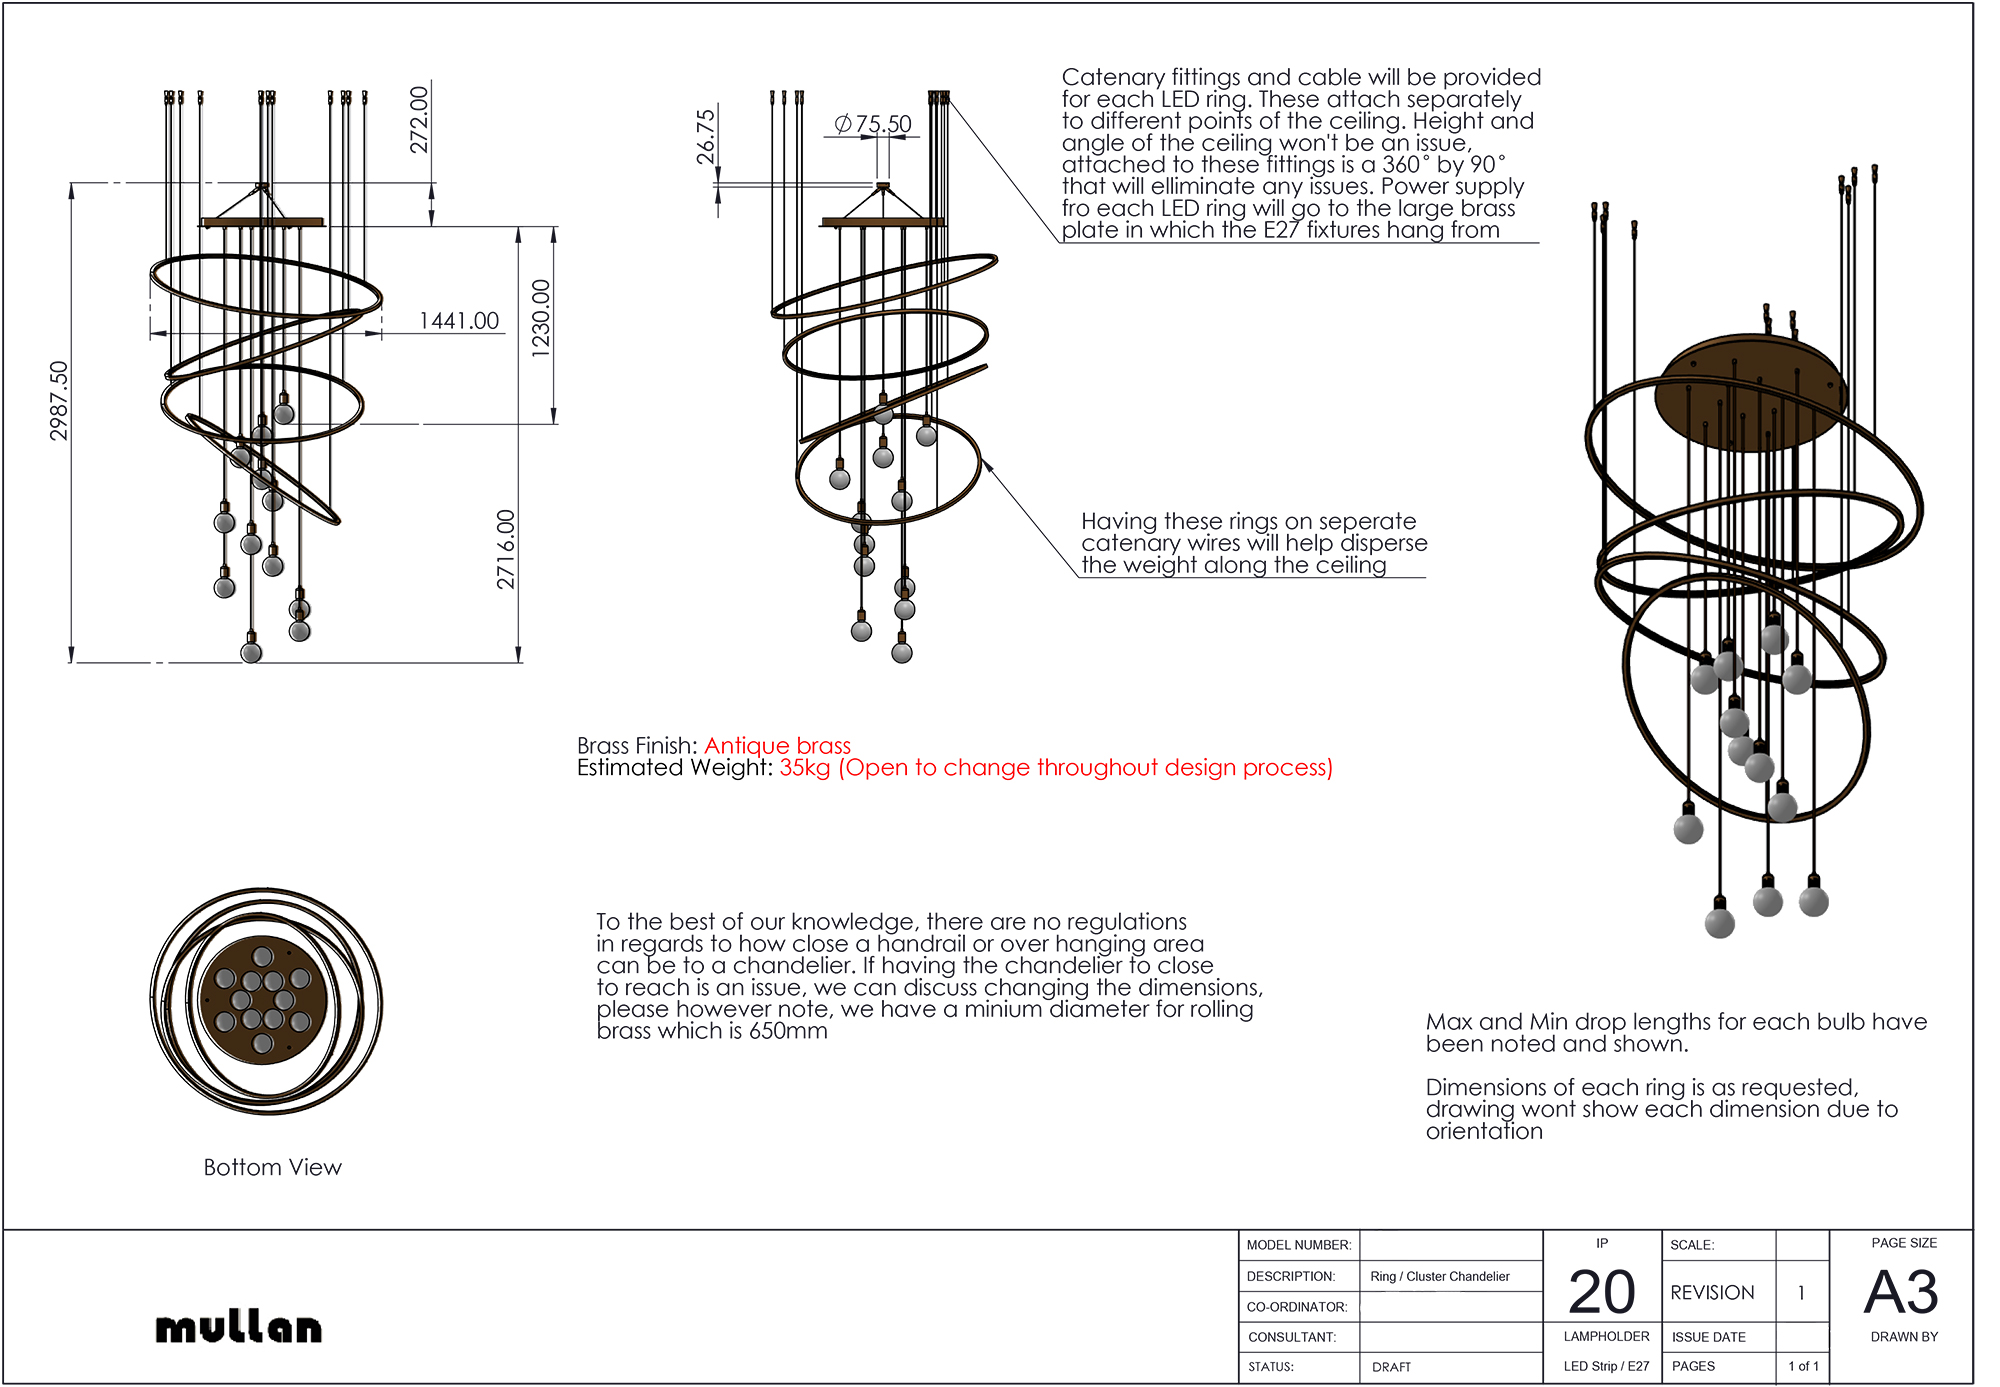
The Antique Brass finish is brass with a chemical treatment to give it its colour, which will patina and age beautifully over time, whereas the Antique Bronze is steel with a powder coated finish, which is duller and more uniform. Although the Antique Bronze is long lasting, there is always the possibility that if the finish was scratched, the steel could show through. When I explained the differences in the finishes to the clients, it was clear which one would work best for us, and they chose the Antique Brass. We then turned our attention to how we were going to hang it on the ceiling. There were a number of ways to do this, but the light was proving to be quite heavy. As Mullan were finalising the details with us, they told us that the fitting would probably weigh upwards of 40kgs, so it would definitely be heavy! The first version of the light had all the cables and fitting points going through a central base plate, but Mullan advised that we should spread out the fitting points to spread the weight more evenly through the ceiling. Here are the two versions with the different fitting options: |
|||
 |
|||
 |
|||
|
We decided on the version which spread out the weight, but after speaking with our electrician who would have the task of installing the chandelier, we decided to get a structural engineer involved to make sure the roof rafters could take the weight and that it was safe to hang. After I’d arranged his visit and talked him through the design, he made his calculations and inspected the roof structure. The good news was that the ceiling joists were running all the way across the roof in the right direction, and would be strong enough to take the weight of the light fitting. He advised us to install a thick plywood pad across the joists to further spread the weight out, so we organised that with our carpenter. Better safe than sorry! Throughout this time I was double checking the design and all the specifications to make sure that the light would be produced perfectly. I worried that positioning the light centrally over the whole stairwell area would increase the risk of one of the children being able to reach the light when they are a few years older, so I decided to move the hanging position over to the area created by the curve of the handrails, not including the stairs themselves. It meant that it would shift over to one side, but it would still look good as it would be positioned centrally over the hallway and look perfectly placed from there. I also made the decision to reduce the diameter of the rings slightly, again to make sure it couldn’t be reached by the children. I tested out my dimensions in both my modelling software and on the stairs, and found that an adult could reach the light if they stood on the stairs and reached out as far as they could with one arm, but by the time the children were big enough to do this they would be sensible enough not to try to swing from it. Once everything was finalised, Mullan got to work fabricating the light. They hadn’t made rings this large before, so had to buy in extra equipment to make them, including paddling pools to treat and finish the rings! Here's a video of the manufacturing process that Mullan kindly shared with me: |
|||
|
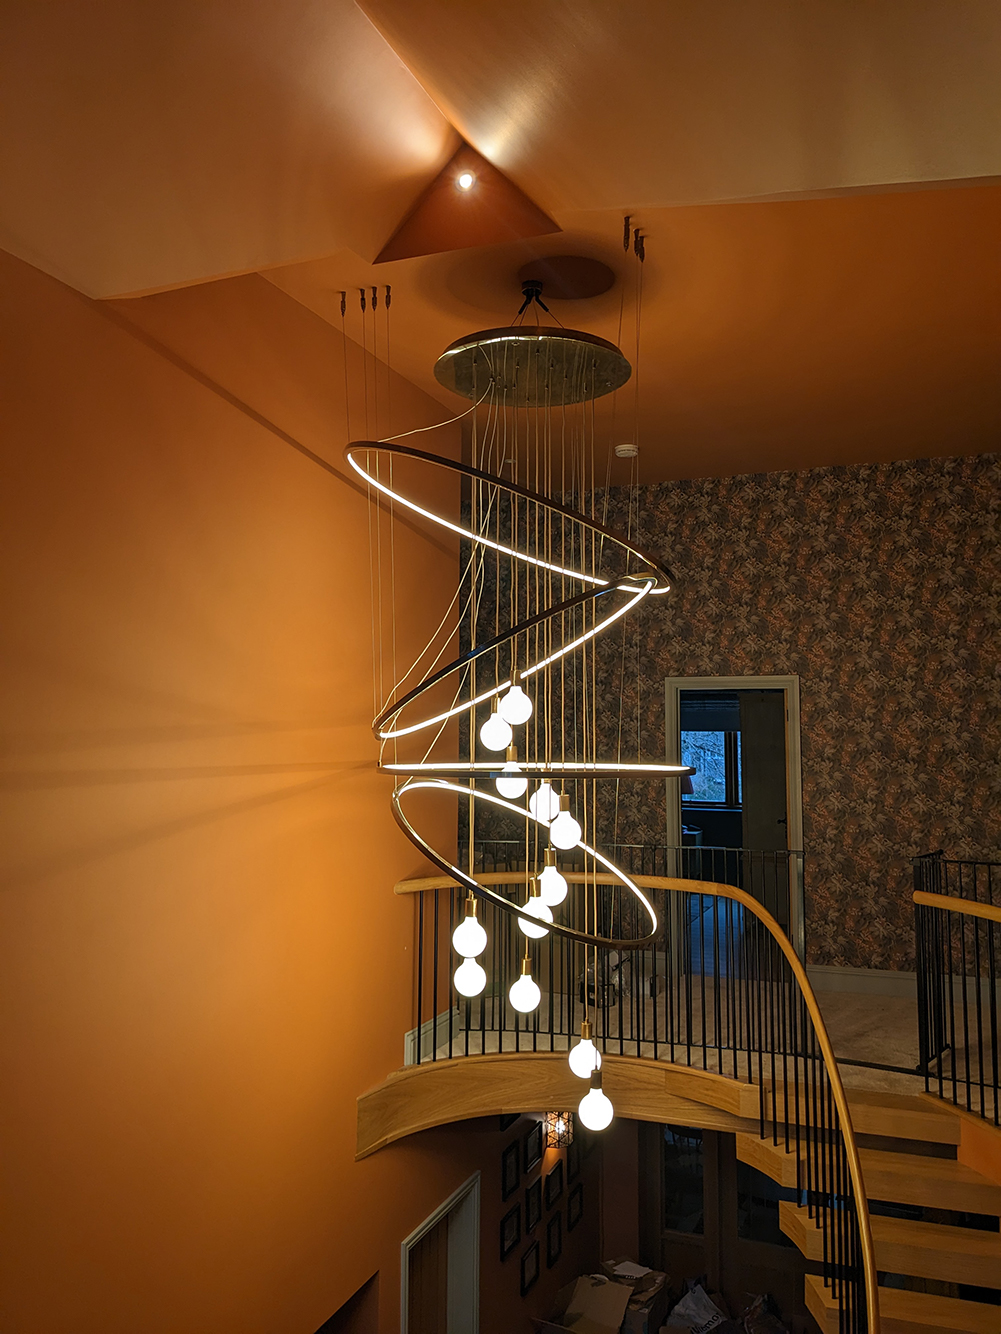
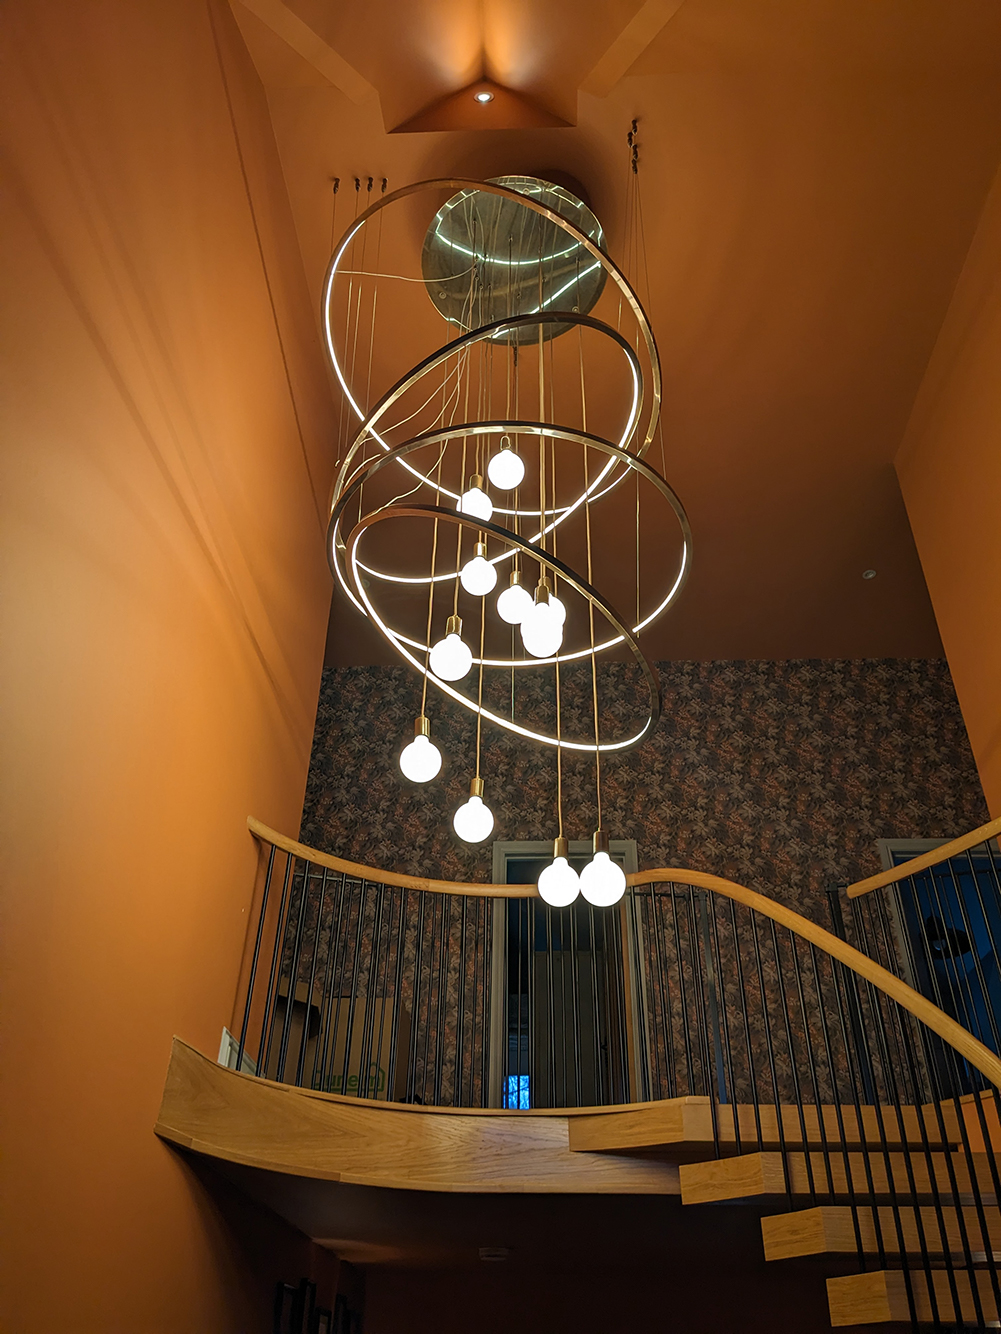
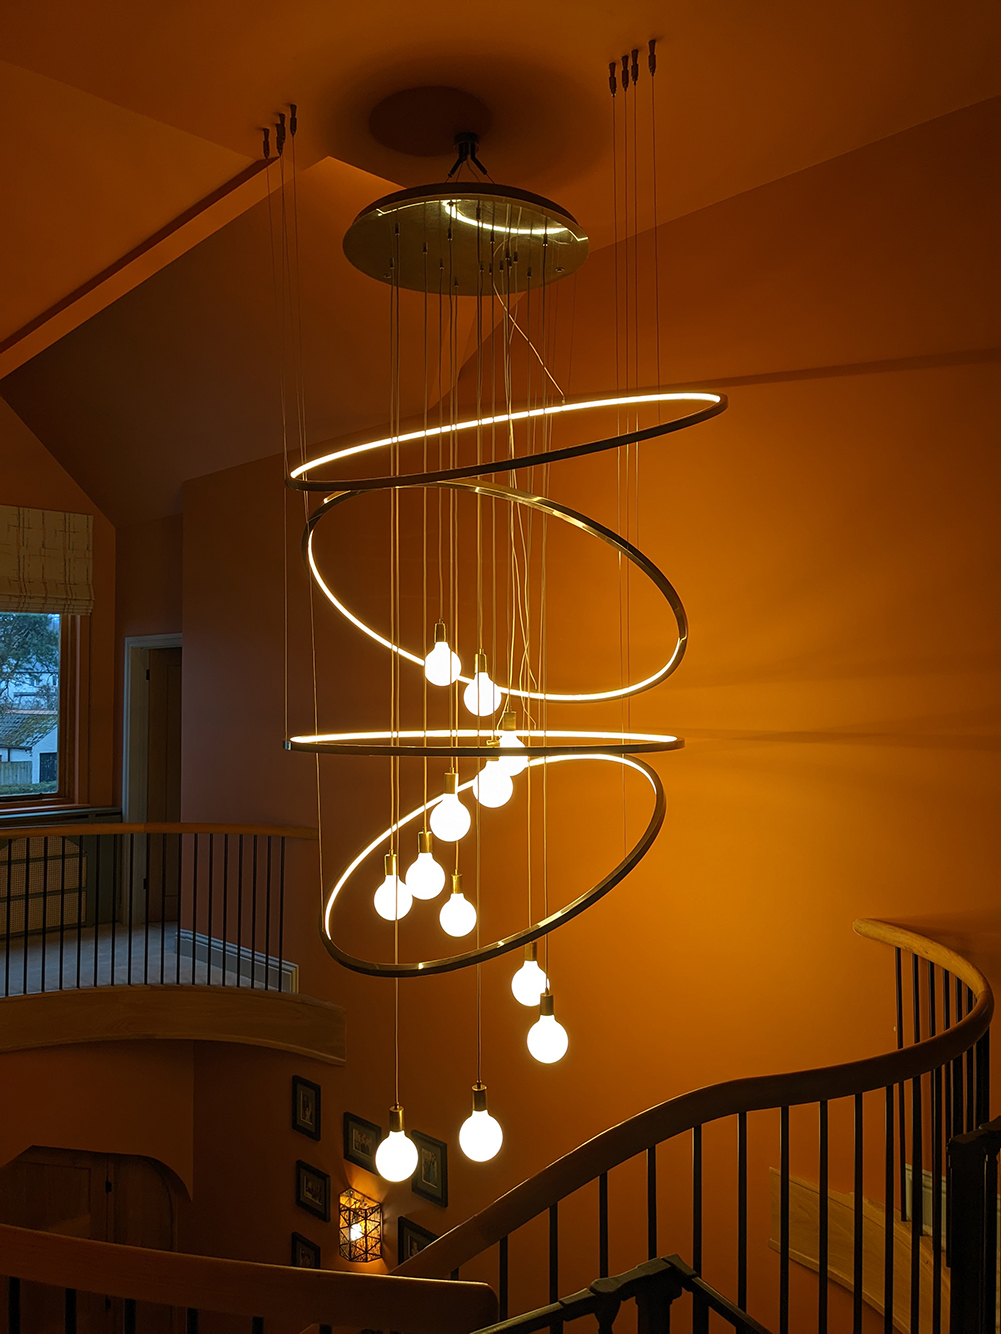
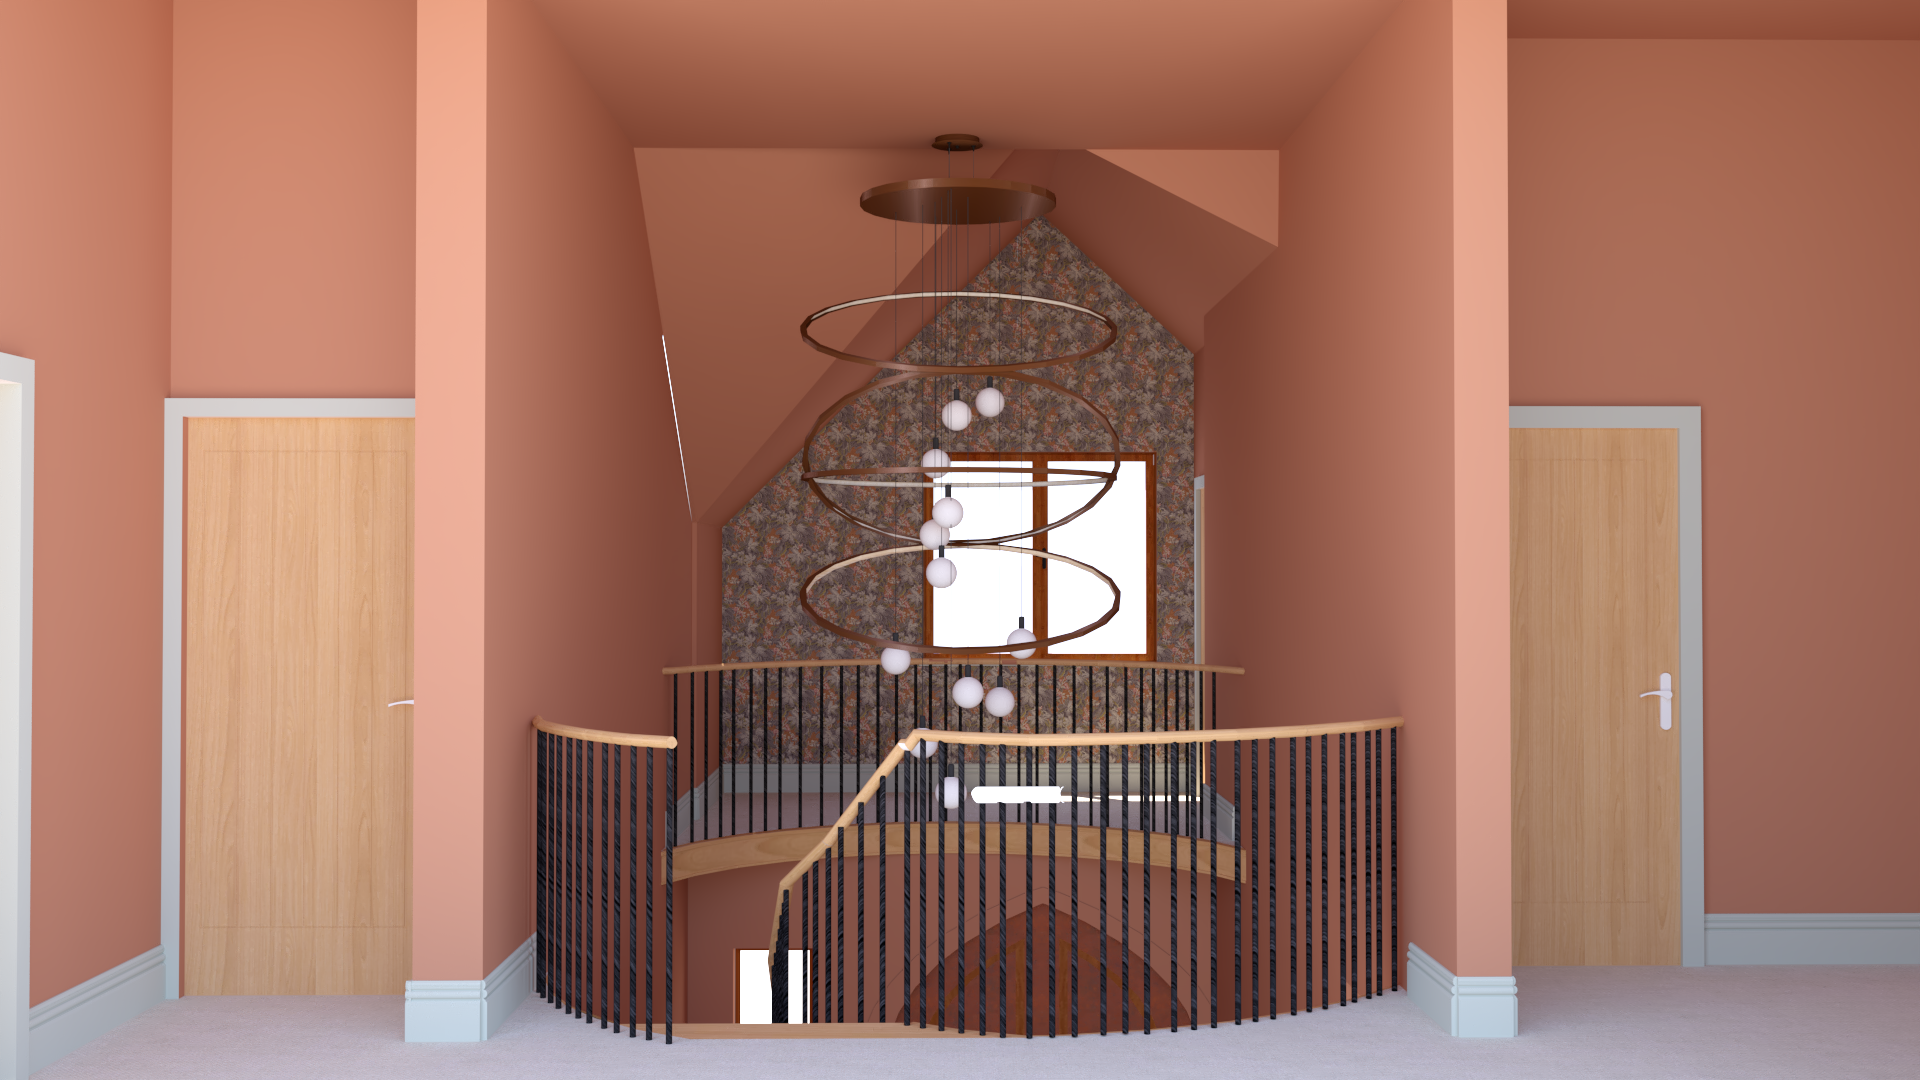
The next hurdle was the installation. After speaking with the clients (who had moved into the house by this time) we agreed it would be safer if we installed the fitting when they would be away on holiday, as we would need internal scaffolding up for a week. We had the chandelier delivered and inspected it - the electrician told me what kind of scaffolding he would need and what height the platforms should be, then I booked in the scaffolding and the date was set. The scaffolding was put up on day one, we collected and started installing the chandelier on day two, on day three the electricians finished off the installation and cleaned the fitting (we needed no finger marks left after the scaffolding had come down, as it would be impossible to get back up to clean them off later). On day four the decorator came to fill in and paint the holes and any marks left by the installation, and then on day five the scaffolding came down. It all went very smoothly, down to the fact that we had done so much preparation and checking before the week of installation. The family came back from their holiday the next day to see this: |
|||
It is truly a beautiful piece of work, something that no one else has and is borne from a real collaboration between us and the clients. I think it expresses their relaxed but quirky style, and I could look at it for hours. I’m extremely grateful to Mullan Lighting for producing such a spectacular piece for us, and to the whole team who we needed to get the piece from idea to installation. |
Welcome to the design blog, where you'll see posts about anything from the projects we are working on, to the latest fabric and wallpaper collections, and all things interiors related. We love colour, pattern, architecture and old buildings, and we love to share our finds with you.
Happy reading!